Introduction: Discover the Ultimate Crunchy Peanut Butter Cookies
In the realm of baked goods, few treats are as beloved as cookies, and among them, peanut butter cookies hold a special place in many hearts. Their rich, nutty flavor coupled with a satisfying crunch makes them a timeless favorite across generations. Whether enjoyed as an after-school snack or served at gatherings, peanut butter cookies evoke a sense of nostalgia and comfort. In this article, we will guide you through the creation of the Ultimate Crunchy Peanut Butter Cookies, a delightful combination of textures and flavors that promises to satisfy your sweet cravings. With a perfect balance of creaminess from peanut butter and the crunch of roasted peanuts, these cookies are sure to become a staple in your household.
The journey to crafting these delectable cookies begins with understanding the essential ingredients that contribute to their unique taste and texture. Each component plays a pivotal role in ensuring that every bite is a perfect blend of flavors and textures.
Understanding the Ingredients: What Makes These Cookies Special
To create the Ultimate Crunchy Peanut Butter Cookies, it’s essential to explore the core ingredients that elevate this classic treat. Knowing how each ingredient functions will help you achieve the perfect cookie.
– The Role of Peanut Butter: At the heart of this recipe is peanut butter, which not only imparts a rich flavor but also contributes to the cookies’ chewy texture. When selecting peanut butter, choose a variety that is creamy and rich. Natural peanut butter is an excellent choice, as it contains minimal added ingredients and delivers a robust peanut flavor. The fat content in peanut butter also helps to create a moist cookie that doesn’t dry out during baking.
– Sugars: Granulated vs. Brown: The balance of sweetness is crucial in cookie-making. Granulated sugar provides the necessary sweetness and contributes to the cookie’s spread, while brown sugar adds moisture and a hint of caramel flavor. Using a combination of both allows for a perfectly textured cookie that is not overly sweet but has depth in flavor.
– Importance of the Egg in Baking: Eggs serve multiple purposes in baking, acting as a binding agent that holds the ingredients together. They also add moisture and richness to the cookies. In this recipe, one large egg is sufficient to achieve the ideal consistency, ensuring that your cookies are both chewy and crunchy.
– The Flavor Enhancer: Vanilla Extract: Vanilla extract is a classic flavor enhancer that elevates the overall taste of your cookies. It adds a warm, aromatic quality that complements the nuttiness of the peanut butter. For the best results, opt for pure vanilla extract rather than imitation vanilla, as it provides a more authentic flavor profile.
– Baking Soda: The Leavening Agent: Baking soda is key to achieving the desired texture in your cookies. As a leavening agent, it helps the cookies rise and spread during baking. Additionally, it reacts with the acids in the brown sugar to create a tender crumb. Be sure to measure it accurately for optimal results; too much can lead to a soapy taste, while too little may result in dense cookies.
– The Texture of Old-Fashioned Rolled Oats: Incorporating old-fashioned rolled oats adds a delightful texture to the cookies. They provide a chewy bite that contrasts nicely with the crunch of the peanuts. Additionally, oats contribute to the overall heartiness of the cookie, making them feel more substantial and satisfying.
– Roasted Peanuts: Crunch Factor: The inclusion of roasted peanuts is what truly makes these cookies stand out. Their crunchiness enhances the overall texture and adds a burst of peanut flavor. When selecting peanuts, choose unsalted varieties to maintain a balanced sweetness in the cookie. Chopping them into smaller pieces allows for an even distribution throughout the batter.
– Optional Additions: Chocolate Chips: For those who can’t resist the allure of chocolate, adding chocolate chips can elevate these cookies to new heights. The melty chocolate pairs beautifully with the peanut butter, creating a rich and indulgent treat. Whether you prefer milk, dark, or semi-sweet chocolate, this optional addition is sure to please any sweet tooth.
Step-by-Step Instructions: Crafting the Perfect Cookies
Now that you have a clear understanding of the ingredients, it’s time to dive into the step-by-step process of making the Ultimate Crunchy Peanut Butter Cookies. These instructions will set the stage for a successful baking experience.
– Preheat and Prepare: Setting the Stage for Baking: Before you start mixing, it’s essential to preheat your oven to 350°F (175°C). This ensures that the cookies bake evenly and achieve the perfect texture. Additionally, line your baking sheets with parchment paper. This not only prevents the cookies from sticking but also makes cleanup a breeze.
– Importance of Oven Temperature: An accurate oven temperature is crucial for baking success. Consider using an oven thermometer to verify that your oven is at the correct temperature. Baking at too high a temperature can cause the cookies to burn on the outside while remaining raw on the inside, while a low temperature may result in flat, undercooked cookies.
– Using Parchment Paper for Easy Cleanup: Lining your baking sheets with parchment paper is a simple yet effective way to ensure that your cookies release easily after baking. It also helps to prevent the bottoms from browning too much, allowing for a beautifully golden cookie.
– Mixing Wet Ingredients: The Foundation of Flavor: Begin by creaming together the peanut butter, granulated sugar, and brown sugar in a large mixing bowl. Use a hand mixer or stand mixer for about 2-3 minutes, until the mixture becomes light and fluffy. This process incorporates air into the batter, contributing to a lighter texture.
– Achieving the Perfect Creamy Consistency: The goal is to create a smooth, creamy consistency that allows for easy incorporation of the other ingredients. If you’re using natural peanut butter, it may require a bit more time to achieve the desired texture, so be patient and keep mixing.
– Techniques for Mixing: Hand Mixer vs. Whisk: While a hand mixer may be the easiest tool for this task, you can also use a whisk if you prefer a more hands-on approach. Whisking by hand requires a bit more effort but can be a rewarding experience as you engage with the ingredients directly.
– Combining Dry Ingredients: Creating the Right Texture: In a separate bowl, whisk together the flour, baking soda, and salt. Properly whisking the dry ingredients ensures that the baking soda is evenly distributed throughout the flour, which is vital for consistent rising.
– Significance of Properly Whisking Dry Ingredients: This step may seem simple, but it’s essential for the texture of your cookies. Undermixing can lead to clumps of baking soda that might cause uneven rising, while overmixing the dry ingredients with the wet can lead to tough cookies.
– The Balance of Dry to Wet Ingredients: Gradually add the dry mixture to the wet ingredients, mixing just until combined. Overmixing at this stage can develop the gluten in the flour, resulting in cookies that are tough rather than tender.
– Adding Crunch: Incorporating Peanuts and Optional Chocolate: Finally, fold in the roasted peanuts and, if desired, the chocolate chips. Use a spatula to gently incorporate these ingredients, being careful not to overmix. This technique helps maintain the cookies’ texture by keeping the air you’ve incorporated in the batter intact.
– Techniques for Folding Ingredients Without Overmixing: When folding in the peanuts and chocolate, use a gentle motion to avoid deflating the batter. Scoop from the bottom of the bowl and fold over the top, rotating the bowl as you go. This method ensures that the peanuts and chocolate are evenly distributed without overworking the dough.
– Customizing Your Cookies: The Chocolate Decision: If you choose to add chocolate chips, consider the ratio that suits your taste. A half cup of chocolate chips balances well with the peanut butter flavor without overpowering it. Alternatively, for a more indulgent cookie, feel free to increase the amount to three-quarters of a cup.
With these foundational steps in place, you’re well on your way to creating the Ultimate Crunchy Peanut Butter Cookies. The blend of ingredients, combined with meticulous preparation, sets the stage for a truly delightful baking experience. Stay tuned for the next part of this article, where we will explore the baking process and how to achieve the ideal cookie texture and flavor.
{{image_2}}
Shaping the Cookies: Aesthetic and Functional Techniques
Once you have your cookie dough ready, it’s time to shape them. This step is crucial not only for presentation but also for achieving the best texture.
Portion Sizes: Using a Cookie Scoop vs. Tablespoon
The size of your cookies can significantly affect their texture and baking time. For uniform cookies that bake evenly, using a cookie scoop is highly recommended. A standard cookie scoop (about 1.5 tablespoons) will yield cookies that are perfectly portioned. If you don’t have a scoop, using a tablespoon can work just fine, but try to keep the portions consistent. Aim for a heaping tablespoon of dough for each cookie. This will ensure they bake through without becoming too dry.
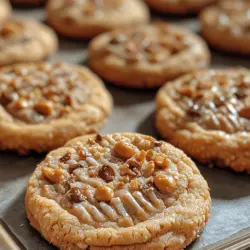
Creating the Crisscross Pattern: Tips for Presentation
To achieve the classic crisscross pattern, which enhances both the aesthetic appeal and helps the cookies bake evenly, follow these simple steps:
1. Prepare: After scooping the dough onto your baking sheet, use a fork that has been lightly dusted with flour or a bit of powdered sugar to prevent sticking.
2. Press: Gently press down on the cookie dough ball with the tines of the fork to flatten it slightly.
3. Crisscross: Rotate the fork 90 degrees and press down again, creating the signature crisscross pattern.
This technique not only makes your cookies look delightful but also allows for a more even bake, as the surface area is increased.
Baking: The Science Behind Perfect Cookies
Baking cookies is as much a science as it is an art. Understanding the nuances of time and temperature can elevate your cookie game.
Understanding Baking Time and Texture
The baking time for your Ultimate Crunchy Peanut Butter Cookies should be closely monitored. Typically, these cookies need about 10-12 minutes in a preheated oven at 350°F (175°C). The key is to remove them from the oven when the edges are set, and the centers still look slightly underbaked. They will continue to cook on the baking sheet due to residual heat, giving you that perfect crunchy texture on the outside while keeping a chewy core.
The Ideal Color Indications
Visual cues can help you determine when your cookies are ready. Look for a golden-brown color around the edges, while the centers should appear slightly pale. If they appear dark brown all over, they may have baked too long and could be too hard once cooled.
Cooling Down: The Importance of Proper Cooling
Once your cookies are out of the oven, it’s essential to let them cool properly to achieve the best texture.
Cooling on the Baking Sheet vs. Wire Rack
Letting your cookies cool on the baking sheet for about 5-10 minutes is crucial. This initial cooling period allows them to firm up, making them easier to transfer. Afterward, move the cookies to a wire rack to cool completely. Cooling on a wire rack prevents steam from building up, which can make the bottoms soggy.
Achieving the Perfect Chewy Texture
The trick to maintaining a chewy texture lies in the cooling process. Allowing the cookies to cool completely on a wire rack ensures that they maintain their structure while remaining soft and chewy in the center. Avoid stacking warm cookies; this can create moisture and lead to sogginess.
Serving Suggestions: Pairing Your Cookies with Beverages
Now that your cookies are baked and cooled, it’s time to enjoy them! Pairing your Ultimate Crunchy Peanut Butter Cookies with the right beverages can enhance your tasting experience.
Exploring Beverage Pairings
Milk: The Classic Companion
Nothing quite compares to the classic pairing of peanut butter cookies with a tall glass of milk. The creamy texture and mild flavor of milk perfectly balance the nutty richness of the cookies. Whether it’s whole milk or a non-dairy alternative, this combination is timeless.
Coffee: A Perfect Match for Peanut Butter Flavors
For a more sophisticated pairing, consider enjoying your cookies with a cup of coffee. The rich, roasted flavors of coffee complement the sweetness of the cookies beautifully. A medium roast or even a dark roast can enhance the nutty notes of the peanut butter.
Alternative Beverages: Tea and Non-Dairy Options
If you’re looking for something lighter, herbal teas such as chamomile or chai can provide a delightful contrast to the rich flavors of the cookies. Non-dairy options like almond milk or oat milk also offer a nutty flavor that pairs well with peanut butter.
Storage Tips: Keeping Your Cookies Fresh
To ensure your Ultimate Crunchy Peanut Butter Cookies stay delicious, follow these best practices for storage.
Best Practices for Storing Cookies
– Airtight Containers: The best way to keep your cookies fresh and crunchy is by storing them in an airtight container. This prevents moisture from getting in, which can lead to a soft texture.
– Layering: If you’re stacking cookies in a container, place parchment paper between layers to prevent them from sticking together.
Shelf Life and Freezing Options
Properly stored, your cookies will stay fresh for about a week at room temperature. If you want to extend their shelf life, you can freeze them for up to three months. Place the cookies in a single layer on a baking sheet and freeze until solid, then transfer them to an airtight container or a freezer bag.
Reviving Stale Cookies: Tips and Tricks
If your cookies do go stale, don’t despair! You can revive them by placing them in a preheated oven at 300°F (150°C) for about 5 minutes. This will help restore some moisture and crunch.
Nutritional Information: Understanding the Cookie’s Profile
Understanding the nutritional value of your Ultimate Crunchy Peanut Butter Cookies can help you enjoy them mindfully.
Breaking Down the Ingredients
A typical peanut butter cookie includes ingredients like peanut butter, sugar, flour, and eggs. Each of these components contributes to the overall nutritional profile.
Caloric Content and Nutritional Benefits
On average, one cookie contains around 100-120 calories, depending on the size and specific ingredients used. Peanut butter is a good source of protein and healthy fats, making these cookies a more satisfying treat compared to other snacks.
Balancing Indulgence with Healthier Choices
While these cookies are indulgent, you can make them healthier by using natural peanut butter and opting for whole grain flour. Reducing sugar can also make a difference without compromising too much on flavor.
Conclusion: Savoring the Ultimate Crunchy Peanut Butter Cookies
In conclusion, the Ultimate Crunchy Peanut Butter Cookies are not just a delightful treat; they are a testament to the joy of baking and sharing. With their rich flavor and satisfying texture, these cookies offer a nostalgic experience that many will cherish. Whether enjoyed as a snack or dessert, this recipe promises satisfaction. So, gather your ingredients, follow the steps outlined, and indulge in the joy of homemade cookies that are sure to impress family and friends alike. Enjoy the process, the aroma wafting through your kitchen, and the smiles that come with sharing these delicious cookies!