Sweet Mini Ice Cream Pies Recipe
Homemade desserts hold a special place in the hearts of many. The joy of crafting a delightful treat from scratch, infused with personal touches and flavors, makes the experience not just about the final product but also about the memories created along the way. Among the myriad of dessert options, Sweet Mini Ice Cream Pies stand out as a perfect treat for any occasion. Whether you’re celebrating a birthday, hosting a summer barbecue, or simply indulging on a lazy Sunday afternoon, these charming little pies offer a delightful combination of creamy ice cream and a crunchy crust that is hard to resist.
One of the most appealing aspects of Sweet Mini Ice Cream Pies is their versatility. With a wide range of flavors and toppings available, you can easily customize each pie to suit your preferences and those of your guests. From classic vanilla and chocolate to more adventurous flavors like mint chip or salted caramel, the possibilities are endless. Additionally, you can cater to various dietary needs by choosing dairy-free ice creams or gluten-free crust options, ensuring that everyone can partake in the sweet indulgence.
The Delight of Mini Ice Cream Pies
In recent years, mini desserts have surged in popularity, and for good reason. These petite treats not only look adorable but also offer a perfect portion size for satisfying cravings without overwhelming your palate. Mini Ice Cream Pies are particularly appealing because they combine the best elements of ice cream and pie in one delightful bite. The cool, creamy center contrasts beautifully with a crunchy crust, creating a textural experience that is sure to please any dessert lover.
Ice cream pies are inherently crowd-pleasers. Their rich flavors and delightful textures make them an instant hit at gatherings, and their small size allows guests to indulge without feeling guilty. Additionally, the ability to customize flavors and toppings means you can easily accommodate a variety of tastes—from chocolate lovers to fruit enthusiasts. This makes Sweet Mini Ice Cream Pies an excellent choice for parties, potlucks, and family gatherings where diverse preferences are the norm.
Ingredients Breakdown
Before diving into the preparation of these mini ice cream pies, it’s essential to understand the role each ingredient plays in creating the perfect dessert. Here’s a detailed breakdown of the key components:
– Graham Cracker Crumbs: The foundation of the crust, graham cracker crumbs provide a sweet, slightly nutty flavor and a satisfying crunch. They form the base that holds the pie together, and their texture complements the creaminess of the ice cream.
– Unsalted Butter: This ingredient is crucial for binding the crust. Unsalted butter helps create a rich flavor and ensures that the crust holds its shape when sliced. The fat content also contributes to a more tender texture, making each bite melt in your mouth.
– Granulated Sugar: Adding sweetness and enhancing the overall flavor of the crust, granulated sugar plays a significant role in balancing the flavors of the pie. It also aids in achieving the desired texture, ensuring the crust is neither too crumbly nor too dense.
– Ice Cream: The star of the show, ice cream is what gives these mini pies their indulgent character. You can choose from a variety of flavors, such as classic vanilla, rich chocolate, fruity strawberry, or even unique options like coffee or matcha. The choice of ice cream will influence the overall taste of the pie, making it a personalized treat.
– Whipped Cream: Used as a topping or mixed into the filling, whipped cream adds a light, airy texture that balances the richness of the ice cream. It can also enhance the visual appeal of the pies, creating a beautiful presentation.
– Chocolate Chips or Fresh Fruit: These toppings not only add visual interest but also contribute additional flavors and textures. Chocolate chips provide a rich, decadent touch, while fresh fruit can offer a refreshing contrast to the creaminess of the ice cream.
– Optional Sauces: Drizzling sauces like chocolate syrup, caramel, or fruit compote over the finished pies can enhance both the visual appeal and flavor complexity, creating a dessert that looks as good as it tastes.
Step-by-Step Instructions
Now that we’ve covered the ingredients, it’s time to dive into the step-by-step instructions for preparing the crust of your Sweet Mini Ice Cream Pies.
Preparing the Crust
The first step in making these mini ice cream pies is to prepare the crust. Achieving the right texture and consistency is vital for a successful pie. Here are some tips to guide you through the process:
1. Mixing the Ingredients: In a mixing bowl, combine the graham cracker crumbs, granulated sugar, and melted unsalted butter. The goal is to create a mixture that resembles wet sand. Begin by adding the graham cracker crumbs and sugar, then slowly drizzle in the melted butter while stirring to combine.
2. Achieving the Right Texture: The mixture should hold together when squeezed in your hand but still be crumbly enough to create a crust. If it feels too dry, you can add a little more melted butter, a teaspoon at a time, until you reach the desired consistency.
3. Forming the Crust: Once the mixture is well combined, it’s time to form the crusts in your mini pie pans. Using your fingers or the back of a measuring spoon, press the mixture firmly into the bottom and up the sides of each mini pie pan. Make sure the crust is evenly distributed and compacted to avoid crumbling when serving.
4. Chilling the Crust: After forming the crusts, place them in the refrigerator for about 10-15 minutes. This step helps the butter solidify, ensuring that the crust holds its shape when filled with ice cream.
With the crust prepared and chilled, you are one step closer to enjoying your Sweet Mini Ice Cream Pies. Stay tuned for the next part, where we will explore filling these delightful pies with your choice of ice cream and adding the finishing touches to create a truly irresistible dessert.
{{image_2}}
Preheating the Oven: Why It Matters
Preheating your oven is a crucial first step in baking, particularly when making Sweet Mini Ice Cream Pies. It ensures that your crust bakes evenly and to the perfect level of crispness. The heat from the oven activates the ingredients in your crust, allowing them to meld together effectively. If you place the crust in a cold oven, it can lead to uneven baking, resulting in a soggy or undercooked crust. Aim to preheat your oven to 350°F (175°C) while you prepare your crust.
Techniques for Packing the Crust into the Mini Muffin Tin for Even Baking
Once your crust mixture is ready, it’s time to pack it into the mini muffin tin. This step is essential for achieving that perfect shape and texture. Here are some effective techniques:
1. Use a Measuring Spoon: Start by using a tablespoon or a small cookie scoop to portion out the crust mixture. This ensures each mini pie has an equal amount of crust.
2. Press Firmly: To achieve a uniform base, press the crust mixture firmly into the bottom and up the sides of each muffin tin cavity. Use your fingers or the bottom of a shot glass to compact the crust evenly.
3. Avoid Overfilling: Ensure that the crust doesn’t rise too far above the tin edges, as this can lead to burnt edges during baking.
4. Check for Gaps: After pressing the crust, check for any gaps or inconsistencies. Use your fingers to smooth out any rough spots or to fill any holes.
Baking Time and Visual Cues for Doneness
Baking the crust is a simple yet vital step. Place your muffin tin in the preheated oven and bake for about 8-10 minutes. Keep an eye on them, as visual cues are key:
– Golden Brown Color: The edges should appear golden brown, indicating that the crust is crispy.
– Firm to the Touch: When you gently press on the crust, it should feel firm rather than soft.
– Cooling: Allow the crusts to cool in the tin for a few minutes before transferring them to a wire rack to cool completely. This prevents sogginess and helps maintain their shape.
Filling with Ice Cream
Once your crusts have cooled, it’s time to fill them with ice cream, the star of this recipe.
Importance of Softening Ice Cream for Easier Filling
Before you begin, take your ice cream out of the freezer and let it sit at room temperature for about 10-15 minutes. Softening the ice cream will make it easier to scoop and fill the mini pie crusts without cracking them.
Tips for Achieving a Smooth, Air-Free Surface
To create a smooth and air-free surface in each mini ice cream pie:
1. Use a Cookie Scoop: A cookie scoop allows for easier portion control and helps you fill each crust evenly.
2. Pack the Ice Cream: Once you scoop the ice cream into the crust, use the back of a spoon to pack it down gently. This eliminates any air pockets and creates a solid, smooth surface.
3. Level the Top: After packing, use an offset spatula or the back of a spoon to level the top of the ice cream for a neat finish.
Adding Whipped Cream
Now that your mini pies are filled with ice cream, it’s time to add a layer of whipped cream for that delightful finishing touch.
Techniques for Creating a Beautiful Finish with Whipped Cream
1. Use a Piping Bag: For a professional touch, transfer your whipped cream to a piping bag fitted with a star tip. This allows you to create beautiful swirls and peaks on top of your mini pies.
2. Spoon Method: If you don’t have a piping bag, you can simply use a spoon to dollop whipped cream onto each pie. Just make sure to create a nice mound for visual appeal.
Discussing Different Styles of Whipped Cream Presentation
There are several styles you can choose from when presenting your whipped cream:
– Classic Swirls: Create small peaks that look inviting and airy.
– Layered Style: Alternate layers of whipped cream and ice cream for a two-tone effect.
– Garnished Finish: Top your whipped cream with chocolate shavings, sprinkles, or a drizzle of caramel for added flair.
Chilling the Pies
After adding the whipped cream, it’s crucial to chill the pies before serving. This step enhances the texture of both the ice cream and whipped cream.
Importance of Chilling for Texture and Serving
Chilling allows the whipped cream to set and the ice cream to firm up, resulting in a more structured dessert. If you skip this step, the pies may be too soft and difficult to serve.
Recommended Chilling Time for Optimal Firmness
Place your mini ice cream pies in the freezer for at least 1-2 hours. If you want them extra firm, you can leave them for up to 4 hours. Just be sure to cover them with plastic wrap to prevent freezer burn.
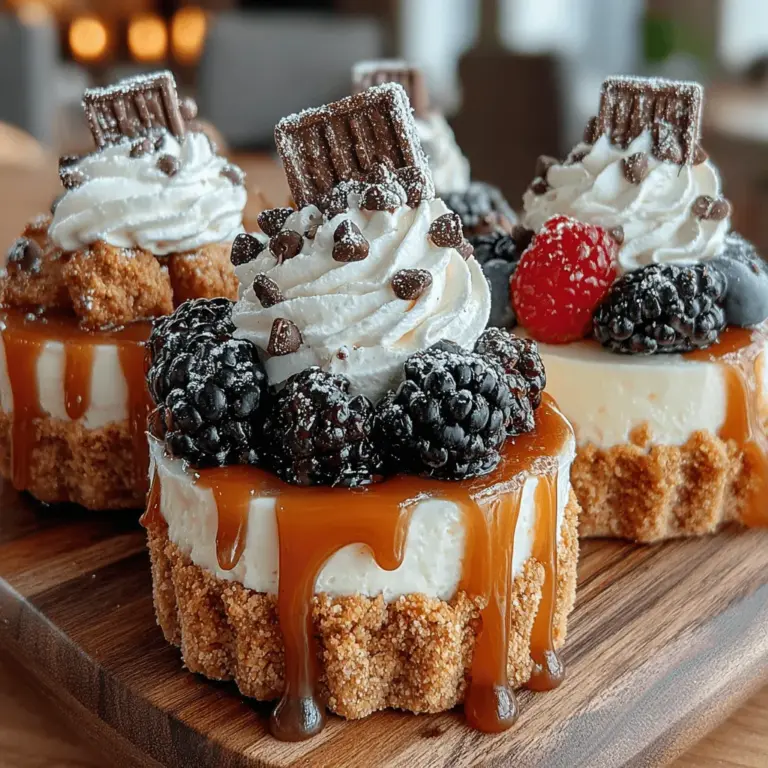
Garnishing and Serving
Presentation plays a significant role in enhancing the appeal of your Sweet Mini Ice Cream Pies. Here are some creative topping ideas and serving suggestions:
Creative Topping Ideas and Presentation Techniques
1. Fresh Fruit: Add slices of strawberries, raspberries, or even a sprinkle of crushed nuts for a fresh and crunchy contrast to the creamy filling.
2. Chocolate Drizzle: Melt some chocolate and drizzle it over the whipped cream for an elegant touch that also adds a rich flavor.
3. Seasonal Sprinkles: Use sprinkles that match the season or theme of your gathering, such as pastel colors for spring or red and green for the holidays.
Suggestions for Serving Aesthetics
– Platter Presentation: Arrange the mini pies on a decorative platter for a stunning visual display.
– Individual Serving: Consider serving them in cupcake liners or small dessert cups for a more personal touch, making it easy for guests to enjoy.
Variations and Customizations
One of the best aspects of Sweet Mini Ice Cream Pies is their versatility. Here are some ideas for variations and customizations:
Explore Different Flavor Combinations for the Ice Cream
– Mint Chocolate Chip: A refreshing twist can be achieved with mint chocolate chip ice cream topped with crushed chocolate cookies.
– Fruit Sorbets: For a lighter option, try fruit sorbets like mango or raspberry, which pair beautifully with a graham cracker crust.
Suggest Alternative Crust Options
1. Cookie Crusts: Instead of a traditional graham cracker crust, try using crushed Oreos or gingersnap cookies for a unique flavor profile.
2. Gluten-Free Alternatives: For gluten-free options, consider using ground almonds or gluten-free cookies to create a crust that everyone can enjoy.
Ideas for Seasonal or Themed Toppings
– Holiday Themes: For Halloween, use orange and black sprinkles; for Christmas, consider crushed candy canes or cinnamon.
– Summer Treats: Top with fresh berries and whipped cream for a patriotic Fourth of July dessert.
Conclusion
Making Sweet Mini Ice Cream Pies at home is not only easy but also a delightful way to showcase your culinary creativity. The combination of a crunchy crust, rich ice cream, and fluffy whipped cream makes for a dessert that’s sure to impress family and friends. The joy of creating these mini pies lies in the endless possibilities for flavors and toppings, allowing you to experiment with your favorite ingredients and make each pie unique.
Whether it’s a summer barbecue, a birthday party, or just a treat for yourself, these mini ice cream pies are the perfect dessert. Encourage your loved ones to join in the fun of making them, and share the bliss of these sweet creations. Try out different flavors, toppings, and crust options to personalize your mini pies and make them your own!
