Dive into the world of delightful pastries with Heavenly Nun’s Puffs, a light and airy treat that will transport your taste buds to cloud nine. These pastries, which are often celebrated for their delicate texture and versatility, have long been a favorite among pastry lovers. Whether you’re hosting a festive gathering or simply indulging in a cozy afternoon snack, Nun’s Puffs are the perfect choice to elevate any occasion.
In this article, we will guide you through the ingredients, provide step-by-step instructions, and share some fascinating insights about these treats, ensuring your baking experience is both enjoyable and satisfying. As you embark on this culinary journey, you will not only learn how to master this delicious recipe but also understand the rich history and scientific principles that make Heavenly Nun’s Puffs a beloved classic.
Understanding Heavenly Nun’s Puffs
Exploring the Origin of Nun’s Puffs
The name “Nun’s Puffs” is steeped in historical intrigue, with roots linking back to the kitchens of nuns in France. These pastries, known as “Puffs” or “Choux” in French, were originally crafted by nuns who sought to create a light and airy dessert that could be enjoyed by both the clergy and the laypeople. The nuns, with their expertise in baking and cooking, became well-known for their ability to create fluffy pastries that were both elegant and satisfying.
Over the years, Nun’s Puffs made their way across various cultures and cuisines, leading to delightful variations. In some regions, they are filled with sweet cream or fruit preserves, while others might serve them plain and dusted with powdered sugar. This adaptability has allowed Nun’s Puffs to maintain their charm and popularity, transcending borders and becoming a favorite in many households.
The Science Behind the Puff
What makes Heavenly Nun’s Puffs truly remarkable is the science behind their delightful rise and texture. The magic occurs during the baking process, where steam generated from the moisture in the dough causes the pastries to puff up, creating a hollow interior that can be filled or enjoyed on its own.
The key to achieving the perfect puff lies in the dough preparation. The classic recipe calls for combining water, butter, flour, and eggs, which work together to create a stable structure. The water vaporizes in the heat of the oven, expanding and pushing the dough outward, while the proteins in the flour and eggs form a network that holds the shape of the puff. It is essential to master the technique of creating this dough, as improper mixing or baking can lead to flat or dense pastries.
Ingredients Breakdown for Heavenly Nun’s Puffs
Understanding the components that make up Heavenly Nun’s Puffs is crucial for achieving the best results. Here’s a breakdown of the essential ingredients needed for this delectable treat:
Essential Components
– Water: The base for the dough, providing moisture that is crucial for steam generation during baking.
– Unsalted Butter: Adds richness and flavor, making the puffs taste decadent and satisfying.
– All-Purpose Flour: The backbone of the puff, providing structure and stability to the dough.
– Eggs: Serve as both a binding agent and a leavening property, helping the puffs rise and achieve that characteristic airy texture.
– Salt: Enhances flavor, balancing the sweetness of any fillings or toppings.
– Vanilla and Almond Extracts: These flavor enhancers add a delightful aroma and subtle taste that elevates the overall experience of the pastries.
– Powdered Sugar: For the finishing touch, providing a sweet dusting that makes the puffs visually appealing.
Optional Add-Ins
To further customize your Heavenly Nun’s Puffs, consider these optional add-ins that can transform your pastries into a unique dessert experience:
– Whipped Cream and Fruit Preserves: These delicious fillings can be piped into the center of the puffs, adding a burst of flavor and creaminess that complements the light texture.
– Creative Flavor Variations: Experiment with zest from citrus fruits or spices like cinnamon and nutmeg to create a unique twist on the traditional recipe. The possibilities are endless, allowing you to tailor the puffs to suit your taste preferences.
Step-by-Step Guide to Making Heavenly Nun’s Puffs
Now that we’ve covered the background and ingredients of Heavenly Nun’s Puffs, it’s time to get into the nitty-gritty of the baking process. Here’s a detailed guide to help you create your own batch of these delightful pastries.
Preheating the Oven: Setting the Stage for Perfection
Before you begin preparing your dough, it’s important to preheat your oven. Proper temperature control is essential for the success of Nun’s Puffs, as the high heat will help create steam quickly, allowing the pastries to rise properly. Set your oven to 425°F (220°C) and let it preheat fully while you prepare the dough. This initial blast of heat is crucial for achieving that signature puff.
Preparing the Dough: Creating a Cohesive Mixture
1. Combine Water and Butter: In a medium saucepan, combine the water and unsalted butter. Place the saucepan over medium heat and bring the mixture to a gentle boil. The butter should melt completely before moving on to the next step.
2. Add Flour: Once the mixture is boiling, remove it from the heat and quickly add the all-purpose flour. Stir vigorously with a wooden spoon until the flour is fully incorporated and the mixture forms a ball. This step is key; it helps to cook the flour slightly, which will improve the texture of your puffs.
3. Cool the Mixture: Allow the dough to cool for a few minutes. You want it to be warm but not hot, as this will make it easier to incorporate the eggs without cooking them.
4. Incorporate the Eggs: Once the dough has cooled slightly, add the eggs one at a time, mixing well after each addition. The dough will appear loose and glossy, which is exactly what you want. Make sure to scrape down the sides of the bowl to ensure all the ingredients are well combined.
5. Season and Flavor: After all the eggs have been added, mix in the salt and extracts. This is where the flavors will come to life, so don’t skip this step. You can also add any optional flavorings or zest at this stage.
6. Check the Consistency: The final dough should be smooth, shiny, and thick enough to hold its shape when piped onto a baking sheet. If it appears too runny, you can add a little more flour, but be cautious not to overdo it.
Now that you have your dough prepared and ready, you’re well on your way to creating Heavenly Nun’s Puffs that will delight your family and friends. In the next part of this article, we will explore the piping, baking, and finishing touches that will take your puffs from the oven to the table, ensuring they are as delightful to look at as they are to eat.
{{image_2}}
Incorporating the Eggs: Achieving Smoothness
When it comes to creating the perfect Heavenly Nun’s Puffs, the incorporation of eggs is a critical step that can significantly influence the texture and structure of your pastries. The key to achieving that sought-after smoothness lies in the temperature of your ingredients and the timing of your mixing.
The Role of Temperature and Timing
For optimal results, it’s crucial that your eggs are at room temperature before you incorporate them into the batter. Cold eggs can shock the mixture and prevent proper emulsification, leading to a denser puff. Take the time to remove your eggs from the refrigerator about 30 minutes before you start baking. This small step can make a world of difference in achieving a light and airy texture.
Once your eggs are at the right temperature, add them to the mixture gradually. This gradual incorporation allows for better binding and ensures that the batter remains smooth. Start by beating the eggs in a bowl until they are lightly frothy, then introduce them to the dough mixture a little at a time. This method allows the batter to absorb the eggs thoroughly without becoming lumpy.
Why Mixing Thoroughly is Crucial
Mixing is an essential part of this process. After you add each portion of egg, continue mixing until the batter is fully combined, and you achieve a glossy finish. A well-mixed batter will help create those delightful air pockets that expand during baking, giving your Nun’s Puffs their characteristic rise and lightness. Avoid the temptation to rush through this step; taking the time to mix thoroughly will yield a superior pastry.
Shaping the Puffs: Techniques for Uniformity
Once your batter is ready, you’re set for the fun part—shaping the puffs. This stage is where consistency in size and shape will ensure even baking and a beautiful presentation.
Using a Pastry Bag vs. a Spoon
For a professional finish, using a pastry bag fitted with a large plain tip is the preferred method for shaping your Nun’s Puffs. This tool allows for greater control and precision, enabling you to pipe uniform dollops of batter onto the baking sheet. Fill the pastry bag with batter and pipe small mounds, roughly two inches apart to allow for expansion during baking.
If you don’t have a pastry bag, a regular spoon can also do the job. However, this method may result in less uniformity. If you opt for spoons, try to keep the size consistent—about one tablespoon per puff—to ensure even baking.
Ensuring Even Spacing on the Baking Sheet
Spacing is critical when arranging your puffs on the baking tray. Aim for about two inches of space between each mound of batter. This distance allows the puffs to expand properly without merging into one another. If the puffs are too close, they might not rise as expected, leading to a less appealing final product.
Baking the Puffs: Achieving Golden Perfection
Now that your puffs are shaped and ready to go, it’s time to bake them to golden perfection. This step is where patience and attention to detail come into play.
Key Indicators of Doneness
As your Heavenly Nun’s Puffs bake, watch for several key indicators to determine their doneness. The puffs should be beautifully golden brown and puffed up significantly. A slight jiggle in the center can indicate that they are still too soft and need a bit more time in the oven.
A common test is the toothpick method: insert a toothpick into the center of a puff. If it comes out clean, they are ready to be removed from the oven. If you see any wet batter, give them a few more minutes.
The Impact of Oven Door Management
One of the most common mistakes when baking is frequently opening the oven door. Each time you open the door, you can disrupt the temperature inside, which can affect the rise of your puffs. For the best results, avoid opening the oven until you are close to the expected baking time. If you must check on them, do so quickly to minimize heat loss.
Cooling and Filling: The Finishing Touch
Once baked to perfection, it’s essential to cool your Nun’s Puffs properly before proceeding to fill them.
Best Practices for Cooling
Transfer your puffs to a wire rack immediately after removing them from the oven. Cooling them on the rack allows air to circulate around them, preventing sogginess. Be patient; filling them while they are still warm can cause the filling to melt and compromise the puff’s structure.
Methods for Filling Without Compromising Structure
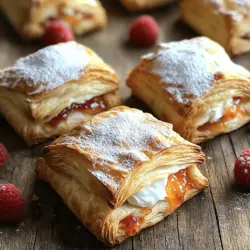
There are various ways to fill your Heavenly Nun’s Puffs, but the most effective method is to use a pastry bag fitted with a small tip. This allows you to fill each puff without causing it to collapse. Alternatively, you can create a small hole in the side of each puff using a skewer or a paring knife, then gently squeeze your filling inside. Popular fillings include whipped cream, pastry cream, or even fruit preserves.
Dusting and Serving: Presentation Matters
Presentation plays a vital role in the enjoyment of Heavenly Nun’s Puffs. A little extra effort in this area can elevate your dish from good to spectacular.
Tips for a Beautiful Presentation
After filling your puffs, consider dusting them lightly with powdered sugar for a classic touch. For an added twist, you can drizzle them with chocolate or a fruit glaze. To achieve a uniform coating of powdered sugar, use a small sifter to sprinkle it over the puffs evenly.
Best Serving Suggestions
Serve your Heavenly Nun’s Puffs on a beautiful platter, perhaps garnished with fresh berries or mint leaves for color. You can also arrange them in a pyramid style for an inviting display. Consider serving them warm or at room temperature, allowing your guests to experience their delightful texture fully.
Serving Suggestions and Pairing Ideas
Heavenly Nun’s Puffs are versatile and can be enjoyed in a variety of ways, making them an excellent addition to any gathering.
Enjoying Heavenly Nun’s Puffs
Best Time to Serve: These delightful pastries shine at brunches, afternoon teas, or as a dessert after dinner. Their lightness makes them a perfect ending to a hearty meal, ensuring your guests leave satisfied but not overly full.
Pairing with Beverages: To enhance the experience, consider pairing your Heavenly Nun’s Puffs with coffee, tea, or even dessert wines. A rich espresso complements the sweetness of the filling, while a light herbal tea can provide a refreshing contrast. If you’re feeling indulgent, a sweet dessert wine can elevate the flavors and make for an elegant pairing.
Creative Serving Ideas
Incorporating Seasonal Fruits
Take your presentation to the next level by adding seasonal fruits. Fresh berries, sliced peaches, or citrus segments can add color and freshness to your serving platter. This not only enhances the visual appeal but also balances the sweetness of the puffs with a tart contrast.
Transforming Puffs into a Dessert Platter
Consider creating a dessert platter featuring your Heavenly Nun’s Puffs alongside other treats like macarons, mini éclairs, or fruit tarts for a delightful spread. This arrangement is perfect for entertaining and allows your guests to sample a variety of flavors and textures.
Nutritional Perspective on Heavenly Nun’s Puffs
While Heavenly Nun’s Puffs are undoubtedly a treat, understanding their nutritional value can help you enjoy them in moderation.
Understanding the Nutritional Value
On average, each puff contains approximately 100 calories, depending on the filling and portion size. They generally consist of simple ingredients—flour, eggs, butter, and sugar—making them a delightful indulgence that can fit into a balanced diet.
Balancing Indulgence with Health Considerations
While it’s important to savor these pastries, consider balancing indulgence with health by serving them alongside fresh fruits or a light salad. This approach allows you to enjoy the sweetness of the puffs while still incorporating nutrient-rich foods into your meal.
Conclusion: The Joy of Baking Heavenly Nun’s Puffs
Heavenly Nun’s Puffs are not just a treat; they are a celebration of flavors and textures that can elevate any occasion. By following the detailed instructions and insights provided, you can create these delightful pastries with confidence and ease. Whether you choose to enjoy them as they are or fill them with your favorite treats, these puffs promise to bring joy and satisfaction to your baking adventures. Embrace the process, share them with loved ones, and indulge in the heavenly flavors of this classic pastry. Happy baking!