Introduction
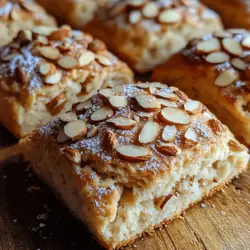
Indulge in the delightful world of baking with these Heavenly Almond Scones, a perfect blend of textures and flavors that elevate any breakfast or tea time experience. Imagine a morning where the aroma of freshly baked scones wafts through your kitchen, enticing your family and friends to gather around the table. These scones are not only easy to prepare but also offer a unique almond flavor profile that is sure to impress. With a crispy exterior and a soft, tender crumb, these Heavenly Almond Scones are perfect for any occasion, whether it’s a casual brunch or an elegant afternoon tea.
Scones have a rich history, originating from the British Isles, where they have been enjoyed for centuries. Traditionally served with clotted cream and jam, scones are a versatile treat that can be customized with various flavors and ingredients. The addition of almond flour and pure almond extract in this recipe takes the classic scone to new heights, offering a nutty richness that pairs beautifully with the sweetness of a light glaze or a dollop of cream.
In this article, we will delve into the ingredients that make these Heavenly Almond Scones so special, provide step-by-step instructions for achieving the perfect bake, share tips for success, and even explore the best ways to serve these delightful treats. Whether you’re a seasoned baker or a novice looking to hone your skills, this recipe is designed to guide you through every aspect of creating scones that are not only stunning but also delicious.
Understanding the Ingredients
To create the perfect Heavenly Almond Scones, it is essential to understand the role of each ingredient and how they contribute to the texture and flavor of the final product. Here’s a breakdown of the key ingredients:
All-Purpose Flour
All-purpose flour serves as the foundation of the scone, providing the necessary structure and texture. The protein content in all-purpose flour helps create a tender crumb while still maintaining enough strength to hold the scone’s shape during baking. For optimal results, it’s important to measure the flour accurately—too much flour can lead to dense scones, while too little can result in a crumbly texture.
Granulated Sugar
Granulated sugar adds sweetness to the scones and helps achieve a golden crust when baked. The sugar not only enhances the flavor but also contributes to the overall moisture content of the scone. For those who prefer a less sweet scone, you can reduce the amount of sugar slightly without compromising the texture.
Baking Powder
Baking powder is the leavening agent that gives scones their light and airy texture. It works by creating carbon dioxide gas, which causes the dough to rise in the oven. Ensure your baking powder is fresh for the best results; expired baking powder can lead to flat scones.
Salt
Salt is a crucial ingredient that enhances flavor and balances the sweetness of the sugar. It also plays a role in strengthening the gluten structure, contributing to the overall texture of the scones. A pinch of salt can make a significant difference in the flavor profile, so don’t skip this step.
Unsalted Butter
Unsalted butter is a key player in achieving the flaky texture that scones are known for. Chilled and diced butter is mixed into the dry ingredients, creating small pockets of fat that melt during baking, resulting in a tender and flaky crumb. Using unsalted butter allows you to control the saltiness of the final product.
Almond Flour
Almond flour introduces a rich, nutty flavor that enhances the scone’s moistness. It has a finer texture than all-purpose flour and is made from ground almonds, providing a unique taste and nutritional benefits. The combination of almond flour and all-purpose flour results in a delightful balance of flavors and textures.
Heavy Cream
Heavy cream adds richness to the scone dough and helps bind the ingredients together. The high-fat content in heavy cream contributes to the tender crumb and improves the overall mouthfeel. If you’re looking for a lighter option, you can substitute with half-and-half or whole milk, but the scones may be less rich.
Egg
The addition of an egg serves as a binder, adding moisture and helping to create a cohesive dough. Eggs also contribute to the scones’ structure, ensuring they hold their shape during baking. For a vegan version, you can substitute the egg with a flaxseed meal mixture or applesauce.
Pure Almond Extract
Pure almond extract infuses the scones with a delicious almond flavor that elevates the overall taste experience. A little goes a long way, so be careful not to overdo it, as the flavor can become overpowering. If you prefer, you can experiment with other extracts, such as vanilla or coconut, to create your unique twist.
Sliced Almonds
Sliced almonds are used as a topping for the scones, adding a delightful crunch and visual appeal. They can be toasted for an extra layer of flavor, enhancing the nuttiness of the scones. This finishing touch not only enhances the taste but also makes for an eye-catching presentation.
Powdered Sugar and Milk (Optional)
For a sweet glaze to finish the scones beautifully, a mixture of powdered sugar and milk can be drizzled over the top once they have cooled. This optional step adds a touch of sweetness and a glossy finish that makes the scones even more irresistible.
Preparation Steps
Now that we have a better understanding of the ingredients, let’s dive into the preparation steps to create these Heavenly Almond Scones. Follow these instructions carefully to ensure your scones turn out perfectly every time.
Preheat & Prepare
Before you begin mixing your ingredients, it’s important to preheat your oven to 400°F (200°C). Preheating is a crucial step in baking, as it ensures that the scones will rise properly and achieve that desirable golden-brown color. While the oven is heating, line a baking sheet with parchment paper to prevent sticking and facilitate easy cleanup.
Mixing Dry Ingredients
In a large mixing bowl, begin by whisking together the all-purpose flour, almond flour, granulated sugar, baking powder, and salt. Whisking helps to combine the ingredients thoroughly and aerate the mixture, which is essential for achieving a light and fluffy texture in your scones. Ensure there are no lumps in the flour mixture, as this can lead to uneven baking.
Once the dry ingredients are well combined, proceed to cut in the chilled, diced unsalted butter using a pastry cutter or your fingers. The goal here is to create a crumbly texture, with small pieces of butter evenly distributed throughout the flour mixture. This process is key to achieving the flaky layers in the scones. Be careful not to overmix; you want to see pea-sized pieces of butter throughout the mixture.
With the dry ingredients and butter combined, it’s time to move on to the wet ingredients, which will bring your scone dough together beautifully.
In the next section, we will continue with the preparation steps, guiding you through the mixing of wet ingredients, shaping the dough, and baking the scones to perfection. Stay tuned for more tips and techniques that will ensure your Heavenly Almond Scones are a delicious success!
{{image_2}}
Techniques for Sifting and Combining Dry Ingredients
Sifting dry ingredients is a crucial technique that enhances the texture and lightness of your scones. Begin by measuring your flour accurately. Using the spoon and level method, spoon flour into your measuring cup and level it off with a knife. Avoid packing the flour down, as this can lead to dense scones.
To sift, place a fine-mesh sieve over a mixing bowl and add your dry ingredients—flour, baking powder, sugar, and salt. Gently shake the sieve back and forth, allowing the dry ingredients to fall through. Sifting aerates the flour, removes lumps, and ensures even distribution of the leavening agents, leading to a more consistent rise during baking.
Combining dry ingredients effectively means whisking them together in the bowl after sifting. Use a whisk or a fork to blend everything thoroughly. This helps prevent clumping and ensures that the baking powder is evenly incorporated, which is essential for achieving light and fluffy scones.
Cutting in Butter
Cutting in butter is a classic technique that creates the desired flaky texture in scones. Start with cold, unsalted butter, as this retains the shape during mixing. Cut the butter into small cubes (about 1/2 inch) and add it to the dry mixture.
Using a pastry cutter or two forks, work the butter into the flour until the mixture resembles coarse crumbs. Be careful not to over-mix; you should still see small pieces of butter throughout the mixture. These pieces will melt during baking, creating steam that gives the scones their signature flakiness. The goal is to create a crumbly texture while keeping the integrity of the butter intact.
Combining Wet Ingredients
Once your dry ingredients are ready, it’s time to combine the wet ingredients. In a separate bowl, crack the egg and whisk it lightly. Then add the milk and almond extract. Whisk together until the mixture is smooth and cohesive.
For best results, use room temperature milk. This helps the ingredients blend more easily, creating a uniform batter. When pouring the wet ingredients into the dry mixture, do so gradually while gently stirring with a wooden spoon or spatula. This prevents the flour from flying everywhere and ensures all ingredients are well combined without overworking the dough.
Forming the Dough
Mixing your dough is a delicate process. After adding the wet ingredients to the dry, stir just until the mixture comes together. You should still see some floury bits; this is perfectly fine. Overworking the dough can result in tough scones, so be gentle.
Once combined, turn the dough out onto a lightly floured surface. Knead it gently by folding it over itself a couple of times, just to bring everything together. Aim for a cohesive dough without any dry patches, but avoid excessive kneading, which can develop gluten and lead to dense scones.
Shaping Scones
To shape your scones, pat the dough into a round disc, about 1 inch thick. Use a sharp knife or a bench scraper to cut the disc into wedges or use a biscuit cutter for round scones. If you prefer uniform scones, a biscuit cutter can help achieve a consistent size.
Place the cut scones on a parchment-lined baking sheet, ensuring they are spaced about 2 inches apart. This spacing allows for proper expansion during baking. If you want to achieve a golden crust, you can brush the tops lightly with milk or an egg wash before baking.
Transferring to Baking Sheet
When transferring your scones to the baking sheet, use a spatula to lift them, ensuring you retain their shape. Place them carefully, maintaining the spacing discussed earlier. If you’ve brushed the tops with milk or an egg wash, do this just before placing them in the oven.
For best results, keep the oven preheated at 400°F (200°C) so that the scones start to rise immediately upon entering. This initial high temperature creates steam, enhancing the flaky texture.
Baking
Baking your scones requires attention to timing and visual cues. Bake the scones in the preheated oven for about 15-20 minutes or until they are golden brown on the tops. The scones should have risen nicely, and a toothpick inserted into the center should come out clean.
If you notice the tops browning too quickly, you can lightly cover them with aluminum foil. This helps prevent burning while allowing the insides to cook thoroughly.
Cooling
Once baked, remove the scones from the oven and let them cool on the baking sheet for about 5 minutes. Then, transfer them to a wire rack to cool completely. Cooling on a wire rack helps maintain the scones’ texture by allowing air to circulate around them, preventing sogginess.
Optional Glaze
For an extra touch of sweetness and elegance, consider adding a glaze. To create a simple almond glaze, mix powdered sugar with a small amount of milk and a splash of almond extract until you achieve a smooth, pourable consistency. Drizzle the glaze over the cooled scones for a beautiful finish.
Serving Suggestions
Presentation Tips
When it comes to serving, presentation matters. Arrange your scones on a beautiful platter or cake stand. You can dust them lightly with powdered sugar or drizzle the glaze across their tops for an elegant touch. Garnish with fresh berries or edible flowers for added color and appeal.
Pairing Ideas
Heavenly Almond Scones are delightful on their own, but they pair wonderfully with accompaniments. Consider serving them with clotted cream, which adds richness, or a pat of butter for a classic touch. Fresh fruit like strawberries, raspberries, or even a fruit compote can add brightness and balance to the almond flavor. For a classic tea experience, serve them alongside a pot of your favorite tea or coffee.
Nutritional Information
Breakdown of Ingredients
The primary ingredients in your Heavenly Almond Scones—flour, butter, sugar, almond extract, and milk—contribute to the overall nutritional profile.
– Flour: Provides carbohydrates and a small amount of protein.
– Butter: Adds fat, which contributes to the scones’ tender texture.
– Sugar: Sweetens the scones while also contributing to browning during baking.
– Almond Extract: Offers flavor without adding significant calories.
– Milk: Contributes protein and calcium.
The exact nutritional content will vary based on portion sizes and specific ingredient brands, but generally, each scone can provide a satisfying treat without excessive calories.
Health Considerations
While these scones are a delightful addition to any meal, moderation is key. Enjoying them as an occasional treat can be part of a balanced diet. They are best appreciated fresh and warm from the oven, offering a comforting experience that can brighten any day.
Conclusion
These Heavenly Almond Scones are not just a treat; they bring warmth and joy into your kitchen. With their elegant almond flavor and tender texture, they are perfect for sharing with loved ones or enjoying a quiet moment with a cup of tea. Baking these scones is not just about the end product but also about the wonderful experience of creating something delicious from scratch. Embrace the art of baking and make these scones a staple in your recipe collection, celebrating the joy they bring to your home.