Introduction to Crispy Ranch Chicken Tender Wraps
In the quest for a delicious, satisfying meal that the whole family will love, Crispy Ranch Chicken Tender Wraps emerge as a standout option. These wraps perfectly combine the irresistible crunch of fried chicken tenders with fresh vegetables and a creamy ranch dressing, creating a harmonious blend of flavors that appeals to both children and adults alike. Not only are they a treat for the taste buds, but they also offer a fun and interactive dining experience, making them ideal for busy weeknights or casual gatherings.
The beauty of Crispy Ranch Chicken Tender Wraps lies in their versatility. You can easily customize them to suit individual preferences, whether by adjusting the level of spiciness or incorporating different vegetables. This adaptability ensures that everyone at the table will find something to enjoy. In this article, we will delve into the ingredients, preparation, and assembly of these delightful wraps, ensuring you have all the information you need to create a memorable dining experience for you and your loved ones.
Understanding the Ingredients
Exploring the Key Components of the Recipe
To make Crispy Ranch Chicken Tender Wraps, it’s essential to understand the key ingredients that come together to create this mouthwatering dish.
– Chicken Tenders: The foundational protein of the dish, chicken tenders are celebrated for their tenderness and ability to absorb flavors. Their mild taste acts as a perfect canvas for the seasonings and sauces that enhance the overall flavor profile of the wrap.
– Buttermilk: This ingredient is critical for marinating the chicken tenders. Buttermilk not only helps to tenderize the meat but also adds moisture and richness, ensuring that the chicken remains juicy and flavorful throughout the cooking process.
– Seasonings: A blend of ranch seasoning, garlic powder, and smoked paprika contributes to the wrap’s signature flavor profile. The ranch seasoning imparts that familiar creamy, herbaceous taste, while garlic powder and smoked paprika add depth and a hint of smokiness.
– Panko Breadcrumbs: These Japanese-style breadcrumbs provide an extra crunch that elevates the texture of the fried chicken. Their larger size compared to traditional breadcrumbs ensures a satisfying crispiness that complements the tender chicken inside.
– Fresh Vegetables: To balance the rich flavors of the fried chicken, fresh vegetables such as romaine lettuce and ripe tomatoes are essential. They add a refreshing crunch and nutritional value to the wraps, making them not only delicious but also a bit healthier.
– Tortillas: The vessel for our wraps, tortillas provide structure and ease of handling. Whether you prefer flour or corn tortillas, they serve as the perfect base to hold all the delicious fillings together.
– Ranch Dressing: No chicken tender wrap is complete without a creamy ranch dressing. This classic pairing enhances the overall flavor with its rich, smooth texture and adds a cooling element to counterbalance the crispy chicken.
Preparing the Chicken Tenders
Marination for Flavor and Tenderness
The first step in creating Crispy Ranch Chicken Tender Wraps is preparing the chicken tenders. Marination is a crucial process that not only infuses the chicken with flavor but also ensures it remains tender and juicy during cooking.
– Importance of Buttermilk: Marinating the chicken in buttermilk is essential for achieving maximum tenderness. The lactic acid in buttermilk breaks down the proteins in the chicken, resulting in a more tender texture. Additionally, the buttermilk serves as a flavor carrier, allowing the seasonings to penetrate the meat effectively.
– Recommended Marination Time: For optimal results, it is recommended to marinate the chicken tenders for at least 1 hour, though longer marination—up to 12 hours—can yield even better flavor and tenderness. Be sure to refrigerate the chicken while it marinates to ensure food safety.
Setting Up the Breading Stations
Once the chicken has marinated, the next step is to prepare for breading. An organized breading station is key to an efficient and mess-free cooking process.
– Importance of Organization: To streamline the breading process, set up three distinct stations: one for the seasoned flour, another for the buttermilk, and a final one for the panko breadcrumbs. This organization allows you to easily coat each chicken tender in flour, dip it in buttermilk, and then roll it in panko without any unnecessary fuss.
– Breading Process: Start by seasoning all-purpose flour with salt, pepper, and additional spices if desired. Then, remove each chicken tender from the buttermilk, allowing any excess to drip off before coating it in the flour mixture. Next, dip the floured chicken back into the buttermilk and finally roll it in the panko breadcrumbs. Press down gently to ensure the breadcrumbs adhere well, creating that coveted crispy exterior once fried.
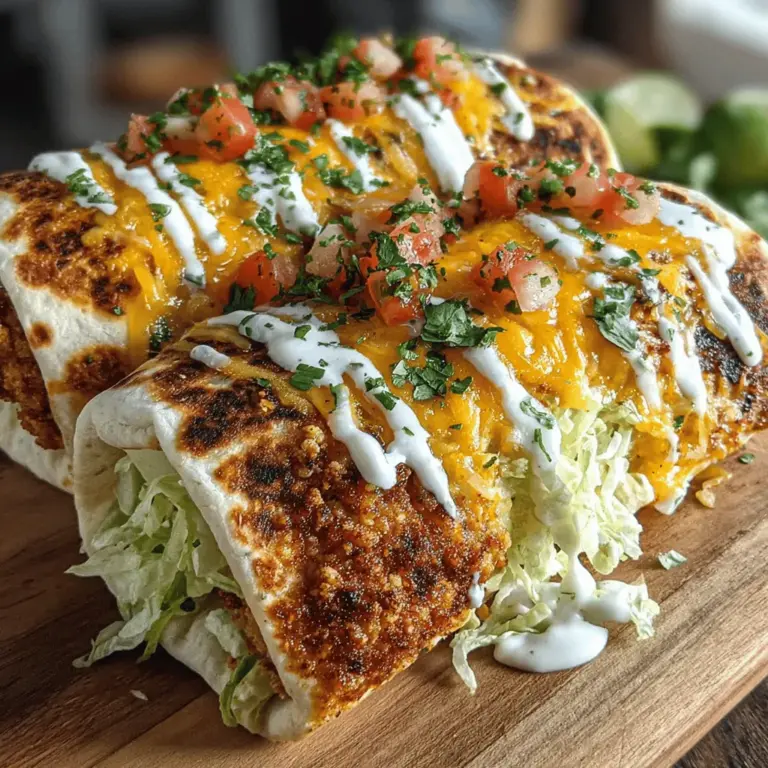
By following these initial steps, you lay a solid foundation for creating Crispy Ranch Chicken Tender Wraps that are bursting with flavor and texture. In the following sections, we will explore the cooking methods and assembly techniques that will bring these wraps to life, ensuring a delightful dining experience for all.
{{image_2}}
Detailed Steps for Breading
Breading chicken tenders is an art that can elevate your Crispy Ranch Chicken Tender Wraps from simple to sensational. Follow these steps for the perfect coating that guarantees a satisfying crunch.
Step-by-Step Process of Coating the Chicken
1. Prepare Your Workstation: Set up three bowls for the breading process. In the first bowl, place about 1 cup of all-purpose flour mixed with a pinch of salt and pepper for seasoning. In the second bowl, pour in 1 cup of buttermilk. In the third bowl, add 1 ½ cups of panko breadcrumbs.
2. Coat with Flour: Take each chicken tender and dredge it into the flour mixture. Ensure every part of the chicken is thoroughly coated. This initial layer helps the buttermilk adhere better to the chicken.
3. Dip in Buttermilk: Next, transfer the floured chicken into the buttermilk, allowing any excess to drip off. This step not only adds moisture but also creates a sticky surface for the panko to cling to.
4. Coat with Panko: Finally, roll the chicken in the panko breadcrumbs, pressing gently to ensure a good coating. The panko provides a light, crispy texture that’s ideal for frying.
5. Rest Before Frying: Once breaded, let the chicken tenders rest on a wire rack for about 10-15 minutes. This allows the breading to set, ensuring it adheres better during frying.
Cooking the Chicken Tenders
Frying Techniques for Perfect Results
Oil Temperature
The success of frying chicken tenderly relies heavily on the oil’s temperature. Ideally, you want your oil heated to around 350°F (175°C).
– Testing Oil Readiness: To check if the oil is ready, drop a small piece of bread into the oil; if it bubbles and sizzles, you’re good to go. Alternatively, you can use a kitchen thermometer for precise measurement.
Cooking Time
Cook the chicken tenders in batches to avoid overcrowding the pan and maintain the oil’s temperature.
– Cooking Time: Each tender should cook for about 4-5 minutes on each side, depending on thickness. The internal temperature should reach 165°F (74°C) for safe consumption. Use a meat thermometer to check the doneness.
Tips for Avoiding Overcrowding
Frying in batches is crucial. Overcrowding the pan can lead to uneven cooking and a greasy texture since the temperature drops too low.
– Batch Cooking: Fry 3-4 tenders at a time, ensuring they have enough space to float freely in the oil. Keep the cooked tenders warm in a preheated oven at 200°F (93°C) while you finish frying the rest.
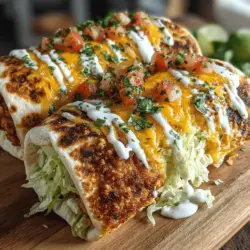
Assembling the Crispy Ranch Chicken Tender Wraps
Layering for Flavor and Presentation
Tortilla Preparation
The choice of tortilla can significantly enhance your wrap experience. Use fresh flour tortillas for their pliability and soft texture, which complements the crunch of the chicken.
– Warming the Tortillas: Warm the tortillas in a dry skillet over medium heat for about 30 seconds on each side. This not only makes them more flexible but also enhances their flavor.
Layering Ingredients
A well-layered wrap ensures that every bite is packed with flavor.
1. Start with Lettuce: Lay a handful of shredded lettuce in the center of the tortilla. This serves as a base and helps prevent the wrap from getting soggy.
2. Add Sliced Tomatoes: Place a few slices of fresh tomatoes on top of the lettuce. Their juiciness adds moisture and balances the crunch of the chicken.
3. Include Cheese: Sprinkle shredded cheddar or your preferred cheese over the tomatoes. The cheese adds creaminess that harmonizes with the other ingredients.
4. Place Chicken Tenders: Add 2-3 crispy chicken tenders on top of the layered ingredients. Ensure they are evenly distributed for balanced flavor in each bite.
5. Drizzle with Ranch Dressing: Finally, drizzle ranch dressing over the chicken and veggies. The tangy flavor of ranch dressing ties all the elements together, making each bite irresistible.
Rolling and Serving the Wraps
Techniques for a Secure Wrap
To prevent your delicious fillings from spilling out, mastering the wrap technique is essential.
Step-by-Step Wrapping Instructions
1. Fold the Sides: Begin by folding the sides of the tortilla inward over the filling. This will help to keep everything contained.
2. Roll Tightly: Starting from the bottom, roll the tortilla tightly upwards, ensuring that the fillings are secured inside. The sides should remain tucked in as you roll.
3. Seal the Wrap: Once fully rolled, you can place the seam side down on a plate. This helps to keep the wrap closed.
Slicing for Presentation
Slicing the wrap not only enhances its visual appeal but also makes it easier to handle.
– Diagonal Slicing: Use a sharp knife to cut the wrap diagonally in half. This exposes the colorful layers inside and makes for an attractive presentation that invites immediate enjoyment.
Conclusion: Enjoying Your Crispy Ranch Chicken Tender Wraps
Crispy Ranch Chicken Tender Wraps are more than just a meal; they are an experience that brings together flavors and textures in a delightful way. With their easy preparation and the ability to customize with your favorite veggies or additional toppings, these wraps are destined to become a household favorite.
Whether enjoyed for dinner or at a casual get-together, they promise to deliver satisfaction with every bite. Serve them alongside a side of fresh fruit or crispy potato wedges for a complete meal. Embrace the joy of cooking and savor the crunch of these delicious wraps!
By following these detailed instructions and tips, you’ll create a dish that not only tastes wonderful but also impresses family and friends alike. Enjoy the process and the flavors, and watch these wraps become a staple in your culinary repertoire!