Introduction
Crispy cheesy potato fingers are the perfect indulgent snack or appetizer that can be enjoyed at any occasion, from casual gatherings to more formal celebrations. These delightful bites combine the comforting essence of potatoes with the rich, gooey goodness of melted cheese, creating a flavor experience that’s hard to resist. The appeal of crispy cheesy potato fingers lies in their perfectly crunchy exterior, followed by a warm, cheesy interior that bursts with flavor at every bite. Best of all, they are surprisingly easy to prepare, making them an ideal choice for both novice cooks and seasoned chefs alike.
This recipe highlights a few key ingredients that contribute to the ultimate texture and taste of these potato fingers. The star of the dish, of course, is the potato itself, which provides the foundation for this delightful snack. Coupled with sharp cheddar cheese that melts beautifully, and enhanced by a blend of seasonings, each ingredient plays a vital role in elevating these potato fingers to a whole new level of deliciousness. To achieve that satisfying crunch, we will also incorporate breadcrumbs—choosing between traditional or panko breadcrumbs—depending on the desired texture. The cooking method involves frying, which ensures that each potato finger is irresistibly crispy.
Now, let’s dive deeper into the ingredients and preparation steps that will lead us to create these mouthwatering crispy cheesy potato fingers.
Understanding the Ingredients
Potatoes
When it comes to selecting the right potatoes for frying, the type you choose can significantly influence the final outcome of the dish. For crispy cheesy potato fingers, starchy potatoes, such as Russets or Yukon Golds, are highly recommended. Russet potatoes, with their high starch content, yield a fluffy interior and crisp exterior when cooked. Yukon Golds, while slightly waxy, offer a creamy texture that pairs well with cheese. They hold their shape during cooking, making them an excellent choice for this recipe.
Before diving into the preparation, it’s essential to understand the role potatoes play in this dish. Potatoes are not only the main ingredient but also provide the base for the texture and flavor profile of the snack. Their ability to absorb flavors from seasonings and cheese makes them a versatile component in this recipe.
Cheese
The choice of cheese is crucial for achieving that perfect melty center. Sharp cheddar cheese is the top pick for crispy cheesy potato fingers due to its robust flavor and excellent melting properties. Cheddar adds a rich, tangy taste to the potato fingers, enhancing their overall appeal. As the cheese melts during cooking, it creates a gooey filling that beautifully contrasts with the crispy outer layer. For a twist, you can also consider blending in other cheeses like mozzarella for extra stretchiness or pepper jack for a hint of spice.
Seasonings
To elevate the flavors of the crispy cheesy potato fingers, we will incorporate a mix of seasonings that are simple yet impactful. Garlic powder, onion powder, and paprika are key players in this flavor enhancement.
– Garlic Powder: Adds a subtle, aromatic flavor that complements the cheese and potatoes without overpowering them.
– Onion Powder: Contributes a mild sweetness and depth, enhancing the overall savory profile of the dish.
– Paprika: Provides a hint of smokiness and a beautiful color to the potato fingers, making them visually appealing.
These seasonings will not only enhance the taste but will also create a well-rounded flavor profile that will keep your guests coming back for more.
Breadcrumbs
The type of breadcrumbs used in this recipe plays a significant role in achieving the desired crunchiness of the potato fingers. While traditional breadcrumbs can work, panko breadcrumbs are highly recommended for their light and airy texture. Panko, a Japanese-style breadcrumb, is coarser than regular breadcrumbs, allowing for superior crispiness when fried. This difference in texture gives your potato fingers an extra crunch that is simply irresistible.
When preparing the coating, consider seasoning the breadcrumbs with additional spices or herbs to infuse even more flavor into the dish. The combination of seasoned flour, egg, and breadcrumbs will create a perfect barrier that locks in moisture while ensuring each potato finger is delightfully crunchy on the outside.
Preparation Steps for Perfect Potato Fingers
Preparing the Potatoes
The first step in crafting your crispy cheesy potato fingers is preparing the potatoes. Start by peeling the potatoes to remove the skin, which can be tough and chewy. Once peeled, cut the potatoes into long, finger-like shapes. Aim for consistent thickness to ensure even cooking, ideally about half an inch thick.
After cutting the potatoes, it’s essential to rinse them under cold water. This step serves to remove excess starch, which can lead to gummy potatoes if not addressed. By rinsing the potato cuts, you help to ensure a crispier end result.
Furthermore, to achieve the perfect texture, parboiling the potato fingers is a critical next step. This process involves briefly boiling the cut potatoes before frying them. Parboiling not only softens the potatoes, making them easier to cook through, but it also helps to create that ideal balance between a fluffy interior and a crispy exterior.
Parboiling for Optimal Texture
To parboil your potato fingers, fill a large pot with water and bring it to a rolling boil. Add a generous pinch of salt to the water; this will season the potatoes as they cook. Carefully add the cut potato fingers to the boiling water and let them cook for about 5-7 minutes. You want them to be tender but not fully cooked, as they will continue to cook during frying.
To tell when the potatoes are ready to be drained, use a fork to test a piece. It should pierce through easily but still hold its shape. Once they reach this stage, drain the potatoes in a colander and let them rest for a few minutes. This cooling period is essential as it allows excess moisture to evaporate, which ultimately contributes to the crispiness when they are fried.
Creating the Breading Station
As the potatoes cool, it’s time to set up your breading station. This setup is crucial for ensuring that your potato fingers are evenly coated and that the breading adheres properly. You will need three shallow dishes for this process:
1. Flour Mixture: In the first dish, combine all-purpose flour with a pinch of salt and a blend of the seasonings you’ve chosen (garlic powder, onion powder, and paprika). This seasoned flour will provide a flavorful base coat for the potato fingers.
2. Egg Wash: In the second dish, crack a couple of eggs and whisk them until smooth. This egg wash will help the breadcrumbs stick to the potatoes, providing a golden crust when fried.
3. Breadcrumbs: The third dish will hold your breadcrumbs. If you’re using panko, consider seasoning them with a bit of salt, pepper, or additional spices for extra flavor.
Now, you’re ready to coat the potato fingers. Start by taking each potato piece and dredging it in the flour mixture, ensuring it’s evenly coated. Shake off any excess flour before dipping it into the egg wash, allowing the egg to cover the potato fully. Finally, roll the potato finger in the breadcrumbs, pressing gently to ensure an even coating. Repeat this process until all potato fingers are coated and ready for frying.
Once your breading station is set and the potatoes are prepared, you’re well on your way to creating a delectable snack that is sure to impress friends and family alike. With these foundational steps complete, you’re ready to move on to the frying process to achieve that perfect crispy finish.
Stay tuned for the next part of this article, where we will dive into the frying method and final touches that will make your crispy cheesy potato fingers absolutely irresistible.
{{image_2}}
Coating the Potato Fingers for Crispy Perfection
To achieve that irresistible crunch on your crispy cheesy potato fingers, proper coating is essential. Follow these step-by-step instructions to ensure that each potato finger is evenly covered in a delightful layer of breadcrumbs and cheese.
Step-by-Step Coating Guidance
1. Prepare the Coating Stations: Set up three shallow bowls or plates:
– Bowl 1: All-purpose flour seasoned with salt and pepper.
– Bowl 2: Lightly beaten eggs (about two eggs should suffice).
– Bowl 3: A mixture of breadcrumbs and grated cheese (use a blend of Parmesan and mozzarella for a rich flavor).
2. Coating Process:
– Flour Dip: Start by taking a potato finger and rolling it in the seasoned flour. Ensure an even coat, shaking off any excess flour.
– Egg Wash: Next, dip the floured potato finger into the beaten eggs, allowing any excess egg to drip off. This egg wash helps the breadcrumb mixture adhere better.
– Breadcrumb and Cheese Mix: Finally, roll the potato finger in the breadcrumb and cheese mixture. Press down gently to ensure a good layer sticks to the potato. Repeat this process for all potato fingers.
Tips for Even Coating
– Use Fresh Breadcrumbs: For the best texture, consider making your own breadcrumbs from stale bread. Fresh breadcrumbs cling better and provide a superior crunch.
– Double Coating: For an extra crispy outer layer, repeat the egg and breadcrumb steps for a double coating.
– Patience is Key: Allow the coated potato fingers to rest for about 10-15 minutes before frying. This helps the coating adhere better during frying.
Frying to Golden Perfection
Now that our potato fingers are coated and ready to go, it’s time to fry them to a golden crisp. Proper frying technique is crucial for achieving that sought-after crunchy exterior while keeping the insides fluffy and cheesy.
Heating the Oil
– Choosing the Right Oil: Use oils with high smoke points for frying, such as vegetable oil, canola oil, or peanut oil. Avoid using olive oil as it can burn at high temperatures.
– Temperature Matters: Heat the oil in a deep frying pan or a deep fryer to about 350°F (175°C). Use a thermometer to monitor the temperature accurately. If the oil is too cool, the potato fingers will absorb excess oil and become greasy; if it’s too hot, they may burn before cooking through.
Safety Tips for Frying
– Use a Deep Pot: Ensure you use a deep pot to minimize splatter and prevent burns from hot oil.
– Keep Kids and Pets Away: Maintain a safe distance from children and pets while frying to prevent accidents.
– Have a Lid Ready: Keep a lid nearby in case of an oil fire; smother the flames by covering the pot if necessary.
Frying Technique
1. Test the Oil: Before adding the potato fingers, drop a small piece of bread into the oil. If it sizzles and bubbles up, the oil is ready.
2. Fry in Batches: Carefully lower a few potato fingers into the hot oil, ensuring they aren’t overcrowded. Overcrowding the pan lowers the oil temperature and results in soggy potato fingers.
3. Flip for Even Cooking: Fry for about 3-4 minutes on one side, then gently flip using tongs. Continue frying until both sides are golden brown and crispy, about 8-10 minutes total.
4. Drain Excess Oil: Once cooked, use a slotted spoon to remove the potato fingers from the oil and place them on a plate lined with paper towels to absorb excess oil.
Serving Suggestions
The presentation of your crispy cheesy potato fingers can enhance the overall dining experience. Here are some creative ideas to serve them up beautifully.
Presentation Ideas
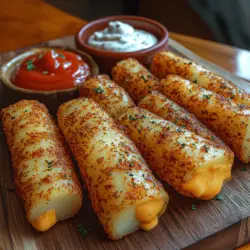
– Platter Style: Serve your potato fingers on a large wooden board or platter. Arrange them in a fan shape for an eye-catching display.
– Garnishing: Sprinkling fresh herbs such as chopped parsley or chives over the potato fingers adds a touch of color and freshness.
– Accompaniment Ideas: Pair your crispy cheesy potato fingers with vibrant sides like a fresh salad or a bowl of roasted vegetables to create a balanced meal.
Dipping Sauces
Enhance the flavor of your potato fingers with delicious dipping sauces. Here are some recommendations:
– Classic Ketchup: A timeless choice that complements the cheesy flavor perfectly.
– Ranch Dressing: Creamy ranch adds a tangy contrast that elevates the dish.
– Garlic Aioli: Whip up a quick garlic aioli by mixing mayonnaise, minced garlic, lemon juice, and salt. This rich dip adds a gourmet touch.
Optional Variations for Homemade Dips:
– For a spicy kick, mix sriracha into mayonnaise for a zesty dip.
– Blend Greek yogurt with herbs and lemon juice for a healthy, refreshing sauce.
Nutritional Information
Understanding the nutritional content of your crispy cheesy potato fingers can help you enjoy them as part of a balanced diet. Here’s a breakdown of the approximate nutritional information per serving (4 potato fingers):
– Calories: 250
– Total Fat: 15g
– Saturated Fat: 5g
– Carbohydrates: 25g
– Dietary Fiber: 2g
– Sugars: 1g
– Protein: 6g
This snack can be enjoyed in moderation as part of a balanced diet, providing a satisfying treat without straying too far from your dietary goals. Pair it with a fresh salad or steamed vegetables to make it a complete meal.
Conclusion
Creating crispy cheesy potato fingers is not only a delightful cooking project but also a fun way to bring friends and family together. Their versatility makes them an excellent choice for snacks, appetizers, or side dishes at any gathering. Whether served at a party or enjoyed as a cozy family meal, these potato fingers are sure to impress.
Encourage your culinary creativity by experimenting with different cheese varieties, spices, and even adding herbs to the breadcrumb mixture. The joy of cooking lies in personalization, and these crispy cheesy potato fingers are the perfect canvas for your unique touch. Happy cooking!