Chilled Citrus Dream Bars Recipe: A Refreshing Delight for Warm Weather
As the temperatures rise and summer approaches, the desire for refreshing desserts becomes paramount. Chilled desserts, in particular, have a unique allure during the warm months, offering a cool reprieve from the heat. Among these delightful options, Chilled Citrus Dream Bars stand out as a perfect treat. This easy-to-make dessert not only offers a burst of flavor but also provides a delightful balance of creamy texture and zesty lemon essence that makes them utterly irresistible.
Chilled Citrus Dream Bars are a fusion of tart and sweet, with layers of creamy goodness that melt in your mouth. The bright and vibrant flavors of fresh lemons are complemented by a smooth, rich filling, making these bars a crowd-pleaser at any gathering. Whether you’re hosting a summer barbecue, celebrating a birthday, or simply looking for a way to cool down on a hot day, these bars promise to be a hit.
Understanding the Ingredients
To create the perfect Chilled Citrus Dream Bars, it’s essential to understand the key ingredients that come together to form this delectable dessert. The quality and freshness of these components play a crucial role in the overall taste and texture, particularly when it comes to the citrus elements.
1. Graham Cracker Crumbs: Serving as the foundation of the dessert, graham cracker crumbs provide a crunchy, slightly sweet crust. The texture is crucial; it should be firm enough to hold the filling while also being tender enough to offer a pleasant contrast to the creamy layers above.
2. Unsalted Butter: This ingredient adds richness and depth to the crust. Unsalted butter is preferred as it allows for better control over the overall saltiness of the dessert, ensuring that the flavors of the citrus shine through.
3. Granulated Sugar: Sweetness is vital to balance the tartness of the lemons. Granulated sugar not only sweetens the filling but also contributes to the overall texture of the crust, creating a cohesive dessert experience.
4. Vanilla Ice Cream: The creamy element of the bars, vanilla ice cream adds a smooth and rich texture that complements the zesty lemon flavor. It serves to mellow the acidity of the lemons while enhancing the overall creaminess of the filling.
5. Fresh Lemon Juice and Zest: The star ingredients of this recipe, fresh lemon juice and zest, provide the essential tanginess that defines the flavor profile of Chilled Citrus Dream Bars. Using fresh lemons is important; the vibrant flavors of freshly squeezed juice and freshly grated zest are significantly more potent and aromatic than their bottled counterparts.
6. Sweetened Condensed Milk: This ingredient adds a luxurious smoothness to the filling, creating a velvety consistency that blends beautifully with the other components. It also enhances the sweetness, making it an integral part of the flavor balance.
7. Whipped Topping: To finish off the filling, whipped topping adds a light, airy quality that ensures the bars are not overly dense. It brings a delightful fluffiness that complements the creamy and tangy aspects of the dessert.
Step-by-Step Guide to Making Chilled Citrus Dream Bars
Now that we’ve explored the essential components that come together to create Chilled Citrus Dream Bars, let’s dive into the initial steps of the recipe, starting with the crust. The crust is the foundation of the bars, and getting it right is crucial for achieving that perfect texture.
Preparing the Crust
To make the crust for your Chilled Citrus Dream Bars, you will need graham cracker crumbs, melted unsalted butter, and granulated sugar. Begin by preheating your oven to 350°F (175°C). This temperature will ensure that the crust cooks evenly and achieves a light golden color.
1. Mixing the Ingredients: In a mixing bowl, combine 1 and ½ cups of graham cracker crumbs with ½ cup of granulated sugar. Mix these dry ingredients until they are evenly distributed. Then, pour in ½ cup of melted unsalted butter. Using a fork or your fingers, mix the ingredients together until the crumbs are well-coated in butter, and the mixture resembles wet sand.
2. Achieving the Right Texture: The consistency of the crust mixture is key. It should hold together when pressed but not be overly wet. If the mixture feels too dry, you can add a little more melted butter, one tablespoon at a time, until you reach the desired texture.
3. Pressing into the Pan: Once your mixture is ready, transfer it to a 9×13-inch baking dish. Use the back of a measuring cup or your hands to firmly press the mixture into an even layer across the bottom of the dish. This step is crucial; a well-pressed crust will provide a sturdy base that won’t crumble when cut.
Baking the Crust
After preparing the crust, it’s time to bake it. Place the baking dish in the preheated oven and bake for 8-10 minutes, or until the crust is lightly golden and fragrant. Keep an eye on it to prevent over-baking, as a golden crust can quickly turn dark.
Once baked, remove the crust from the oven and allow it to cool completely. This cooling step is essential; if you pour the filling over a warm crust, it can cause the layers to separate and compromise the texture of your Chilled Citrus Dream Bars.
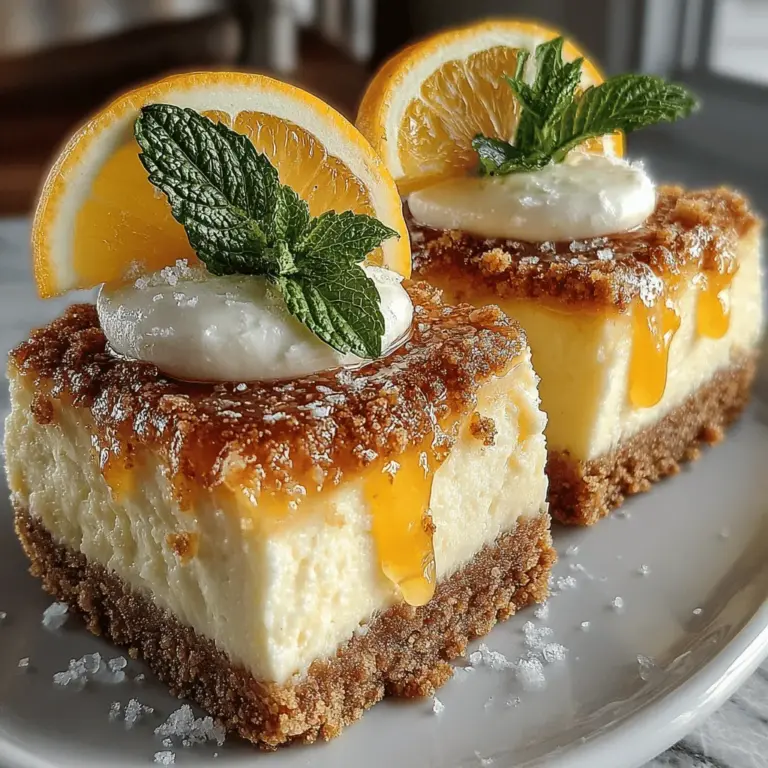
With the crust prepared and cooled, you are now ready to move on to the next steps of creating the creamy and zesty filling that will transform this base into the delightful Citrus Dream Bars you are anticipating. Stay tuned for the next part of the recipe, where we will explore how to bring together the remaining ingredients for this refreshing dessert.
{{image_2}}
Tips on Recognizing When the Crust is Perfectly Baked
Achieving the right crust for your Chilled Citrus Dream Bars is crucial for the overall texture and flavor of the dessert. Here are some key indicators to look for:
1. Color: The crust should be a light golden brown. If you notice any darker edges, this is a sign that it may be overbaked.
2. Firmness: Gently press the center of the crust with your finger. It should feel firm to the touch but not hard. If it still feels doughy, give it a few more minutes in the oven.
3. Aromas: As the crust bakes, a warm, buttery scent will fill your kitchen. If you can smell the delicious aroma of baked crust, it’s a good indicator that it has reached its ideal state.
4. Cool Before Filling: Once baked, allow the crust to cool completely before adding the filling. This cooling period will help maintain its structure and prevent the filling from seeping into the crust.
Creating the Luscious Filling
Step-by-Step Process for Preparing the Lemon Filling
The lemon filling is the star of the show in Chilled Citrus Dream Bars. Follow these steps to create a smooth and tangy filling that perfectly complements the buttery crust.
1. Gather Your Ingredients: Ensure you have all the necessary ingredients for the filling: fresh lemon juice, lemon zest, sugar, eggs, and cornstarch.
2. Juicing and Zesting: Start by zesting two lemons. This step is crucial as it infuses your filling with that vibrant citrus flavor. After zesting, juice the lemons until you have about 1/2 cup of fresh lemon juice.
3. Mixing the Ingredients: In a medium saucepan, combine the sugar and cornstarch. This mixture will help thicken your filling. Gradually whisk in the lemon juice and the zest, ensuring there are no lumps.
4. Adding Eggs: Beat three eggs in a separate bowl and slowly add them to the lemon mixture while continuously whisking. This technique prevents the eggs from scrambling when heated.
5. Cooking the Filling: Place the saucepan over medium heat and cook the mixture, stirring constantly. It should begin to thicken after about 5-7 minutes. Once it reaches a pudding-like consistency, remove it from the heat and let it cool slightly.
Emphasis on the Blending Technique to Achieve a Smooth Consistency
For an exceptionally smooth lemon filling, consider using an immersion blender or a standard blender. This step ensures that any fibrous bits from the zest are completely blended into the filling, resulting in a silky texture.
1. Blending: Pour the slightly cooled filling into a blender and pulse it for about 10-15 seconds until completely smooth. You can also do this with an immersion blender directly in the saucepan.
2. Cooling: Let the blended filling cool to room temperature before proceeding to the next step. This is essential to avoid melting the whipped topping.
Importance of Folding in the Whipped Topping Without Deflating the Mixture
To achieve a light and airy filling, you’ll need to fold in the whipped topping gently. It’s essential to maintain the volume of the whipped cream for a fluffy texture.
1. Whipping the Cream: In a separate bowl, whip 2 cups of heavy cream until stiff peaks form. This step is vital as it adds both volume and richness to your filling.
2. Folding Technique: Using a rubber spatula, scoop a portion of the whipped cream and mix it into the lemon filling to lighten it. Then, gently fold in the remaining whipped cream in batches. Be careful not to overmix, as this will deflate the whipped cream and diminish the lightness of your filling.
Assembling the Bars
Tips for Pouring and Smoothing the Filling Over the Crust
With your crust cooled and your filling ready, it’s time to assemble your Chilled Citrus Dream Bars.
1. Pouring the Filling: Carefully pour the lemon filling over the cooled crust. Start from one edge and let the filling flow across the surface, ensuring minimal disruption to the crust.
2. Smoothing the Surface: Use an offset spatula or the back of a spoon to gently spread the filling evenly across the crust. This step helps achieve a polished and professional appearance.
Importance of Even Distribution for the Final Presentation
For the best presentation, ensure that the lemon filling is evenly distributed over the crust. An uneven filling can lead to inconsistent slices and an unappealing look when cut.
1. Leveling the Filling: After smoothing, check the edges to ensure the filling meets the crust evenly. If you notice any dips or peaks, adjust them with your spatula before freezing.
Freezing and Serving
Guidelines for Freezing Time and Ensuring the Bars Set Properly
To achieve the perfect texture, the bars need to be frozen properly.
1. Freezing Time: Cover the pan with plastic wrap or aluminum foil and place it in the freezer for at least 4 hours, or until the filling is completely set. For best results, overnight freezing is recommended.
2. Checking for Doneness: The filling should be firm but not rock hard. When it’s ready, you should be able to gently press the surface without any give.
Techniques for Slicing the Bars Cleanly
Slicing your Chilled Citrus Dream Bars can be tricky if not done correctly. Here’s how to achieve perfect slices:
1. Using a Sharp Knife: Use a sharp knife dipped in hot water for clean cuts. Wipe the knife with a towel between cuts to maintain clean edges.
2. Cutting Techniques: Cut the bars into squares or rectangles, depending on your serving preference. A ruler can help if you want uniform sizes.
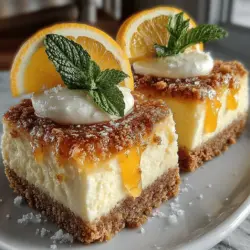
Suggestions for Garnishing with Lemon Slices and Mint for Aesthetic Appeal
For an eye-catching presentation, garnish your Chilled Citrus Dream Bars before serving.
1. Lemon Slices: Thinly slice fresh lemons and arrange them decoratively on top of the bars.
2. Mint Leaves: Add a sprig of fresh mint to each bar for a pop of color and a refreshing touch.
Presentation Ideas for Chilled Citrus Dream Bars
Suggestions for Serving Styles, Including Platter Arrangements and Garnishing Techniques
When it comes to serving your Chilled Citrus Dream Bars, presentation matters. Here are a few ideas to impress your guests:
1. Platter Arrangements: Arrange the bars on a beautiful serving platter, alternating their orientation for visual interest. You can also layer them with parchment paper between the layers for an elegant touch.
2. Garnishing Techniques: Drizzle a little extra lemon curd or a simple glaze over the top of the bars for an added touch of sweetness. Edible flowers can also elevate the presentation.
Ideas for Pairing These Bars with Complementary Beverages, Such as Iced Tea or Lemonade
To enhance the citrus experience, consider serving your Chilled Citrus Dream Bars with refreshing beverages.
1. Iced Tea: A glass of sweetened iced tea with a splash of lemon complements the tartness of the bars beautifully.
2. Lemonade: Freshly squeezed lemonade balances the sweetness of the dessert and enhances its citrus flavor.
Nutritional Information
Overview of the Nutritional Aspects of the Recipe, Including Calories, Fat Content, and Serving Size
Understanding the nutritional value of your dessert can help you enjoy it mindfully. Here’s a breakdown of the nutritional content per serving of Chilled Citrus Dream Bars (assuming 12 servings):
– Calories: Approximately 180 calories
– Total Fat: 10g
– Saturated Fat: 6g
– Cholesterol: 50mg
– Sodium: 60mg
– Total Carbohydrates: 22g
– Dietary Fiber: 1g
– Sugars: 12g
– Protein: 2g
Discussion of the Dessert’s Place in a Balanced Diet and Its Suitability for Various Occasions
Chilled Citrus Dream Bars can be a delightful addition to a balanced diet when enjoyed in moderation. Their bright flavors make them suitable for a variety of occasions, from summer picnics to holiday gatherings. Pairing them with fruit or a light salad can create a well-rounded plate, allowing you to indulge without guilt.
Conclusion
Chilled Citrus Dream Bars are a delightful treat that combines the zesty brightness of lemon with a creamy, airy filling. The buttery crust provides the perfect foundation for this refreshing dessert that is sure to impress your friends and family. Whether you whip them up for a summer gathering or as a sweet indulgence for yourself, these bars are a testament to the joy of homemade desserts.
We encourage you to try your hand at this recipe, savor the delightful flavors and textures, and share the joy of your creation. There’s nothing quite like the satisfaction of preparing a dessert that brings smiles to faces and brightens the day. Enjoy every bite of your Chilled Citrus Dream Bars!