Golden Garlic Breadsticks: An Irresistible Homemade Treat
The aroma of warm, homemade garlic breadsticks wafting through your kitchen is an experience that captivates the senses. Just imagine pulling a tray of golden-brown breadsticks from the oven, their crusts crackling slightly as they cool, and the rich scent of garlic and herbs enveloping the room. Whether served as an appetizer to accompany your favorite pasta dish, a side to elevate a comforting soup, or a delightful snack on their own, garlic breadsticks hold a special place in the hearts of many. Their versatility and flavor make them a beloved staple in numerous cuisines around the world.
In this recipe, you will discover how to create your own batch of golden garlic breadsticks that are not only delicious but also incredibly easy to prepare at home. With an emphasis on fresh ingredients and straightforward steps, this recipe is designed for both seasoned bakers and novices alike. Expect a delightful combination of buttery, garlicky goodness, complemented by a hint of herbs and a sprinkle of Parmesan cheese. Each bite promises a satisfying crunch on the outside, coupled with a soft, pillowy interior that will have you reaching for seconds—and maybe even thirds.
Understanding the Ingredients
To achieve the perfect garlic breadsticks, understanding the role of each ingredient is essential. Here’s a breakdown of what you will need:
All-Purpose Flour: The Foundation of the Breadsticks
All-purpose flour acts as the backbone of your breadsticks. Its balanced gluten content provides enough structure for the dough while ensuring a tender texture. When properly kneaded, it allows for the development of gluten strands, which help the breadsticks rise and hold their shape during baking.
Active Dry Yeast: Importance in the Rising Process
Active dry yeast is a crucial ingredient that contributes to the breadsticks’ light and airy texture. It works by fermenting the sugars in the dough and producing carbon dioxide gas, which causes the dough to rise. This fermentation process not only helps with leavening but also enhances the overall flavor of the breadsticks.
Sugar and Salt: Roles in Flavor Enhancement
Sugar is not merely a sweetener in this recipe; it also feeds the yeast, helping it to activate and rise effectively. Salt, on the other hand, is essential for flavor enhancement. It balances the sweetness of the sugar and controls the fermentation process, ensuring that your breadsticks are perfectly flavored and not overly salty.
Warm Water and Milk: Key for Activating Yeast
The right temperature for your liquid ingredients is critical for activating yeast. Warm water (around 110°F) and milk create an ideal environment for the yeast to flourish. The milk adds richness and contributes to a softer dough, while the combination of water and milk ensures that the dough remains hydrated throughout the mixing and kneading processes.
Olive Oil and Unsalted Butter: Their Roles in Flavor and Moisture
Olive oil introduces a wonderful depth of flavor and moisture to the breadsticks. It helps to keep them tender while adding a subtle richness. Unsalted butter, melted and brushed on top before serving, provides a decadent finish that complements the garlic and herbs beautifully.
Garlic and Herbs: Enhancing the Flavor Profile
Fresh garlic is the star of the show in garlic breadsticks, imparting a robust and aromatic flavor. Depending on your preference, you can adjust the amount of garlic to suit your taste. Additionally, fresh herbs such as parsley or oregano can be added to elevate the flavor profile further, providing a fresh, vibrant touch.
Parmesan Cheese: The Finishing Touch
Finally, a generous sprinkle of grated Parmesan cheese adds a savory, nutty flavor that pairs perfectly with garlic. When baked, it forms a delightful crust that adds both texture and flavor to each breadstick.
Step-by-Step Preparation
Now that you have a clear understanding of the ingredients, it’s time to dive into the preparation. Here’s a step-by-step guide to creating the perfect golden garlic breadsticks:
Activating the Yeast
Begin by activating the active dry yeast. In a small bowl, combine the warm water and a teaspoon of sugar, then sprinkle the yeast over the top. Allow it to sit for about five to ten minutes, or until it becomes frothy. This indicates that the yeast is alive and ready to work its magic in your dough.
Mixing the Dough
In a large mixing bowl, combine the all-purpose flour and salt. Once the yeast mixture is frothy, add it to the flour along with warm milk and olive oil. Using a wooden spoon or a dough whisk, mix the ingredients until they start to come together. The goal here is to combine the wet and dry ingredients effectively, ensuring that no dry flour remains.
Kneading the Dough
Once the dough has formed, transfer it to a lightly floured surface for kneading. Knead the dough for about 8 to 10 minutes, or until it becomes smooth and elastic. You should be able to stretch it without it tearing. This step is crucial, as proper kneading develops the gluten, which will give your breadsticks their characteristic chewiness.
As you knead, keep an eye on the dough’s consistency. It should be slightly tacky to the touch but not overly sticky. If necessary, add small amounts of flour to prevent sticking, but be cautious not to add too much, as this could lead to dense breadsticks.
With these initial steps completed, you’re well on your way to creating golden garlic breadsticks that are sure to impress. In the next part of the recipe, we will cover the rising process, shaping the dough, and the baking technique that will yield perfectly golden and flavorful results. Stay tuned for a delicious continuation!
{{image_2}}
First Rise
The first rise is a critical step in the bread-making process, as it allows the yeast to ferment and produce carbon dioxide. This fermentation is essential because it helps develop the flavor and texture of your breadsticks. During this time, the gluten in the dough is also strengthened, leading to a more elastic and airy final product. Once you’ve mixed your dough, cover it with a damp cloth or plastic wrap and place it in a warm, draft-free area. Let it rise for about 1 to 1.5 hours or until it has doubled in size. This is your dough’s chance to come alive!
Preparing the Garlic Butter
Creating flavorful garlic butter is a straightforward process that elevates the taste of your breadsticks. Here’s how to make it perfectly:
1. Ingredients:
– 1/2 cup unsalted butter, softened
– 5-6 cloves of fresh garlic, minced (adjust to taste)
– 2 tablespoons fresh parsley, finely chopped (optional)
– 1/2 teaspoon salt
– 1/4 teaspoon black pepper
– 1/4 teaspoon paprika (for a touch of color and flavor)
2. Mixing: In a medium bowl, combine the softened butter, minced garlic, parsley, salt, black pepper, and paprika. Using a fork or a small whisk, blend the ingredients until you have a smooth and even mixture.
3. Taste Test: Before using, taste a small amount of the garlic butter to adjust seasoning if necessary. If you prefer a stronger garlic flavor, feel free to add more minced garlic.
4. Storage: If you’re not using the garlic butter immediately, you can store it in an airtight container in the refrigerator for up to a week. Just make sure to let it soften again before using.
Shaping the Breadsticks
Shaping your breadsticks is an important step to ensure they cook evenly and have a uniform appearance. Here’s how to achieve that:
1. Divide the Dough: After the first rise, punch down the dough to release air bubbles. Turn it out onto a lightly floured surface and divide it into equal portions—typically, you can make 12 to 16 breadsticks depending on your desired size.
2. Forming the Sticks: Take a piece of dough and roll it into a long rope, about 8 to 10 inches in length. Try to keep the thickness consistent (around 1/2 inch) for even baking.
3. Placing on Baking Sheet: Line a baking sheet with parchment paper. Place the shaped breadsticks on the sheet, leaving enough space between each stick to allow for the second rise.
Second Rise
The second rise is just as important as the first. It gives the breadsticks a light, airy texture that you’ll love. After shaping, cover the breadsticks with a clean kitchen towel and let them rise for 30-45 minutes in a warm place. You’ll know they are ready to bake when they have puffed up slightly.
Baking the Breadsticks
Preheating the Oven
Preheat your oven to 375°F (190°C) while the breadsticks are completing their second rise. Proper preheating is crucial for achieving the perfect bake. An adequately heated oven ensures that the breadsticks expand quickly when placed inside, helping to create a soft interior and a beautiful golden crust.
Brushing and Baking
Once the second rise is complete, it’s time to brush on your garlic butter:
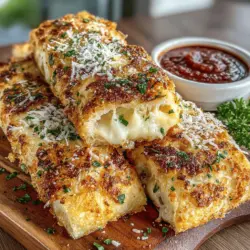
1. Brushing: Generously brush the garlic butter mixture over the breadsticks, making sure to cover every inch for maximum flavor. You can also sprinkle some grated Parmesan cheese or mozzarella on top for an extra cheesy touch.
2. Baking: Place the baking sheet in the preheated oven and bake for 12-15 minutes or until the breadsticks are golden brown and cooked through.
Visual Cues
To determine if your breadsticks are perfectly baked, look for a golden brown color and a slight crispness on the outside. You can also tap the bottom of one—if it sounds hollow, it’s a good indication that they are done.
Serving Suggestions
Presentation Ideas
When it comes to serving your golden garlic breadsticks, presentation counts. Here are a few creative ways to serve them:
– On a Rustic Board: Arrange the breadsticks on a wooden serving board, garnishing with sprigs of parsley for color.
– In a Bread Basket: Place them in a breadbasket lined with a cloth napkin to keep them warm and inviting.
– With Dips: Serve alongside small bowls of marinara sauce, olive oil, or herb-infused dips for a complete experience.
Pairing Options
Garlic breadsticks are incredibly versatile and pair well with various dishes. Here are some recommended options:
– Dips: Marinara sauce for a classic Italian touch, or a rich garlic aioli for those who love extra garlic flavor.
– Soups: They’re perfect for dipping into hearty soups like minestrone or tomato basil.
– Salads: Serve them alongside a fresh garden salad or Caesar salad for a delightful meal.
Nutritional Information
Understanding the nutritional value of your garlic breadsticks can help you enjoy them guilt-free. Here’s a brief overview:
– Serving Size: One breadstick (approximately 50-60 grams).
– Calories: About 150-200 calories per serving, depending on ingredients used.
– Nutritional Breakdown:
– Carbohydrates: 25-30 grams
– Protein: 2-4 grams
– Fat: 5-10 grams (largely from butter and cheese)
Health Considerations
While these golden garlic breadsticks are a treat, consider these alternatives for a healthier version:
– Whole Wheat Flour: Substitute all-purpose flour with whole wheat flour for added fiber.
– Low-Fat Butter: Use a low-fat spread or olive oil instead of butter to reduce calories.
– Herbs and Spices: Experiment with adding herbs like oregano or thyme for extra flavor without additional calories.
Conclusion
Making homemade golden garlic breadsticks is not only a rewarding experience but also an enjoyable one. The aroma of freshly baked breadsticks wafting through your kitchen is simply irresistible. As you bite into the warm, buttery goodness, you’ll understand why these treats are a favorite in many households.
We encourage you to try this recipe and feel free to experiment with various herbs, spices, or cheeses to create your signature version of garlic breadsticks. Whether served as an appetizer, side dish, or snack, these golden delights are sure to please anyone at your table. Enjoy the process, share with friends and family, and savor every bite of your homemade garlic breadsticks!