Dreamy Neapolitan Cake: A Slice of Nostalgia
The Dreamy Neapolitan Cake is more than just a dessert; it’s a nostalgic journey back to childhood. With its vibrant layers of chocolate, strawberry, and vanilla, this cake embodies the sweet simplicity of summer picnics and birthday parties. Each slice serves as a reminder of carefree days filled with laughter, sunshine, and indulgence. This cake is perfect for a variety of occasions, whether you are celebrating a special milestone or simply gathering with family. Not only does it offer a delightful taste experience, but its colorful presentation also makes it an eye-catching centerpiece at any gathering.
In this article, we will guide you through the step-by-step process of creating your very own Dreamy Neapolitan Cake, from selecting the right ingredients to the final assembly. We’ll delve into the essential components that make this cake truly special, ensuring you have all the tools and knowledge needed to replicate this beloved dessert in your own kitchen.
Understanding the Ingredients for the Dreamy Neapolitan Cake
To create the Dreamy Neapolitan Cake, it is crucial to understand the ingredients that contribute to its flavor and texture. Each component plays a vital role, ensuring that the cake is not only delicious but also moist and inviting.
Exploring the Base Ingredients
The foundation of any great cake lies in its base ingredients. For the Dreamy Neapolitan Cake, you will need:
– All-Purpose Flour: This versatile ingredient provides the structure needed for the cake. It balances the moisture from other ingredients, resulting in a tender crumb.
– Granulated Sugar: Not only does sugar sweeten the cake, but it also aids in the creaming process with butter, helping to create a light and airy texture.
– Unsalted Butter: Butter adds richness and flavor. Using unsalted allows you to control the salt content, ensuring the perfect balance in the cake.
– Whole Milk: Milk adds moisture to the batter, contributing to a soft and tender texture. It also helps dissolve the sugar and incorporate air into the batter.
– Eggs: Eggs are essential for binding the ingredients together. They provide moisture and richness and also help the cake rise, giving it a light texture.
– Baking Powder: This leavening agent is crucial for achieving the right rise in your cake. It reacts with the wet ingredients to produce carbon dioxide, which helps the cake to rise in the oven.
Diving into Flavor Enhancers
While the base ingredients are critical, flavor enhancers take the Dreamy Neapolitan Cake to the next level:
– Vanilla Extract: The addition of vanilla extract enhances the overall flavor of the cake. It provides a warm, aromatic undertone that complements the other flavors beautifully.
– Cocoa Powder: For the chocolate layer, unsweetened cocoa powder adds depth and richness. It balances the sweetness of the other layers, creating a harmonious flavor profile.
– Food Coloring (Optional): If you want to achieve a vibrant pink hue for the strawberry layer, food coloring can be used. While natural strawberry puree can also be an option, food coloring ensures a consistent and vivid color that stands out.
With a solid understanding of the ingredients, you are now ready to embark on the journey of creating the Dreamy Neapolitan Cake. Each step will guide you through the process, ensuring that you achieve the perfect balance of flavors and textures.
Step-by-Step Guide to Creating the Dreamy Neapolitan Cake
Preparing the Cake Batter
To start, preheat your oven to 350°F (175°C). This ensures that your cake bakes evenly from the moment it goes in. While the oven is heating, prepare your cake pans. Grease three 9-inch round cake pans with butter or non-stick cooking spray, and line the bottoms with parchment paper to prevent sticking.
Next, it’s time to cream the butter and sugar together. In a large mixing bowl, combine the softened unsalted butter and granulated sugar. Using an electric mixer, beat them together on medium speed until the mixture is light and fluffy. This process incorporates air into the batter, which contributes to a lighter texture in your finished cake. Aim for a pale yellow color and a fluffy consistency, which usually takes about 3-5 minutes.
Once the butter and sugar are well combined, it’s time to add the eggs. Crack in your eggs one at a time, mixing well after each addition. This step is crucial as it allows the eggs to fully incorporate into the batter, ensuring an even distribution of moisture and binding agents.
After the eggs are added, you will alternate adding the dry and wet ingredients to the mixture. Start by sifting together the all-purpose flour, baking powder, and cocoa powder (for the chocolate layer) in a separate bowl. Gradually add this dry mixture to the creamed butter and sugar while simultaneously pouring in the whole milk. Mix on low speed until just combined. Be careful not to overmix; this can lead to a dense cake texture.
Dividing the Batter for Flavorful Layers
Now that your cake batter is ready, it’s time to divide it into three equal parts for the distinct flavor layers. You can use a kitchen scale for accuracy or simply eyeball it. A good rule of thumb is to divide the batter into thirds, but ensure you reserve one part for the chocolate layer.
In one bowl, add cocoa powder to create the chocolate layer. Mix until fully incorporated. In the second bowl, you will add strawberry flavoring or puree, depending on your preference. If you opt for food coloring, add a few drops to achieve the desired pink hue. The last part of the batter will remain plain for the vanilla layer.
Baking the Layers to Perfection
With your batter divided and flavored, it’s time to bake. Pour the chocolate batter into one prepared cake pan, the strawberry batter into another, and the vanilla batter into the last. Place all three pans in the preheated oven and bake for approximately 25-30 minutes, or until a toothpick inserted into the center comes out clean.
While the cakes are baking, keep an eye on the time. If you notice the tops are browning too quickly, you can cover them loosely with aluminum foil to prevent over-browning. Once baked, remove the pans from the oven and allow the cakes to cool in the pans for about 10 minutes. Then, carefully turn them out onto wire racks to cool completely.
Cooling is a crucial step, as it ensures that the cake layers are stable and won’t crumble when you frost them. Once cooled, you’ll be ready to move on to the delicious task of crafting the perfect frosting and assembling your Dreamy Neapolitan Cake.
Stay tuned for the next part where we’ll cover how to create the ideal frosting and assemble your cake for a stunning presentation.
{{image_2}}
Mixing the Base Frosting
Creating the ideal base frosting for your Dreamy Neapolitan Cake involves mastering a fluffy buttercream that serves as the perfect canvas for your cake layers. Here is how to achieve that light and airy texture:
Essential Steps for Achieving a Fluffy Buttercream
1. Start with Room Temperature Ingredients: Ensure your unsalted butter is softened to room temperature. This allows for better incorporation of air, resulting in a fluffier frosting.
2. Beat the Butter: Using a stand mixer or hand mixer, beat the butter on medium speed until it becomes creamy and pale, about 2-3 minutes. This step is crucial as it helps to aerate the butter.
3. Gradually Add Sugar: Slowly add in the powdered sugar, about one cup at a time, while continuing to mix on low speed. This prevents a sugar cloud from forming and allows for better incorporation.
4. Incorporate Heavy Cream and Vanilla Extract: Once the sugar is fully mixed in, pour in the heavy cream and vanilla extract. Beat the mixture on high speed for another 2-3 minutes until it is fluffy and has reached your desired consistency. If the frosting is too thick, add a little more cream; if too thin, add more powdered sugar.
The Balance Between Powdered Sugar, Heavy Cream, and Vanilla Extract
The right balance between powdered sugar, heavy cream, and vanilla extract is essential for flavor and texture. Generally, a ratio of 4 cups of powdered sugar to 1/4 cup of heavy cream and 1 teaspoon of vanilla extract works well. Adjust these quantities based on your personal preference for sweetness and creaminess.
Creating Distinct Flavors
To make your Neapolitan Cake a true standout, offering three distinct flavors of frosting is key: chocolate, strawberry, and vanilla.
How to Make Chocolate Frosting with Cocoa Powder
1. Basic Chocolate Frosting Recipe: Start with the base buttercream you created. To transform it into chocolate frosting, simply add in 1/2 cup of unsweetened cocoa powder after mixing in the heavy cream and vanilla.
2. Mix Thoroughly: Continue mixing until the cocoa powder is fully incorporated, and the frosting has a rich chocolate color and flavor. Adjust the consistency with a little more cream if needed.
Adding Strawberry Puree for a Fruity Twist
1. Prepare Strawberry Puree: Blend fresh or frozen strawberries until smooth. Strain the puree through a fine mesh sieve to remove seeds for a smoother texture.
2. Incorporate into Frosting: Fold in approximately 1/4 cup of the strawberry puree into one-third of your base buttercream. Mix until well combined, adjusting the sweetness with more powdered sugar if necessary.
Keeping the Vanilla Frosting Simple Yet Delicious
1. Vanilla Frosting: For the remaining third of the buttercream, keep it simple. Just use the basic buttercream recipe, ensuring a robust vanilla flavor by adding an extra teaspoon of vanilla extract.
2. Final Adjustments: Taste and adjust the vanilla frosting, ensuring it is sweet enough to balance the other flavors but not overpowering.
Assembling the Dreamy Neapolitan Cake
Layering your cake correctly is essential for both visual appeal and flavor integration.
Techniques for Stacking the Cake Layers Securely
1. Leveling Your Cake Layers: Use a serrated knife to trim the tops of your cooled cake layers, ensuring they’re flat. This not only makes stacking easier but also prevents the cake from leaning.
2. Use a Cake Board: Place the first layer of cake on a sturdy cake board or serving plate. This provides stability and makes it easier to move your cake later.
Tips for Spreading Frosting Evenly Between Layers
1. Use an Offset Spatula: This tool is ideal for spreading frosting evenly across the surface of each cake layer. Apply a generous amount of frosting using the spatula, and then gently spread it outwards to the edges.
2. Layering Technique: Alternate the flavors as you layer the cake. For example, start with vanilla, followed by chocolate, then strawberry, and repeat until all layers are stacked.
Final Frosting Application for a Smooth Finish
1. Crumb Coat: Apply a thin layer of frosting all over the cake to seal in crumbs, then refrigerate for about 30 minutes. This step helps to achieve a clean finish.
2. Final Frosting Layer: After chilling, apply a thicker layer of frosting to the top and sides of the cake. Use a bench scraper or offset spatula to smooth out the frosting for a beautiful finish.
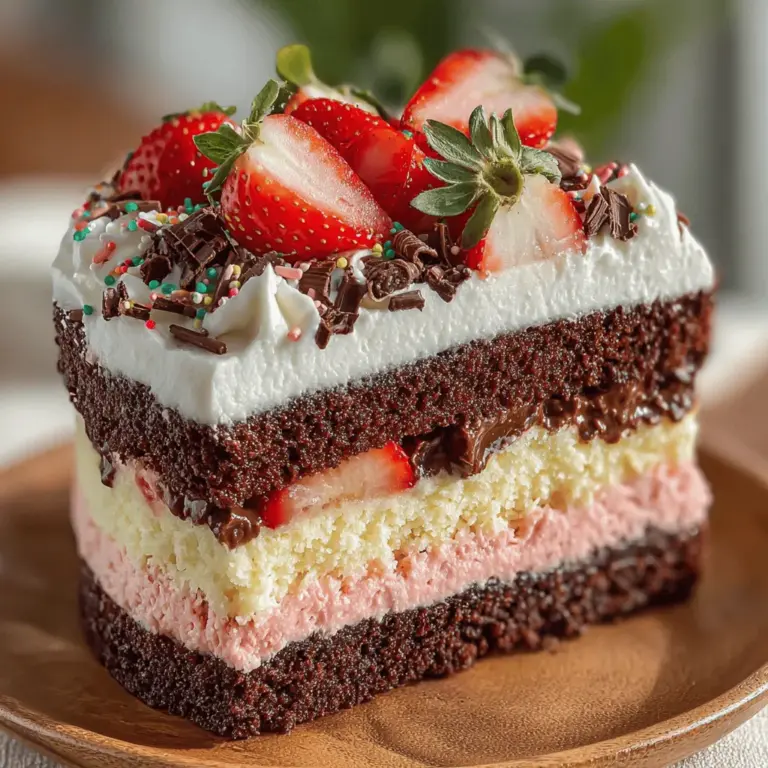
Decorating the Cake: Making It a Showstopper
Once your cake is assembled and frosted, it’s time to decorate and make it visually appealing.
Choosing Decorative Elements
1. Fresh Fruits and Chocolate Shavings: Top your cake with fresh strawberries, banana slices, or raspberries for a pop of color and freshness. You can also add chocolate shavings or curls for an elegant touch.
2. Colorful Sprinkles: Sprinkles can add a festive flair. Consider using rainbow sprinkles for a playful look or chocolate sprinkles to complement the chocolate frosting.
The Impact of Colorful Sprinkles on Presentation
Sprinkles not only enhance the visual appeal but also add texture and a fun element. Scatter them on top of the cake and down the sides for a delightful contrast against the smooth frosting.
How to Create an Inviting and Festive Look
Consider arranging the fruits in a spiral or a pattern, and use a piping bag to add decorative swirls of frosting around the base or on top. This will elevate the cake’s presentation and make it a true centerpiece.
Serving Suggestions for the Dreamy Neapolitan Cake
To enhance the enjoyment of your Dreamy Neapolitan Cake, consider these serving suggestions.
Pairing the Cake with Ice Cream: Flavor Combinations to Consider
Serving your cake with a scoop of ice cream can take it to the next level. Vanilla ice cream pairs well with all three cake flavors, while chocolate or strawberry ice cream complements the respective frosting flavors beautifully. Consider a scoop of each for a delightful combination.
Creating a Beautiful Dessert Platter for Gatherings
When hosting a gathering, present your cake on a decorative cake stand surrounded by an assortment of desserts. Include cookies, brownies, and fruit for a colorful dessert platter that invites guests to indulge.
The Joy of Sharing This Cake with Family and Friends
Baking is about creating memories, and sharing your Dreamy Neapolitan Cake with loved ones is the perfect opportunity. Slice the cake into generous pieces and enjoy it together, reminiscing about childhood favorites and savoring each delicious bite.
Conclusion: The Joy of Baking and Sharing
The Dreamy Neapolitan Cake is not just a treat; it’s an experience filled with joy and nostalgia. By following the steps outlined in this article, you can create a stunning dessert that delights both the eyes and the taste buds. Whether it’s for a special occasion or a simple gathering, this cake brings happiness to every table, making it a cherished recipe in your baking repertoire. Enjoy the process of baking and the sweet moments shared over each slice of this delicious cake.
