Frozen Yogurt Cereal Milk Squares: A Sweet Nostalgic Treat
Imagine a dessert that captures the essence of your childhood breakfasts, transforming the familiar taste of cereal milk into a delightful frozen treat. The Frozen Yogurt Cereal Milk Squares are just that—a creamy, sweet indulgence that evokes nostalgia while introducing a modern twist to your dessert repertoire. With a texture reminiscent of a soft, creamy yogurt and a flavor profile that dances between sweet vanilla and the beloved cereal notes, these squares offer a delightful escape from the ordinary.
The trend of incorporating cereal flavors into desserts has gained immense popularity in recent years. From cereal-flavored milkshakes to cereal-infused ice creams, the nostalgia of childhood cereals is being celebrated in innovative ways. Frozen Yogurt Cereal Milk Squares stand out in this trend, providing a perfect blend of convenience and creativity. They are not only easy to prepare but also a joy to share with family and friends, making them an ideal treat for gatherings or a special snack to enjoy at home.
Understanding the Ingredients
To create these delectable Frozen Yogurt Cereal Milk Squares, it’s essential to understand the role of each ingredient in the recipe. This will not only enhance your culinary skills but also allow you to appreciate the flavors that come together in this unique dessert.
– Whole Milk: The foundation of any good cereal milk is whole milk. It provides the creaminess and richness that elevates the overall texture of the squares. Using whole milk is crucial as it retains a higher fat content, giving the final product a luscious mouthfeel that skim or low-fat milk simply cannot replicate.
– Granulated Sugar: Sugar is not just a sweetener; it plays a vital role in balancing the flavors in this recipe. It enhances the sweetness of the yogurt while complementing the subtle notes of the cereal. The right amount of sugar will ensure that your squares are perfectly sweet without being overly cloying.
– Vanilla Extract: A splash of vanilla extract adds depth to the flavor profile of the yogurt mixture. Its aromatic qualities enhance the overall taste, bringing a warm, inviting essence that harmonizes beautifully with the other ingredients.
– Greek Yogurt: Using Greek yogurt is a game changer for this recipe. It adds a rich creaminess and a boost of protein, making the squares not only delicious but also a bit more nutritious. The tanginess of Greek yogurt also balances the sweetness, creating a well-rounded flavor.
– Cereal Choices: One of the most exciting aspects of this recipe is the opportunity for customization. The type of cereal you choose can dramatically alter the flavor of your squares. From classic options like Cornflakes and Fruity Pebbles to more contemporary choices like granola or even chocolate cereals, the possibilities are endless. Don’t be afraid to experiment with your favorites, as each cereal will impart its unique character to the dessert.
– Optional Toppings: To elevate your Frozen Yogurt Cereal Milk Squares, consider adding optional toppings. Crushed cereal sprinkled on top can provide an extra crunch, while fresh fruits like berries or sliced bananas can introduce a burst of freshness. For those with a sweet tooth, a drizzle of honey or chocolate sauce can enhance the visual appeal and flavor complexity of the squares.
Step-by-Step Guide to Making Frozen Yogurt Cereal Milk Squares
Now that you have a solid understanding of the ingredients, let’s dive into the step-by-step process of creating these delightful Frozen Yogurt Cereal Milk Squares. Each step is designed to be straightforward, ensuring that you can easily replicate this treat in your own kitchen.
1. Creating the Cereal Milk:
Start by measuring out your whole milk and pouring it into a mixing bowl. To sweeten the milk, dissolve granulated sugar into it thoroughly. This initial step is crucial, as it ensures that the sugar is evenly distributed throughout the milk, resulting in a well-balanced sweetness in the final product.
2. Infusing with Cereal:
Once you have your sweetened milk, it’s time to infuse it with cereal. Add your chosen cereal to the milk, ensuring it is fully submerged. Allow the mixture to sit for about 30 minutes. This soaking period is essential, as it allows the flavors from the cereal to be extracted fully into the milk, creating that nostalgic cereal milk flavor that will define your squares.
3. Straining the Cereal Milk:
After the soaking period, it’s time to strain the cereal milk to achieve a smooth texture. Using a fine-mesh sieve or cheesecloth, pour the mixture through to separate the liquid from the cereal. Gently press the cereal to extract any remaining milk without forcing any solids through the sieve. This step is crucial to ensure that your squares have a creamy, smooth consistency without any graininess.
As you progress through these steps, the anticipation builds for the final product—deliciously creamy Frozen Yogurt Cereal Milk Squares that capture the essence of childhood in every bite. Stay tuned for the next part of this article, where we’ll continue to guide you through the remaining steps to bring this delightful recipe to life.
{{image_2}}
Creating the perfect Frozen Yogurt Cereal Milk Squares is not just about gathering ingredients; it’s an art form that combines flavors, textures, and creativity. In this section, we’ll dive into the detailed steps to make these delightful squares, along with tips to personalize your creation and enhance your experience.
Mixing with Yogurt
To achieve that perfect creamy consistency, start by choosing a high-quality yogurt. Greek yogurt is an excellent choice because of its thick texture and tangy flavor, which complements the sweetness of cereal milk. When mixing, it’s crucial to incorporate the cereal milk gradually into the yogurt.
1. Combine Ingredients: In a large mixing bowl, pour in your cereal milk. Add in the yogurt and a splash of vanilla extract for flavor enhancement.
2. Whisk Together: Use a whisk to blend the yogurt and cereal milk until smooth. Make sure there are no lumps, as this will ensure a uniform texture throughout the squares. The goal is to achieve a creamy and homogenous mixture that is both rich and enjoyable.
Preparing the Pan
Lining your baking dish with parchment paper is a crucial step that cannot be overlooked. This simple act ensures that your frozen yogurt squares come out easily without sticking to the pan.
1. Choose the Right Size: A 9×9-inch baking pan works well for this recipe, giving you ample space to pour in your mixture.
2. Line with Parchment: Cut a piece of parchment paper large enough to cover the bottom and extend up the sides of the pan. This will create a sling effect, making the removal of the frozen block effortless after freezing.
Adding the Cereal Squares
Now comes the fun part—incorporating the cereal! This step requires a gentle touch to maintain the integrity of the cereal while ensuring even distribution throughout the yogurt mixture.
1. Fold, Don’t Stir: Add your cereal to the yogurt mixture. Using a spatula, employ a folding technique rather than stirring. This means gently lifting the mixture from the bottom and folding it over the cereal. Repeat this motion until the cereal is evenly coated but still maintains its crunchiness.
2. Ensure Even Distribution: The folding technique helps to evenly distribute the cereal without breaking it down. This step is essential for achieving the perfect balance of yogurt and cereal in each square.
Freezing Process
Freezing is where the magic happens! Patience is key to ensuring your squares reach the right texture.
1. Pour and Smooth: Pour the yogurt and cereal mixture into your prepared pan. Use a spatula to smooth the top, ensuring an even surface for freezing.
2. Adequate Freezing Time: Cover the pan with plastic wrap and place it in the freezer. It’s essential to freeze the mixture for at least 4-6 hours or overnight for the best results. To check if the squares are ready, simply insert a toothpick into the center; if it comes out clean, your squares are set and ready to be cut.
Cutting into Squares
Once your Frozen Yogurt Cereal Milk Squares are fully frozen, it’s time to cut them into serving pieces.
1. Remove from Pan: Lift the parchment paper out of the pan to remove the frozen block easily.
2. Cutting Technique: Using a sharp knife, cut the frozen block into even squares. For best results, run the knife under hot water before making each cut to ensure clean edges. This technique prevents the yogurt from sticking to the knife, resulting in perfectly shaped squares.
Serving Suggestions
Now that you have your beautifully cut squares, it’s time to serve and enjoy!
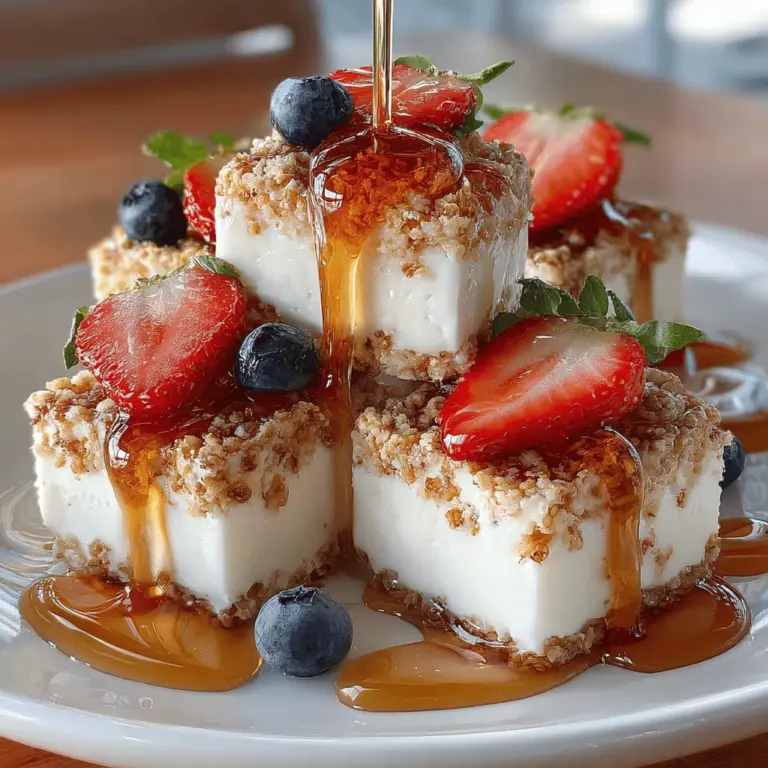
1. Classic Presentation: Serve the squares chilled on a platter. You can garnish them with fresh fruit, such as berries or banana slices, for added color and flavor.
2. Drizzle or Dip: Consider drizzling honey or chocolate sauce over the top for an extra sweet treat. Alternatively, serve with a side of fruit puree for dipping.
3. Perfect for Any Occasion: These squares are a hit at summer gatherings, picnics, or as a satisfying snack after a workout. Their refreshing taste makes them a delightful treat on warm days.
The Joy of Customization
One of the best parts of making Frozen Yogurt Cereal Milk Squares is the opportunity for personalization. Here’s how you can make this recipe uniquely yours:
Exploring Flavor Variations
– Flavored Yogurts: Experiment with different yogurt flavors. Strawberry or peach yogurt can infuse your squares with a fruity twist, while vanilla or coconut can enhance the creamy base.
– Spices and Extracts: For a more complex flavor profile, consider adding spices like cinnamon or nutmeg, or extracts such as almond or maple.
Cereal Combinations
– Mix It Up: Don’t limit yourself to just one type of cereal. Combine your favorites for a unique mix. Consider using granola, puffed rice, or even chocolate-flavored cereals for a decadent touch.
– Texture Play: Different cereals will yield various textures, from crunchy to chewy. Find combinations that work for you.
Healthier Alternatives
– Non-Dairy Options: If you have dietary restrictions, substitute regular yogurt with plant-based options like almond, coconut, or soy yogurt.
– Sweetener Swaps: To reduce sugar, consider using natural sweeteners like agave nectar or maple syrup, or opt for unsweetened yogurt and adjust the sweetness based on your taste preference.
Nutritional Information
Understanding the nutritional benefits of your ingredients can enhance your enjoyment of the Frozen Yogurt Cereal Milk Squares.
Caloric Breakdown
Each square provides a delightful balance of nutrients while remaining a delicious treat. Based on a standard serving size, here’s a rough estimate of the caloric content:
– Calories per Square: Approximately 80-100 calories, depending on the specific ingredients used.
Health Benefits
– Greek Yogurt: Rich in protein and probiotics, Greek yogurt supports digestive health and can aid in muscle recovery.
– Whole Grains: The inclusion of whole grains from cereals provides fiber, which is essential for maintaining digestive health and promoting satiety.
Conclusion
Making Frozen Yogurt Cereal Milk Squares is not only simple but also incredibly rewarding. The combination of creamy yogurt and crunchy cereal creates a delightful treat that can be enjoyed at any time. With the flexibility to customize flavors and ingredients, this recipe is perfect for gatherings, snacks, or a refreshing dessert on a warm day.
We encourage you to try your hand at making these squares and share your experiences. Whether you stick to the classic recipe or explore new flavors and combinations, the joy of creating and indulging in these delicious treats is sure to foster a sense of community and creativity in your kitchen. Enjoy your culinary adventure!
