Introduction
Banana cream pie is a beloved classic that evokes nostalgic memories of family gatherings, summer picnics, and warm evenings spent with loved ones. This rich, creamy dessert, typically encased in a flaky crust and topped with fluffy whipped cream, often takes center stage at celebrations and casual get-togethers alike. However, the traditional preparation of banana cream pie can be quite labor-intensive, involving baking time and intricate layering techniques that might deter even the most enthusiastic home cooks.
Enter the Delightful No-Bake Banana Cream Pie Cups! This innovative recipe captures the same luscious flavors and textures of the classic pie but streamlines the process, making it accessible to anyone, regardless of their culinary expertise. These individual dessert cups are perfect for parties, potlucks, or simply satisfying your sweet tooth at home. Not only are they easy to prepare, but they are also visually stunning, making them a delightful addition to any dessert table. In this article, we will guide you through the key ingredients, provide step-by-step instructions for making these delectable banana cream pie cups, and share tips for achieving the ultimate creamy dessert that will impress your family and friends.
Understanding the Ingredients
To create the best No-Bake Banana Cream Pie Cups, it’s essential to understand the role of each ingredient. Here’s a closer look at the key components that come together to form this delightful dessert:
Ripe Bananas
The star of the show in our no-bake cups is undoubtedly the ripe banana. These tropical fruits not only bring a natural sweetness to the dish but also contribute a creamy texture that is essential for the filling. When selecting bananas for this recipe, opt for those that are just past their peak ripeness—these will yield the best flavor and consistency. The natural sugars in ripe bananas enhance the overall taste and make the dessert beautifully sweet without the need for excessive added sugar.
Heavy Whipping Cream
Heavy whipping cream is crucial in creating the light and airy whipped topping that complements the rich banana pudding. When whipped to perfection, it adds a luxurious texture that elevates each bite. This ingredient is not just for the topping; it also plays a role in the pudding base, helping to create a creamy consistency that marries well with the bananas.
Vanilla Wafer Cookies
To achieve the perfect crunch and sweetness, we use vanilla wafer cookies as the base for our banana cream pie cups. These cookies provide a delightful contrast to the creamy filling and are integral in adding flavor depth to the dessert. Their crumbly texture also makes them an excellent vehicle for layering, ensuring that each cup is packed with deliciousness.
Cornstarch
As a thickening agent, cornstarch is essential for achieving that classic pudding-like texture in our dessert. It binds the ingredients together and ensures that the filling has the right consistency, allowing it to hold up well in the individual cups. When combined with the other ingredients, cornstarch helps create a smooth, creamy base that beautifully envelops the banana slices.
Granulated and Powdered Sugar
To balance the flavors, we incorporate both granulated and powdered sugar into the recipe. Granulated sugar provides sweetness to the pudding mixture, while powdered sugar is typically used in the whipped cream topping. The combination of these sugars ensures that the dessert is perfectly sweetened without being overly cloying.
Preparing the Pudding Mixture
Creating a smooth and delicious pudding base is a crucial step in making your No-Bake Banana Cream Pie Cups. Follow these guidelines to get it just right:
Combining Dry Ingredients
Start by whisking together the dry ingredients—cornstarch, granulated sugar, and a pinch of salt—in a medium saucepan. This step is important because it ensures that the cornstarch is evenly distributed, preventing any lumps from forming when it’s combined with the milk. The salt enhances the flavors and balances the sweetness, allowing the banana flavor to shine through.
Cooking Technique
Next, gradually add milk to the dry mixture, stirring constantly to combine. Place the saucepan over medium heat and continue to stir as the mixture heats up. It’s important to be patient during this step; the key to achieving the right consistency lies in carefully monitoring the heat and stirring continuously. As the mixture thickens, you’ll notice it starting to bubble gently. Once it reaches a pudding-like consistency—typically after about 5 to 10 minutes of cooking—remove it from the heat. Allow the pudding to cool slightly before proceeding to the next step.
Incorporating Bananas into the Pudding
Now that you have your creamy pudding base, it’s time to incorporate the bananas, which will enhance both the flavor and texture of your dessert.
Selecting the Perfect Banana
When it comes to choosing bananas for your No-Bake Banana Cream Pie Cups, look for bananas that are ripe but not overly spotty. Ideal bananas will have a few brown specks, indicating they are sweet and flavorful, yet still firm enough to hold their shape when sliced. This balance is crucial, as you want the banana slices to maintain their integrity within the pudding and not turn mushy.
Mixing Method
Once you have sliced the bananas, gently fold them into the cooled pudding mixture. Use a spatula to carefully incorporate the banana slices, ensuring they are evenly distributed without breaking them apart too much. This step is essential, as it allows the banana flavor to infuse throughout the pudding while maintaining the beautiful texture of the slices.
With the bananas now included in the pudding base, you’re well on your way to assembling your No-Bake Banana Cream Pie Cups. The next step will be to whip up the cream, which will serve as the luscious topping that ties everything together. Stay tuned for the continuation of this delightful recipe!
{{image_2}}
Creating the Perfect Whipped Cream for That Light Topping
When it comes to banana cream pie, the whipped cream topping is essential for achieving that signature lightness and creamy texture. Here’s how to master it.
Choosing the Right Cream
For the best results, heavy whipping cream is your go-to choice. Unlike lighter creams, heavy whipping cream contains a higher fat content (around 36-40%), which not only helps the cream whip up beautifully but also maintains its structure when folded into the pudding mixture. This stability is crucial for ensuring that your whipped cream remains fluffy and holds its shape when served.
Whipping Technique
Achieving the perfect whipped cream involves more than just mixing; it requires technique. Start by chilling your mixing bowl and beaters in the freezer for about 10 to 15 minutes before whipping. Cold equipment helps the cream whip faster and more efficiently.
1. Start Slow: Begin whipping the cream on low speed to incorporate air without splattering. Gradually increase the speed after a minute or two.
2. Watch for Soft Peaks: Whip until you reach soft peaks, which means that the cream will hold a shape but still has a slight droop at the tips. This stage is crucial; over-whipping can lead to a grainy texture or even butter. If you see peaks that stand tall and stiff, you’ve gone too far.
Combining Pudding and Whipped Cream
To achieve that delightful fluffy texture in your banana cream pie cups, the way you incorporate the whipped cream into the pudding mixture is key.
Folding Method
The folding method is essential for maintaining the lightness of the whipped cream. Here’s how to do it correctly:
1. Prepare the Pudding: First, ensure that your pudding mixture has cooled completely. This step is essential because adding whipped cream to a warm pudding can cause it to deflate.
2. Gently Fold: Use a spatula to scoop a dollop of whipped cream into the pudding base. Stir gently to combine, using a folding motion rather than stirring. This technique helps retain the airiness of the whipped cream.
3. Repeat: Once the initial dollop is integrated, continue to add the whipped cream in batches, folding gently until fully combined. This careful approach will result in a light, airy filling for your cups.
Layering the Cups
Now that you have your banana pudding and whipped cream mixture ready, it’s time to assemble your delightful cups.
Base Layer
Start with the crushed vanilla wafers as the base layer. These cookies provide a satisfying crunch that contrasts beautifully with the creamy filling.
1. Crush the Cookies: Place the vanilla wafers in a zip-top bag and crush them into fine crumbs using a rolling pin or your hands. Aim for a consistency that resembles sand, which will help them adhere better in the cups.
2. Layering: Add a generous tablespoon of crushed cookies to the bottom of each serving cup, pressing gently to form a solid base.
Layering Technique
Creating even layers not only enhances the flavor but also improves the presentation of your banana cream pie cups.
1. First Layer: Spoon a layer of the banana pudding mixture on top of the crushed cookies, filling the cup about halfway.
2. Repeat: Add another layer of crushed vanilla wafers, followed by another layer of pudding. Continue this process until you reach the top of the cup, finishing with pudding for a neat appearance.
3. Final Touch: Aim for at least two layers of each component to create a beautiful visual effect that showcases the layers.
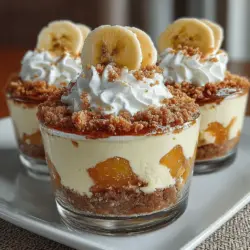
Topping and Garnishing
Presentation matters, especially for a dessert as delightful as banana cream pie cups.
Whipped Cream Topping
Top each cup with a generous dollop of the freshly whipped cream. Use a piping bag fitted with a star tip for a decorative touch, or simply spoon it on for a more casual look.
Garnishing with Fresh Bananas
To enhance both the flavor and the visual appeal of the dessert, slice fresh bananas and gently arrange them on top of the whipped cream. This not only adds a pop of color but also reinforces the banana flavor.
1. Banana Slices: Use ripe, but firm bananas to prevent browning. You can also sprinkle a little lemon juice on the banana slices if you’re preparing them in advance.
2. Final Touches: Consider adding a light dusting of crushed vanilla wafer crumbs on top for an extra crunch, or a sprinkle of cinnamon for a flavor twist.
Chilling and Serving
Chilling your banana cream pie cups is a crucial step that enhances the overall flavor and texture.
Recommended Chilling Time
Ideally, you should let the assembled cups chill in the refrigerator for at least 2 to 4 hours before serving. This resting time allows the flavors to meld beautifully and the pudding to set, ensuring a perfect bite every time.
Serving Suggestions
When it comes to serving, presentation can elevate the entire dessert experience.
1. Decorative Platters: Arrange your cups on a decorative platter for a stunning display at gatherings or parties.
2. Colorful Bowls: Alternatively, use colorful bowls or individual dessert cups to add a touch of vibrancy to your table setting. Consider using clear cups to showcase the beautiful layers of your dessert.
Conclusion
Delightful No-Bake Banana Cream Pie Cups are a fantastic way to enjoy the classic flavors of banana cream pie without the hassle of baking. With their creamy texture, sweet banana flavor, and crunchy cookie layers, these cups are sure to impress your family and friends. They are perfect for special occasions, casual gatherings, or simply as a sweet treat to satisfy your cravings.
This easy recipe encapsulates the comforting flavors of banana cream pie in a fun and convenient format that everyone will love. So gather your ingredients, follow these steps, and indulge in a delightful dessert that showcases the beloved banana cream pie in a fresh, innovative way. Your friends and family will surely ask for seconds!