Guilt-Free Peanut Butter Cups: A Delicious Indulgence Without the Guilt
In a world increasingly aware of health and wellness, the concept of guilt-free treats has emerged as a beacon of hope for dessert lovers everywhere. These delectable morsels provide the joy of indulgence while allowing you to maintain a healthy lifestyle. The “Guilt-Free Peanut Butter Cups” recipe is a perfect embodiment of this trend, combining rich flavors with wholesome ingredients to create a dessert that satisfies your sweet tooth without derailing your dietary goals.
The appeal of these peanut butter cups lies not only in their delightful taste but also in their nutritional profile. Made with natural ingredients, this recipe offers a healthier alternative to traditional candy bars, which are often laden with refined sugars, artificial additives, and unhealthy fats. Instead, you can enjoy the creamy goodness of peanut butter and the rich, satisfying taste of dark chocolate—with none of the guilt.
Understanding Guilt-Free Treats
But what exactly does “guilt-free” mean in the context of desserts? At its core, it refers to treats that are made with wholesome, natural ingredients that provide satisfaction without excessive calories or harmful additives. Guilt-free desserts often prioritize nutritional value, so you can enjoy a sweet treat while still being mindful of your health.
This balance between enjoyment and health consciousness is crucial. It’s about finding ways to indulge your cravings without compromising your well-being. By opting for natural ingredients over heavily processed options, you can create desserts that are not only delicious but also nourishing. The Guilt-Free Peanut Butter Cups exemplify this philosophy, allowing you to relish a classic treat while supporting your health goals.
Ingredients Overview
Understanding the ingredients used in the Guilt-Free Peanut Butter Cups is key to appreciating their health benefits and flavor profiles. Each component plays a vital role in creating a delicious and wholesome dessert.
1. Natural Peanut Butter: The star of this recipe, natural peanut butter is a powerhouse of nutrition. It’s packed with protein, healthy fats, and essential vitamins and minerals. When selecting peanut butter, look for options that contain only peanuts and perhaps a pinch of salt, avoiding those with added sugars or hydrogenated oils. You can choose between smooth and crunchy varieties, depending on your texture preference.
2. Honey vs. Maple Syrup: Both honey and maple syrup serve as natural sweeteners in this recipe. Honey offers a unique floral sweetness and is rich in antioxidants, while maple syrup provides a distinct flavor profile and contains essential minerals such as manganese and zinc. When selecting a sweetener, consider which flavor complements your palate best while keeping in mind their health benefits.
3. Vanilla Extract: Just a splash of pure vanilla extract elevates the flavor of peanut butter cups, adding warmth and depth. Vanilla is not only aromatic but also boasts antioxidant properties, making it a delightful addition to your guilt-free treats.
4. Fine Sea Salt: A pinch of fine sea salt may seem minor, but it plays a crucial role in enhancing the overall taste of the peanut butter cups. Salt balances sweetness and intensifies flavors, creating a more satisfying dessert experience.
5. Dark Chocolate (70% Cacao or Higher): Dark chocolate is a healthier alternative to milk chocolate, rich in antioxidants and lower in sugar. Choosing chocolate with at least 70% cacao provides a more intense chocolate flavor and offers various health benefits, including improved heart health and cognitive function.
6. Coconut Oil: This ingredient aids in melting the chocolate smoothly and adds a subtle flavor. Coconut oil is also known for its medium-chain triglycerides (MCTs), which can provide quick energy and support metabolism.
7. Optional Topping—Sea Salt: Adding a sprinkle of sea salt on top of the finished cups not only enhances the visual appeal but also amplifies the flavor. The contrast between sweet and salty is a classic combination that makes each bite even more enjoyable.
Preparation Steps Explained
Now that we have a clear understanding of the ingredients, let’s dive into the preparation steps for making these Guilt-Free Peanut Butter Cups.
Preparing the Cupcake Liners:
The first step in creating these delightful treats involves preparing your cupcake liners. For easy removal and a polished presentation, it’s best to use silicone or paper liners. Silicone liners are reusable and provide a non-stick surface, making them a convenient choice. If you opt for paper liners, ensure they are of good quality to prevent sticking.
When selecting the right liners, consider the size of the cups you want to make. Standard cupcake liners work well for regular-sized peanut butter cups, while mini liners can be used for bite-sized versions.
Whipping Up the Peanut Butter Filling:
Once your liners are ready, the next step is to whip up the luscious peanut butter filling. Start by combining the natural peanut butter, your chosen sweetener (honey or maple syrup), vanilla extract, and a pinch of sea salt in a mixing bowl. The key to achieving the perfect consistency is to blend the ingredients until they are smooth and creamy. If you prefer a bit of texture, you can opt for crunchy peanut butter, which adds delightful bits of peanuts to the filling.
This filling is what sets your Guilt-Free Peanut Butter Cups apart; it should be rich, flavorful, and perfectly sweetened to your taste. Adjust the sweetness as needed, keeping in mind that the dark chocolate coating will also contribute to the overall flavor profile.
As you prepare for the next steps, get ready to indulge in the wonderful combination of flavors and textures that these Guilt-Free Peanut Butter Cups have to offer. Stay tuned for the continuation of this recipe, where we will cover the essential steps for assembling and coating your treats, ensuring they turn out perfectly every time.
{{image_2}}
Creating your own Guilt-Free Peanut Butter Cups at home is not only satisfying but also allows you to indulge without the guilt typically associated with traditional sweets. This section will guide you through the step-by-step process of making these delightful treats, including crafting the creamy filling, melting the chocolate, assembling the cups, and storing them properly. We will also explore the nutritional benefits of this wholesome dessert, ensuring you feel good about every bite.
Step-by-Step Process for Creating a Creamy Filling
The filling for your peanut butter cups is crucial, as it provides that rich, creamy texture that pairs perfectly with the chocolate. Here’s how to create it:
1. Ingredients for the Filling:
– 1 cup natural peanut butter (smooth or crunchy, depending on preference)
– 1-2 tablespoons maple syrup or honey (adjust for sweetness)
– 1 teaspoon vanilla extract
– A pinch of salt (to enhance flavor)
2. Mixing the Filling:
– In a mixing bowl, combine the peanut butter, maple syrup or honey, vanilla extract, and salt.
– Use a hand mixer or a whisk to thoroughly blend the ingredients until smooth and creamy. The goal is to achieve a uniform consistency without any lumps. If the mixture is too thick, you can gradually add a teaspoon of almond milk or water until you reach your desired creamy texture.
3. Consistency and Flavor Balancing:
– Taste the mixture to ensure the flavor is balanced. You want a blend of sweetness and saltiness that complements the chocolate. If you prefer a sweeter filling, add more syrup or honey in small increments. Just remember, the sweetness will contrast with the dark chocolate, so aim for a harmonious balance.
Melting the Chocolate
Melting chocolate may seem simple, but it requires attention to avoid burning and ensure a smooth texture. Here are two effective methods: the stove and the microwave.
Different Methods for Melting Chocolate: Stove vs. Microwave
1. Stovetop Method:
– Use a double boiler by placing a heatproof bowl over a pot of simmering water. This gentle heat prevents direct contact with the flame, reducing the risk of burning.
– Break your chocolate into small, even pieces and place them in the bowl. Stir frequently until the chocolate is completely melted and smooth.
2. Microwave Method:
– Place chopped chocolate in a microwave-safe bowl. Microwave in 30-second intervals at medium power, stirring after each interval. This method is quick but requires careful monitoring to avoid overheating.
– Once melted, stir until completely smooth. If the chocolate appears thick or clumpy, add a teaspoon of coconut oil to help achieve a silky texture.
Essential Tips for Preventing Burning and Achieving a Smooth Texture
– Always use high-quality chocolate for the best flavor and texture. Dark chocolate (70% cocoa or higher) is ideal for a guilt-free option.
– Avoid getting any water in the chocolate, as moisture can cause it to seize up and become unusable.
– Stirring the chocolate while melting helps distribute the heat evenly, preventing hot spots that can lead to burning.
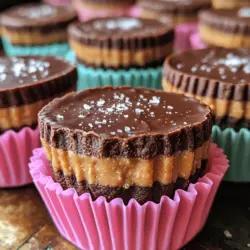
Assembling the Peanut Butter Cups
Now that you have your creamy filling and melted chocolate ready, it’s time to assemble your peanut butter cups.
Detailed Instructions on Layering Chocolate and Peanut Butter
1. Prepare the Molds:
– Use silicone muffin cups or a mini muffin tin lined with paper liners. This will make it easier to remove the cups once they are set.
2. Creating the Chocolate Base:
– Pour a small amount (about a tablespoon) of melted chocolate into the bottom of each mold. Use a spoon or brush to spread it evenly across the base and slightly up the sides, creating a thin layer. This layer should be enough to hold the filling without spilling.
3. Adding the Peanut Butter Filling:
– Once the chocolate base has set slightly (you can chill it in the freezer for a few minutes), add a generous dollop (about a tablespoon) of the peanut butter filling into the center of each cup. Use the back of a spoon to flatten and spread it evenly. Ensure that the filling does not touch the edges to avoid leakage.
4. Topping with More Chocolate:
– Cover the peanut butter filling with another layer of melted chocolate, ensuring it completely encases the filling. Use a spoon to smooth the top and make sure the filling is well sealed.
5. Chilling:
– Place the filled molds in the refrigerator for at least 30 minutes or until the chocolate has completely hardened.
Chilling and Serving
Chilling your peanut butter cups is crucial not just for setting the chocolate, but also for enhancing the flavors and textures.
Importance of Proper Chilling for Texture and Flavor Enhancement
Allowing the cups to chill properly ensures that the chocolate hardens into a satisfying shell while the filling remains creamy. This contrast in texture is what makes these peanut butter cups so enjoyable.
Recommendations for Presentation and Serving Suggestions
– Once the cups are set, gently remove them from the molds. They can be served as is, or you can add a decorative touch by placing them on a beautiful platter.
– Consider dusting the tops with a sprinkle of sea salt or a light drizzle of melted chocolate for an extra touch of elegance.
Ideas for Garnishing
– Place the peanut butter cups on a bed of crushed nuts or cocoa powder for an attractive presentation.
– You can also serve them alongside fresh berries or slices of banana for an appealing color contrast and added flavor.
Storage Suggestions
To maintain the freshness of your Guilt-Free Peanut Butter Cups, proper storage is essential.
Best Practices for Storing Leftovers to Maintain Freshness
– Store your peanut butter cups in an airtight container at room temperature for up to one week. If you live in a warm climate, consider keeping them in the fridge to prevent melting.
– For longer storage, refrigerate them in an airtight container, which can extend their shelf life to about two weeks.
Tips on Freezing for Extended Enjoyment
– If you want to keep your peanut butter cups for even longer, freeze them. Simply place the cups in a single layer on a baking sheet and freeze until solid, then transfer them to a freezer-safe container.
– When you’re ready to enjoy them, let them thaw in the refrigerator for a few hours or at room temperature for a quick treat.
Nutritional Benefits of Guilt-Free Peanut Butter Cups
One of the best parts about making your own peanut butter cups is knowing exactly what goes into them. Here’s a closer look at the nutritional profile of the main ingredients.
Analysis of the Nutritional Profile of the Main Ingredients
– Peanut Butter: A great source of protein, healthy fats, and essential vitamins like E and B6, peanut butter provides energy and helps maintain muscle mass.
– Dark Chocolate: Rich in antioxidants and nutrients, dark chocolate can improve heart health and offer mood-boosting benefits. It also contains minerals like iron, magnesium, and zinc.
Health Benefits of Peanut Butter: Protein, Healthy Fats, and Vitamins
Peanut butter is not just delicious; it’s also packed with health benefits. The protein helps keep you feeling full, while the healthy fats can support heart health and provide a source of sustained energy. Additionally, the vitamins and minerals found in peanut butter contribute to overall wellness, making it a great addition to your diet.
Dark Chocolate’s Role in a Balanced Diet and Its Health Advantages
Dark chocolate, when consumed in moderation, can be a part of a balanced diet. It’s known to lower blood pressure, improve blood flow, and reduce the risk of heart disease. Its rich flavor and texture make it a perfect match for the creamy peanut butter, ensuring you enjoy every bite without compromising your health.
Conclusion
These Guilt-Free Peanut Butter Cups not only satisfy your sweet tooth but also provide a nutritious option for dessert lovers. With a combination of creamy peanut butter and rich dark chocolate, you can indulge in a treat that is both delicious and health-conscious.
As you create these delightful cups, don’t hesitate to experiment with variations. Try adding chopped nuts, a sprinkle of cinnamon, or even a touch of coconut for a twist on the classic. The joy of making healthier dessert choices lies in the creativity you bring to the kitchen.
So, gather your ingredients, follow the steps, and enjoy the process of creating these Guilt-Free Peanut Butter Cups. You’ll find that making healthier choices doesn’t mean sacrificing flavor or satisfaction. Enjoy your guilt-free indulgence!