Crispy Delight Garlic Breadsticks Recipe
Garlic breadsticks are a beloved staple in many cuisines around the globe, celebrated for their irresistible aroma and delightful taste. Whether served as an appetizer, a side dish, or a snack, these warm, buttery delights have a way of elevating any meal. Their popularity transcends borders, from the classic Italian breadsticks enjoyed with pasta to American variations served in pizzerias. The comforting familiarity of garlic breadsticks makes them a go-to choice for family gatherings, casual dinners, or any occasion that calls for a touch of warmth and flavor.
When it comes to homemade garlic breadsticks, the satisfaction of crafting them from scratch is unparalleled. The aroma that fills your kitchen as they bake is enough to make anyone’s mouth water. Among the various recipes available, the Crispy Delight Garlic Breadsticks stand out as a perfect addition to any meal. This recipe combines the classic flavors of garlic and herbs with a crispy exterior and a soft, chewy interior, ensuring that each bite is a delightful experience. Whether paired with marinara sauce, served alongside a fresh salad, or enjoyed on their own, these garlic breadsticks are sure to impress.
The Magic of Garlic Breadsticks
Garlic breadsticks have a rich history that reflects their cultural significance. Originating from Italy, breadsticks—known as “grissini”—are a traditional accompaniment to many Italian meals. These slender, crispy treats were first created in the 14th century as a means to utilize leftover bread dough. Over time, variations emerged, with garlic becoming a popular addition due to its flavor and health benefits. Today, garlic breadsticks are not just a culinary delight; they represent the warmth of home-cooked meals and the joy of sharing food with loved ones.
Garlic itself is a key ingredient in this recipe, playing a significant role in culinary traditions worldwide. Renowned for its robust flavor and numerous health benefits, garlic is often celebrated for its potential to boost the immune system, improve heart health, and add depth to dishes. The inclusion of garlic in breadsticks not only enhances their flavor but also contributes to their nutritional profile, making them a more wholesome option compared to many other snack foods.
The ingredients used in this Crispy Delight Garlic Breadsticks recipe come together to create a balanced and flavorful treat. All-purpose flour serves as the foundation for the dough, providing the necessary structure and texture. Instant yeast is pivotal in creating a light and airy breadstick, while granulated sugar helps with fermentation and enhances the overall flavor. Fine sea salt is essential in bread-making for its ability to enhance taste and strengthen the dough.
In addition to these basics, olive oil is a wonderful ingredient that not only adds moisture but also contributes a rich flavor. Extra-virgin olive oil is particularly beneficial, as it contains healthy fats and antioxidants. The garlic in the recipe offers both health benefits and a robust flavor profile, while dried oregano and red pepper flakes provide aromatic notes that elevate the dish. Finally, the addition of Parmesan cheese adds a savory, cheesy flavor that perfectly complements the garlic, and fresh parsley serves as a garnish that brightens up the dish.
Ingredients Breakdown
To prepare Crispy Delight Garlic Breadsticks, you will need the following ingredients:
– All-Purpose Flour: This versatile flour is crucial for creating the perfect dough. It provides the right balance of protein and starch necessary for structure and chewiness in your breadsticks.
– Instant Yeast: Unlike active dry yeast, instant yeast works quickly and doesn’t require proofing in warm water. It allows your dough to rise effectively, contributing to the light and airy texture of the breadsticks.
– Granulated Sugar: Sugar plays a dual role in this recipe. It enhances the flavor of the breadsticks and feeds the yeast, promoting fermentation, which is essential for the dough’s rise.
– Fine Sea Salt: Salt is a vital ingredient in bread-making. It enhances the flavor and controls yeast fermentation, ensuring that the dough rises evenly and produces a desirable texture.
– Warm Water: The ideal temperature for activating yeast is crucial for the success of your breadsticks. Warm water helps to dissolve the yeast and sugar, creating an environment where the yeast can thrive.
– Olive Oil: Extra-virgin olive oil adds a depth of flavor and moisture to the dough. Its healthy fats contribute to the overall texture, making the breadsticks crispy on the outside and tender on the inside.
– Garlic: Fresh garlic is the star of this recipe, infusing each breadstick with its unmistakable flavor and offering various health benefits, including anti-inflammatory properties and immune support.
– Dried Oregano and Red Pepper Flakes: These ingredients provide aromatic notes and a touch of heat that complement the garlic. They enhance the overall flavor profile, making the breadsticks more enticing.
– Parmesan Cheese: This aged cheese adds a savory, umami flavor to the breadsticks, enhancing their taste and making them even more irresistible.
– Fresh Parsley: Used as a garnish, fresh parsley not only adds a pop of color but also a hint of freshness that balances the richness of the breadsticks.
Step-by-Step Instructions for Crispy Delight Garlic Breadsticks
Preparing the Dough
The first step in making Crispy Delight Garlic Breadsticks is preparing the dough. Begin by combining all the dry ingredients in a mixing bowl. This includes the all-purpose flour, instant yeast, granulated sugar, and fine sea salt. Mixing these ingredients thoroughly ensures that the yeast and salt are evenly distributed throughout the flour, which is essential for consistent results.
Next, make a well in the center of the dry ingredients and pour in the warm water and olive oil. It’s important to use water that is warm but not too hot, as temperatures above 120°F can kill the yeast. The ideal temperature is around 110°F. Gently mix the ingredients together with a wooden spoon or your hands until a shaggy dough forms.
Once the dough starts coming together, transfer it to a lightly floured surface for kneading. Kneading is a critical process in bread-making, as it develops gluten, which gives the bread its structure and elasticity. To knead the dough, push it down and away from you with the heel of your hand, then fold it over and turn it a quarter turn. Repeat this process for about 8-10 minutes until the dough is smooth and elastic. If the dough is too sticky, sprinkle a little more flour as needed, but be careful not to add too much, as this can lead to dense breadsticks.
As you knead, you will notice the dough becoming more pliable and less sticky. The goal is to achieve a dough that is soft and slightly tacky to the touch but not overly sticky. This step is crucial; the right texture will ensure that your garlic breadsticks turn out perfectly crispy on the outside and soft on the inside.
Now that your dough is prepared and kneaded to perfection, it’s time to let it rise. Place the kneaded dough in a lightly greased bowl, cover it with a clean kitchen towel or plastic wrap, and allow it to rise in a warm, draft-free environment for about 1 to 1.5 hours or until it has doubled in size. This rising period is essential for developing the flavor and texture of the breadsticks, so be patient and let the magic happen.
Stay tuned for the next section, where we will continue with the shaping and baking of your Crispy Delight Garlic Breadsticks, guiding you through the final steps to achieve that perfect golden-brown finish.
{{image_2}}
First Rise
The first rise is a crucial step in bread-making that significantly affects the flavor and texture of your garlic breadsticks. Allowing the dough to proof helps develop the gluten structure, leading to a light and airy texture while enhancing the flavors from the yeast. During this time, the yeast ferments the sugars in the dough, producing carbon dioxide, which causes the dough to expand.
Let your dough rest in a warm, draft-free area for about 1 to 2 hours, or until it has doubled in size. Cover the bowl with a damp cloth or plastic wrap to keep moisture in and prevent the surface from drying out. This step is essential, not just for the fluffiness of the breadsticks but also for the deep, rich flavors that develop from the fermentation process.
Making the Garlic Oil
Garlic oil is the star ingredient that takes your breadsticks from ordinary to extraordinary. To make garlic oil, simply combine high-quality olive oil with minced garlic. For the best flavor infusion, gently heat the oil in a saucepan over low heat. This method allows the garlic to release its aromatic oils without burning, which can impart a bitter taste.
Tips on Maximizing Garlic Flavor Infusion
– Use Fresh Garlic: Freshly minced garlic provides a more robust flavor than pre-minced or jarred options.
– Infuse Over Low Heat: Keep the temperature low to avoid frying the garlic. This slow infusion process allows the flavor to meld seamlessly with the oil.
– Add Herbs: Consider adding fresh or dried herbs such as rosemary or thyme to the oil during the infusion to enhance the flavor profile.
How to Adjust the Garlic Oil Mixture for Personal Preferences
Everyone has different tastes when it comes to garlic. If you prefer a milder flavor, reduce the amount of garlic or infuse the oil for a shorter period. For a bolder taste, increase the garlic or let it infuse longer. You can also experiment with adding a pinch of red pepper flakes for a spicy kick or a sprig of rosemary for a more herbal note.
Shaping the Breadsticks
Once your dough has risen, it’s time to shape your breadsticks. Start by gently deflating the dough on a lightly floured surface. Divide it into equal portions, about 12 pieces for standard-sized breadsticks.
Techniques for Cutting Dough into Even Strips for Uniform Cooking
– Use a Bench Scraper: This tool is perfect for cutting dough cleanly without squishing it.
– Measure for Consistency: Weighing each piece can ensure uniformity, helping them bake evenly.
– Roll or Stretch: Gently roll each piece into a long strip, approximately 12 inches long. Be careful not to overwork the dough, as this can lead to tough breadsticks.
Second Rise
After shaping the breadsticks, you’ll want to let them rise again for about 30 minutes. This second rise is crucial as it contributes to the final texture. The dough relaxes once more, allowing the gluten to develop further, which results in a lighter, more tender breadstick.
Cover the shaped breadsticks with a clean kitchen towel while they rise. This prevents them from drying out and ensures they remain soft during baking.
Preheating the Oven
Preheat your oven to 425°F (220°C). Getting the oven temperature just right is essential for achieving that desired crispy exterior. A hot oven will help the breadsticks rise quickly in the first few moments of baking, creating a perfect crust.
Adding Garlic Oil and Baking
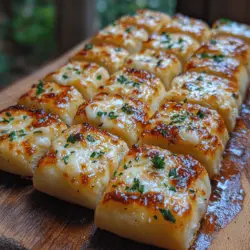
Once the breadsticks have completed their second rise, it’s time to brush them with your homemade garlic oil. Use a pastry brush to apply a generous layer of oil, ensuring that every inch of the surface is covered. This not only adds flavor but also contributes to a beautifully golden color.
Techniques for Brushing Oil and Sprinkling Cheese Evenly
– Use a Light Hand: Avoid soaking the breadsticks in oil; a light brushing is sufficient to coat them.
– Even Distribution of Cheese: If you’re using cheese, sprinkle it evenly over the brushed oil to prevent clumping, ensuring every bite is flavorful.
Signs to Look for to Know When Breadsticks Are Perfectly Baked
Keep an eye on the breadsticks as they bake. They should turn a lovely golden brown and have a crispy crust while remaining soft inside. The aroma of garlic and baked bread will fill your kitchen, making it hard to resist. Typically, they take about 12 to 15 minutes to bake.
Garnishing and Serving
Once your garlic breadsticks are out of the oven, consider garnishing them with a sprinkle of fresh parsley or additional herbs for a pop of color and flavor. Serve them warm alongside marinara sauce, ranch dressing, or your favorite dipping sauce.
Suggestions for Serving Options and Pairings with Sauces
– Marinara Sauce: A classic pairing that complements the garlic flavor beautifully.
– Creamy Ranch: For a twist, serve with ranch dressing for a creamy contrast.
– Herbed Butter: Mix softened butter with herbs and a touch of garlic for a rich topping.
Tips for Achieving Perfect Breadsticks
Achieving the perfect garlic breadsticks requires attention to detail. Here are some tips to consider:
– Common Mistakes and How to Avoid Them:
– Overworking the dough can lead to tough breadsticks. Be gentle when handling it.
– Skipping the second rise may result in dense breadsticks.
– Importance of Using Quality Ingredients for Best Results: Quality flour, fresh garlic, and good olive oil make a noticeable difference in flavor and texture.
– Variations on the Recipe:
– Add grated Parmesan or cheddar for cheesy garlic breadsticks.
– Incorporate herbs like basil or oregano for extra flavor.
– Try a sprinkle of everything bagel seasoning for a unique twist.
Nutritional Information
Each garlic breadstick contains approximately 150 calories, with 5 grams of protein, 4 grams of fat, and 25 grams of carbohydrates.
Health Considerations
– Gluten: This recipe is not gluten-free; however, you can substitute a gluten-free flour blend to cater to those with gluten sensitivities.
– Dairy: If you prefer a dairy-free option, omit cheese or use dairy-free substitutes.
Conclusion
Making your own garlic breadsticks is a delightful experience that fills your home with inviting aromas and results in a scrumptious treat. The joy of pulling apart warm, crispy breadsticks is unmatched, especially when shared with family and friends.
Try out this recipe, and you’ll soon find yourself reaching for it time and again. Homemade garlic breadsticks not only elevate any meal but also bring a sense of satisfaction that store-bought options simply can’t match. So gather your ingredients, roll up your sleeves, and enjoy the rewarding process of creating these crispy delights. Your taste buds will thank you!