Feta cheese has surged in popularity in recent years, becoming a staple ingredient in kitchens around the globe. Its tangy, salty flavor adds a delightful punch to a wide array of dishes, from salads to pastas, and even as a topping for savory pastries. One of the most exciting ways to enjoy feta is in the form of crispy baked feta crust cubes—a simple yet impressive appetizer that is perfect for gatherings, parties, or a cozy night in. These delightful cubes boast a crunchy exterior that gives way to the creamy, rich interior of the feta, creating a harmonious blend of flavors and textures that will leave your guests asking for more.
Understanding Feta Cheese
Feta cheese has its roots deeply embedded in Greek cuisine, where its production dates back thousands of years. Traditionally made from sheep’s milk or a blend of sheep’s and goat’s milk, feta is characterized by its crumbly texture and tangy flavor. The cheese is aged in brine, which not only contributes to its unique taste but also helps preserve it, making it a versatile ingredient that can be enjoyed in various forms.
The flavor profile of feta is distinctively salty and slightly tangy, with a creamy mouthfeel that complements a wide range of dishes. It works beautifully in salads, lending a refreshing contrast to crisp vegetables, and can be used in baked dishes to add depth and richness. Additionally, feta cheese is an excellent source of calcium, protein, and beneficial probiotics, making it a nutritious addition to your diet. Incorporating feta into your meals not only enhances flavor but also boosts the nutritional value of your dishes.
Ingredients Breakdown
To create the irresistible crispy baked feta crust cubes, you will need a few key ingredients that work together to deliver a delightful culinary experience. Here’s a breakdown of what you’ll need:
– Feta Cheese: The star of the dish, feta provides a creamy texture and tangy flavor. It’s essential to choose high-quality feta for the best results, preferably from a reputable source.
– Panko Breadcrumbs: Unlike regular breadcrumbs, panko is lighter and flakier, resulting in an extra crispy crust when baked. The unique texture of panko allows for maximum crunch, making it an ideal choice for this recipe.
– Fresh Herbs: Fresh herbs such as oregano, thyme, or basil elevate the flavor of the feta cubes. Using fresh herbs instead of dried ones gives a vibrant taste and aroma that beautifully complements the cheese.
– Garlic Powder: A sprinkle of garlic powder adds depth and savory notes to the dish, enhancing the overall flavor profile.
– Olive Oil: A drizzle of high-quality olive oil not only helps the breadcrumbs adhere to the feta but also contributes richness and promotes even browning during baking.
– Salt and Pepper: These essential seasonings enhance the flavors of the dish, ensuring the feta is perfectly seasoned and delicious.
With these ingredients in hand, you’re well on your way to creating a dish that is both visually appealing and wonderfully flavorful.
Step-by-Step Guide to Making Crispy Baked Feta Crust Cubes
Now that you have a clear understanding of the ingredients, let’s dive into the preparation process for these crispy baked feta crust cubes. Follow these steps for a successful appetizer that will impress your family and friends.
Prepping the Oven and Baking Sheet
Before you begin assembling your ingredients, it’s crucial to prepare your oven for baking. Preheat your oven to 400°F (200°C). This temperature is ideal for achieving a golden, crispy crust while ensuring the feta cheese warms up nicely without becoming overly soft.
While the oven is heating, prepare your baking sheet. Line it with parchment paper to prevent the feta from sticking and to make cleanup a breeze. The parchment paper will also help achieve a crispier bottom for the cheese cubes, as it allows hot air to circulate around them during baking.
Slicing the Feta Cheese
The next step is to slice the feta cheese into uniform cubes. To do this, remove the feta from its packaging and drain any excess brine. Use a sharp knife to cut the feta into cubes, aiming for about 1-inch pieces. Uniformity in size is key; this not only ensures even cooking but also provides a pleasing presentation.
The size of the cubes can affect the texture and overall experience of the dish. Smaller cubes might become too dry during baking, while larger ones may not cook through adequately. Aiming for 1-inch pieces strikes the perfect balance, allowing for a crispy exterior while retaining the creamy center that makes feta so delightful.
With the feta prepared and the oven ready, you’re now set to coat the cubes in the flavorful panko mixture and bake them to perfection. Stay tuned for the next part of this article, where we’ll delve into the exciting process of coating the feta and the final baking steps that will transform these ingredients into a mouthwatering treat.
{{image_2}}
Setting Up the Dipping Stations
To create the perfect crispy baked feta crust cubes, setting up your dipping stations is critical. Begin by gathering three shallow bowls to hold your coatings: one for flour, one for beaten eggs, and one for breadcrumbs.
The Importance of Seasoning Each Layer
Seasoning is an essential step that often gets overlooked but is crucial for maximizing flavor. In the flour bowl, mix in a pinch of salt and pepper, along with other spices such as garlic powder or paprika to add depth. For the egg mixture, you can whisk in herbs like oregano or thyme, which will infuse the feta with aromatic flavors. Finally, in the breadcrumb bowl, consider adding grated Parmesan cheese or additional spices to enhance the crunch and flavor profile. This multi-layered approach to seasoning ensures that every bite of your crispy baked feta is bursting with taste.
Coating the Feta
Once your dipping stations are ready, it’s time to coat the feta. Begin by cutting the feta cheese into cubes, approximately 1-inch thick. This size allows for even cooking and the perfect balance of creamy texture and crispy exterior.
The Coating Process
Start by taking a piece of feta and gently rolling it in the flour, ensuring it’s fully covered. This initial layer helps the egg adhere better. Next, dip the floured feta into the egg wash, allowing any excess to drip off. Then, move the feta to the breadcrumb bowl, pressing down firmly to ensure a generous coating. This step is crucial; pressing the breadcrumbs will help them cling to the feta during baking, creating that desired crispy texture. Repeat the process for all the feta cubes, ensuring each one is thoroughly coated.
Baking the Feta
After coating, it’s time to bake your feta cubes to crispy perfection. Preheat your oven to 375°F (190°C). Line a baking sheet with parchment paper for easy cleanup and to prevent sticking.
Optimal Baking Time and Temperature
Place the coated feta cubes on the prepared baking sheet, ensuring they are spaced apart to allow for even cooking. Bake the feta for about 20-25 minutes or until they turn golden brown and crispy on the outside. The baking time may vary slightly depending on your oven, so keep an eye on them to prevent over-browning.
Enhancing Crispiness with Olive Oil
Before placing the feta in the oven, lightly spray or drizzle the cubes with olive oil. This step is essential as it helps to further crisp up the exterior, giving you that perfect golden finish while enhancing the flavor. The oil creates a barrier that promotes browning and prevents the breadcrumbs from becoming soggy.
Serving Suggestions
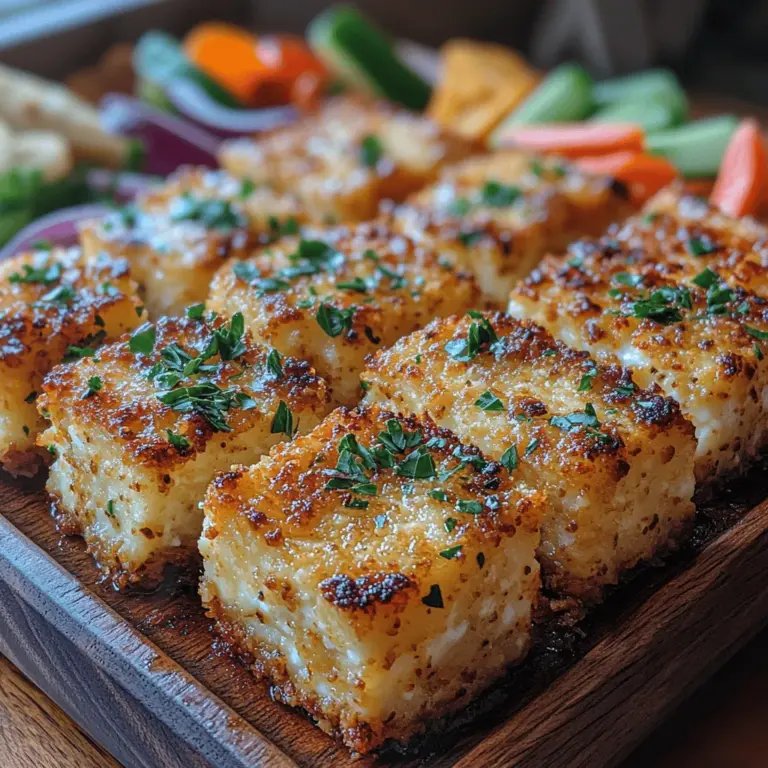
Crispy baked feta crust cubes are incredibly versatile and can be served in various ways. Here are some delightful accompaniments to elevate your dish:
1. Fresh Vegetables: Pair your baked feta with a platter of fresh, crunchy vegetables. Think cucumber slices, cherry tomatoes, and bell pepper strips for a refreshing contrast.
2. Pita Chips: Serve the feta cubes with pita chips for a satisfying crunch. The combination of creamy, salty feta and crispy chips is simply irresistible.
3. Dipping Sauces: Create an array of dipping sauces to complement the flavors of the feta. A tangy tzatziki, a spicy harissa dip, or even a simple balsamic glaze can enhance the overall experience.
4. Creative Presentation: For gatherings or parties, consider skewering the feta cubes with fresh herbs or serving them in small, elegant cups with dipping sauces at the bottom. This not only makes for a beautiful presentation but also allows guests to enjoy the dish easily.
Nutritional Information
Understanding the nutritional content of your crispy baked feta is essential, especially if you’re serving it at a health-conscious gathering. Each serving of baked feta cubes typically contains approximately:
– Calories: 150-200 (depending on the oil and coating used)
– Protein: 6-8 grams (thanks to the feta cheese)
– Carbohydrates: 10-15 grams
– Fat: 10-15 grams (primarily from olive oil and feta)
Health Benefits of the Ingredients
Feta cheese is a great source of protein and calcium, making it a healthy choice when enjoyed in moderation. Whole-grain panko breadcrumbs add fiber to the dish, promoting digestive health. Additionally, using olive oil not only enhances flavor but also provides heart-healthy fats. By incorporating fresh vegetables or whole-grain accompaniments, you can further increase the nutritional value of your appetizer.
Storage and Reheating
If you happen to have leftovers (which is rare!), proper storage will help maintain the texture and flavor of your crispy baked feta. Allow the cubes to cool completely before transferring them to an airtight container. Store them in the refrigerator for up to 3 days.
Reheating Methods
To reheat and preserve the crispy texture, avoid using the microwave, as it can make the breadcrumbs soggy. Instead, preheat your oven to 350°F (175°C) and place the feta cubes on a baking sheet. Heat them for about 10 minutes or until warmed through and crispy again. Alternatively, you can use an air fryer for quick reheating, which will help to restore the crunchy exterior.
Conclusion
Crispy baked feta crust cubes are not just a delightful appetizer; they are a versatile dish that can be enjoyed at any gathering, from casual get-togethers to elegant parties. The layers of flavor achieved through careful seasoning, combined with the satisfying crunch of the coating, make these cubes a standout dish.
By following the steps outlined above, you can create a crowd-pleasing appetizer that showcases the wonderful flavors of feta cheese. Whether served with fresh vegetables, pita chips, or tantalizing dipping sauces, these crispy baked feta cubes are sure to impress your guests and become a staple in your recipe repertoire. So gather your ingredients, set up your dipping stations, and enjoy the delicious combination of flavors and textures that this dish has to offer.