Introduction
If you’re on the hunt for a dessert that combines nostalgia with simplicity, look no further than S’more Bliss Bars. These delectable no-bake treats encapsulate the beloved flavors of classic s’mores while presenting them in a convenient, easy-to-eat form. Perfect for summer barbecues, family gatherings, or even just a cozy night in, S’more Bliss Bars are a delightful choice that caters to both the young and the young-at-heart.
The appeal of S’more Bliss Bars lies not only in their rich, gooey flavor profile but also in their effortless preparation. With no oven required, these bars are accessible to bakers of all skill levels, making them an ideal project for kids, busy parents, or anyone looking to satisfy their sweet tooth without the fuss. The combination of crunchy graham cracker crust, luscious chocolate, and chewy marshmallows ensures that each bite is a blissful experience reminiscent of campfire evenings spent roasting marshmallows.
The Allure of S’mores
The history of s’mores dates back to the early 20th century, with the earliest recorded recipe appearing in the 1927 publication “Tramping and Trailing with the Girl Scouts.” Since then, s’mores have become a staple of outdoor gatherings, evoking fond memories of campfire stories and the warm glow of flames. The classic combination of graham crackers, chocolate, and toasted marshmallows has captured the hearts and taste buds of countless individuals, making s’mores synonymous with summer fun.
S’more Bliss Bars brilliantly capture the essence of traditional s’mores while offering a creative twist. These bars encapsulate the rich and gooey goodness of the original treat, minus the need for a campfire. By transforming the beloved flavors into a no-bake dessert, they provide a versatile option that can be enjoyed year-round. Whether you’re hosting a birthday party, a holiday gathering, or simply craving a sweet indulgence, S’more Bliss Bars have you covered.
The versatility of s’mores-inspired desserts is another aspect of their allure. From cookies to cheesecakes, the flavors of s’mores can be adapted into a variety of treats, allowing for endless creativity in the kitchen. S’more Bliss Bars stand out among these variations due to their simplicity and rich texture, making them a go-to recipe for those who want to indulge their s’mores cravings without the hassle.
Ingredients Breakdown
Creating the perfect S’more Bliss Bars starts with understanding the essential ingredients that contribute to their delightful flavor and texture. Each component plays a crucial role in building the bars’ decadent profile.
Graham Cracker Crumbs
The foundation of S’more Bliss Bars begins with graham cracker crumbs. These crumbs provide the base flavor and texture, mimicking the classic graham cracker layer of traditional s’mores. Their subtle sweetness and crunch create a sturdy yet tender crust that holds the bars together.
Unsweetened Cocoa Powder
To enhance the richness and depth of flavor, unsweetened cocoa powder is included in the recipe. It adds a chocolatey undertone that complements the semisweet chocolate chips, making each bite even more indulgent. Cocoa powder also contributes to the overall texture, ensuring the bars are not overly sweet.
Powdered Sugar
Powdered sugar is another critical ingredient in S’more Bliss Bars. It not only adds sweetness but also acts as a binding agent, helping to hold the mixture together. The fine texture of powdered sugar ensures a smooth consistency, creating a delightful mouthfeel in the finished product.
Unsalted Butter
To achieve the ideal moistness and richness, unsalted butter is used in the recipe. The butter helps to create a creamy texture, adding depth to the flavor profile. Using unsalted butter allows you to control the saltiness of the bars, ensuring they maintain the perfect balance of flavors.
Mini Marshmallows
No s’more-inspired dessert would be complete without mini marshmallows. These little puffs of sweetness bring the classic gooey factor to S’more Bliss Bars. When mixed into the batter, they melt slightly, resulting in a chewy texture that contrasts beautifully with the crunch of the graham cracker base.
Semisweet Chocolate Chips
The star of the show in S’more Bliss Bars is undoubtedly the semisweet chocolate chips. Their rich and indulgent chocolate flavor is essential for replicating the beloved chocolate layer of traditional s’mores. As the bars set, the chocolate chips provide a luscious layer of sweetness that ties all the flavors together.
Peanut Butter
For those looking to add an extra layer of creaminess and flavor, peanut butter can be included as an optional ingredient. It enhances the overall richness of the bars and adds a delightful nutty flavor that complements the chocolate and marshmallows beautifully. For those with dietary restrictions or preferences, alternatives like almond butter or sunflower seed butter can be used instead.
Salt
A pinch of salt is included to balance the sweetness of the bars. The salt amplifies the flavors, ensuring that each component shines through without becoming overpowering.
Ingredient Substitutions
One of the best features of S’more Bliss Bars is their adaptability. If you have dietary restrictions or preferences, there are numerous substitutions you can make without compromising on flavor. For a nut-free option, simply omit the peanut butter or use sunflower seed butter. Vegan alternatives for butter and chocolate chips are widely available, allowing you to create a vegan version of these delicious bars. Additionally, gluten-free graham crackers can be substituted for those with gluten sensitivities, ensuring everyone can enjoy this decadent treat.
Step-by-Step Instructions
Now that you have a solid understanding of the ingredients involved, let’s delve into the step-by-step instructions for preparing your S’more Bliss Bars. Follow these guidelines closely to achieve the perfect consistency and flavor.
Preparing the Base
1. Gather Your Ingredients: Start by assembling all your ingredients. Measure out the graham cracker crumbs, cocoa powder, powdered sugar, unsalted butter, mini marshmallows, semisweet chocolate chips, and salt. Having everything ready will streamline the process.
2. Mix Dry Ingredients: In a large mixing bowl, combine the graham cracker crumbs, cocoa powder, powdered sugar, and salt. Use a whisk to ensure that the dry ingredients are evenly mixed. This step is crucial for achieving a uniform flavor throughout the bars.
3. Melt the Butter: In a small saucepan or microwave-safe bowl, melt the unsalted butter until it is fully liquid. Allow it to cool slightly before incorporating it into the dry mixture. This helps to prevent the mini marshmallows from melting prematurely.
4. Combine Wet and Dry Ingredients: Pour the melted butter into the bowl with the dry ingredients. Use a spatula or wooden spoon to mix until the dry ingredients are fully incorporated. The mixture should be crumbly but cohesive enough to hold its shape when pressed.
5. Press the Base into the Pan: Line an 8×8-inch baking pan with parchment paper, allowing some overhang for easy removal. Transfer the crumb mixture into the prepared pan and use your hands or the back of a measuring cup to firmly press the mixture into an even layer. This creates a sturdy base for your S’more Bliss Bars.
Importance of Evenly Mixing Dry Ingredients
Evenly mixing the dry ingredients is essential for achieving a consistent flavor and texture in your S’more Bliss Bars. If the cocoa powder or powdered sugar is clumped together, certain areas of the bars may be overly sweet or chocolatey, leading to an imbalanced taste. Taking the time to whisk the dry components thoroughly ensures that each bite is deliciously harmonious.
Tips for Achieving the Right Texture
To create the perfect texture for your S’more Bliss Bars, pay attention to the moisture content. If the mixture appears too dry, you can add a small amount of melted butter or a splash of milk to help bind it together. Conversely, if the mixture is too wet, add a bit more graham cracker crumbs until it reaches the desired consistency.
Incorporating Wet Ingredients
1. Prepare the Marshmallows: In a separate bowl, measure out the mini marshmallows and semisweet chocolate chips. Reserve a small handful of each for topping the bars later.
2. Combine Marshmallows and Chocolate: Gently fold the mini marshmallows and chocolate chips into the prepared base mixture. Be careful not to overmix, as you want to keep the marshmallows intact for that delightful chewy texture.
3. Spread the Mixture: Once the marshmallows and chocolate chips are evenly distributed, spread the mixture over the pressed graham cracker base in the baking pan. Use a spatula to create an even layer.
Techniques for Mixing Wet and Dry Components
When combining the wet and dry components, it’s essential to use gentle folding motions rather than vigorous stirring. This technique helps to maintain the integrity of the marshmallows and chocolate chips, resulting in a delightful texture in the final product.
As you prepare to finalize your S’more Bliss Bars, take a moment to appreciate the simplicity and deliciousness of this no-bake treat. The combination of flavors and textures is sure to impress, making these bars a favorite for any occasion. In the next part of the article, we will cover the finishing touches and how to store your S’more Bliss Bars for optimal enjoyment.
{{image_2}}
Achieving a “Wet Sand” Texture
Creating the perfect base for your S’more Bliss Bars begins with achieving a “wet sand” texture. This is a crucial step that ensures your crust will hold together beautifully once baked. To achieve this texture, mix your graham cracker crumbs, melted butter, and sugar thoroughly. The mixture should be damp enough to clump together when squeezed in your hand but dry enough to fall apart easily. If your mixture feels too dry, add a teaspoon more of melted butter until you reach the desired moisture level. This blend serves as the foundation for your bars, providing that signature crunch and sweetness reminiscent of traditional s’mores.
Pressing the Mixture into the Pan
Once your crust mixture reaches the perfect “wet sand” consistency, it’s time to press it into the pan. Use a 9×9-inch baking dish lined with parchment paper for easy removal later. Start by evenly distributing the graham cracker mixture across the bottom of the pan. Using the back of a measuring cup or your fingertips, firmly press the mixture down to create a compact and uniform base. This step is vital as a well-pressed crust will ensure that your S’more Bliss Bars have stability and structure when sliced. Aim for an even thickness throughout to prevent any weak spots that might crumble during cutting.
Importance of a Firm Base for Stability
A firm base is essential for the overall stability of your S’more Bliss Bars. This foundation not only supports the layers above but also helps maintain the integrity of the bars after baking. A well-compacted crust will hold the layers of chocolate and marshmallows, preventing them from sinking or oozing out. The balance between firmness and tenderness is key; you want a crust that is sturdy enough to hold everything together but still tender enough to provide that satisfying bite.
Tips for Using Parchment Paper Effectively
Parchment paper is your best friend when making S’more Bliss Bars. To ensure easy removal after baking, line your pan with parchment paper, allowing some overhang on the sides. This creates handles that simplify lifting the bars out of the pan once they’ve cooled. For added security, lightly coat the parchment with cooking spray or additional melted butter. This prevents any sticking issues and allows for a clean release. Make sure to press the parchment into the corners of the pan to avoid any gaps, ensuring uniform cooking.
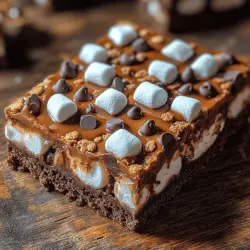
Layering with Chocolate and Marshmallows
With your crust properly prepared, it’s time to layer in the chocolate and marshmallows. Start by spreading a layer of chocolate chips evenly over the crust. This will create a luscious chocolate layer that melds beautifully with the marshmallows. For a perfect melt, consider using a combination of semi-sweet and milk chocolate chips for a balanced sweetness. After distributing the chocolate, add a generous layer of mini marshmallows on top. The key to achieving even distribution is to sprinkle the marshmallows from a height, allowing them to fall evenly across the surface. This helps ensure that every bite is packed with gooey marshmallow goodness.
Best Practices for Even Distribution
To achieve an even distribution of chocolate and marshmallows, take your time during layering. If you notice any areas with more chocolate or marshmallows than others, use a spatula to gently spread or redistribute them. A good practice is to layer in a staggered fashion—adding some chocolate chips, then some marshmallows, and repeating until you reach the desired coverage. This technique will help create a harmonious blend of flavors in each bar, ensuring that no bite is lacking in that classic s’mores flavor.
How to Ensure Marshmallows Adhere Well
Marshmallows can sometimes be tricky, as they tend to puff up during baking. To ensure they adhere well to the chocolate and crust, gently press them down into the chocolate layer before baking. This not only helps them stay in place but also encourages them to meld with the chocolate, creating a delightful gooey texture. During the last few minutes of baking, keep an eye on the marshmallows; you’ll want them golden and toasted, which enhances their flavor and adds a beautiful visual appeal to your bars.
Chilling to Set
After baking, allowing your S’more Bliss Bars to chill is crucial for achieving the right texture. Once you remove them from the oven, let them cool at room temperature for about 30 minutes before transferring them to the refrigerator. Chilling helps the chocolate set and allows the layers to firm up, making them easier to cut into bars. The science behind chilling is simple: cooling solidifies the fats in the chocolate and butter, giving your bars a more cohesive structure. Aim to chill them for at least two hours for the best results, ensuring a perfect slice.
The Science Behind Chilling and Its Effects on Texture
Chilling your S’more Bliss Bars doesn’t just make them easier to cut; it also affects the overall texture and flavor. As the bars cool, the chocolate hardens slightly, creating a delightful contrast against the soft, gooey marshmallows. This combination of textures is what makes these bars so indulgent. Additionally, chilling allows the flavors to meld together, enhancing the overall experience of each bite. The cooler temperatures also help the bars maintain their shape, making it less likely for them to crumble when you serve them.
Cutting and Garnishing
Once your S’more Bliss Bars have chilled adequately, it’s time to cut and garnish them. For clean cuts, use a sharp knife that has been warmed under hot water. Wipe the knife between cuts to prevent sticking and ensure those beautiful edges remain intact. Aim to cut them into squares or rectangles, depending on your serving preference. For an added touch of decadence, consider garnishing with a drizzle of melted chocolate over the top or a sprinkle of mini marshmallows. This not only enhances the presentation but also adds an extra layer of flavor that complements the bars beautifully.
Techniques for Cutting Clean Bars
To achieve perfectly cut bars, make sure to allow them to chill completely before slicing. A well-chilled dessert is firmer and less prone to falling apart. Start by cutting the bars into halves, then quarters, and finally into smaller squares. This method ensures that each piece is uniform in size and allows for easy serving. If you find that the chocolate is sticking to the knife, simply reheat it again in hot water to achieve a clean cut. This attention to detail in cutting will elevate the overall presentation of your S’more Bliss Bars.
Ideas for Garnishing with Chocolate Drizzle and Marshmallows
Garnishing your S’more Bliss Bars can elevate their appearance and taste. A simple chocolate drizzle can be made by melting extra chocolate chips in a microwave or double boiler and then drizzling it over the cooled bars using a fork or piping bag. For an even more s’mores-inspired touch, consider adding a few toasted mini marshmallows on top right before serving. This not only adds visual appeal but creates a fun, interactive element for your guests. A sprinkle of graham cracker crumbs on top can also enhance the s’mores experience, tying all the flavors together.
Serving Suggestions
When it comes to serving your S’more Bliss Bars, presentation matters. For gatherings, consider cutting them into smaller bite-sized pieces for easy snacking. Arrange them on a decorative platter, perhaps alongside some fresh fruit or a scoop of ice cream for a delightful dessert table. If you’re serving them at a special occasion, garnishing with fresh mint leaves can add a pop of color and freshness. For the best enjoyment, serve these bars at room temperature; this allows the chocolate to soften slightly while the marshmallows remain perfectly gooey.
Optimal Serving Temperatures for Best Enjoyment
S’more Bliss Bars are best enjoyed at room temperature. This allows the chocolate to retain a creamy texture while the marshmallows maintain their soft, gooey consistency. If you’ve chilled them in the refrigerator, allow them to sit out for about 15-20 minutes before serving. This brief period at room temperature will enhance the overall flavor and texture, making each bite even more enjoyable. Pairing them with a glass of cold milk or a warm cup of coffee can also enhance the experience, balancing the sweetness of the dessert.
The Experience of Enjoying S’more Bliss Bars
S’more Bliss Bars offer a delightful taste and texture experience that evokes fond memories of campfire gatherings. The combination of rich chocolate, fluffy marshmallows, and a crunchy graham cracker crust creates a nostalgic flavor reminiscent of summer nights spent roasting marshmallows. Each bite is a harmonious blend of sweetness and texture, with the chocolate melting in your mouth while the marshmallows provide a chewy contrast. This indulgent treat can transport you to simpler times, making them a perfect dessert for sharing with friends and family.
Pair your S’more Bliss Bars with a range of beverages for an enhanced experience. A cold glass of milk is a classic choice, balancing the sweetness and richness of the bars. Alternatively, a cup of hot coffee can beautifully complement the flavors, with its bitterness offsetting the sweetness of the dessert. For a fun twist, consider pairing them with a flavored hot cocoa or even a scoop of vanilla ice cream, creating a delightful dessert duo that is sure to please.
Nutritional Information
Understanding the nutritional aspect of your S’more Bliss Bars can help in mindful indulgence. Each serving is typically around 2 inches square, offering a delightful treat while also delivering a satisfying crunch and chew. While these bars are undeniably indulgent, made with chocolate, marshmallows, and graham crackers, moderation is key. Each bar contains a fair amount of calories, sugar, and fat, so enjoying them as an occasional treat rather than a daily indulgence is wise.
A quick overview of the nutritional breakdown per serving includes approximately 200-250 calories, depending on the specific ingredients used. This indulgent factor is what makes S’more Bliss Bars such a special treat, so savoring them in moderation can enhance your enjoyment while still keeping your dietary goals in mind.
Conclusion
In summary, S’more Bliss Bars are a delightful treat that combines the classic flavors of s’mores into a convenient bar format. The combination of a crunchy graham cracker crust, gooey marshmallows, and rich chocolate creates a dessert that is sure to impress anyone who takes a bite. Whether you’re sharing them at a gathering or enjoying them as a personal indulgence, these bars bring the joy of homemade desserts to the forefront.
We encourage you to share the experience of creating and enjoying S’more Bliss Bars with friends and family. The process of making these treats can be just as enjoyable as eating them, providing a wonderful opportunity to bond over a shared love for sweet treats. Take some time to explore variations or even involve others in the preparation. After all, the joy of creating and enjoying homemade desserts is something that brings people together, creating lasting memories one delicious bite at a time.