Oreo Cheesecake Bliss Bars are a delightful fusion of two of the most beloved treats in the dessert world—Oreos and cheesecake. This irresistible dessert combines the rich, creamy texture of cheesecake with the iconic chocolatey crunch of Oreo cookies, creating a treat that is sure to satisfy any sweet tooth. Whether you’re planning a family gathering, a potluck with friends, or simply looking to indulge in something special, these bliss bars are the perfect choice. Not only are they incredibly delicious, but they are also easy to prepare, making them an accessible option for both novice bakers and seasoned dessert enthusiasts alike.
The allure of Oreo Cheesecake Bliss Bars lies in their simplicity and versatility. With just a handful of ingredients and straightforward steps, you can whip up a batch that will impress your guests and leave them asking for seconds. They are also ideal for sharing; cut them into squares, plate them up, and watch as they disappear in no time. So, let’s dive into the world of dessert bliss and explore how to create these scrumptious bars!
Understanding the Ingredients
Before we start mixing, it’s essential to understand the key ingredients that will transform simple components into a mouthwatering dessert. Each ingredient plays a crucial role in achieving the ultimate flavor and texture that Oreo Cheesecake Bliss Bars are known for.
The Crust: A Crunchy Foundation
The crust of these bliss bars is made primarily from crushed Oreo cookies mixed with melted butter. This combination creates a rich, chocolatey base that perfectly complements the creamy cheesecake filling on top. The Oreos provide not only flavor but also texture, giving each bite a satisfying crunch. The melted butter acts as a binding agent, ensuring that the crust holds together beautifully once baked.
The Cheesecake Filling: Creamy Perfection
The star of the show is undoubtedly the cheesecake filling. This creamy concoction is made from three key ingredients: cream cheese, sugar, and sour cream. Cream cheese is the foundation of any cheesecake, providing that velvety texture and tangy flavor that is loved by many. When sweetened with sugar, it transforms into a luscious filling that is impossible to resist.
Sour cream is added to enhance the creaminess of the filling while contributing a subtle tang that balances the sweetness. This combination of cream cheese and sour cream results in the perfect cheesecake texture—smooth, rich, and utterly delightful.
Optional Toppings: Elevating Presentation
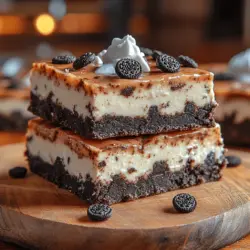
While the Oreo Cheesecake Bliss Bars are delicious on their own, you can take them to the next level with a few optional toppings. Mini Oreos scattered on top add a fun and festive touch, while a dollop of whipped cream can enhance the dessert’s creaminess. These toppings not only make the bars visually appealing but also add an extra layer of flavor that complements the existing ingredients.
Preparation Steps for Oreo Cheesecake Bliss Bars
Now that we have a solid understanding of the ingredients, let’s go through the preparation steps to create these Oreo Cheesecake Bliss Bars. Follow these detailed instructions to ensure your bars turn out perfectly.
Step 1: Preheating the Oven
Before you begin mixing and baking, it’s crucial to preheat your oven to 325°F (163°C). Preheating is an essential step that ensures your dessert bakes evenly. An oven that is not at the proper temperature can lead to uneven baking, which might affect the texture and consistency of your cheesecake bars.
Step 2: Creating the Crust
1. Gather Your Ingredients: You will need approximately 24 Oreo cookies and 4 tablespoons of unsalted butter for the crust.
2. Crush the Oreos: Start by placing the Oreo cookies in a food processor and pulse until they reach a fine crumb consistency. If you don’t have a food processor, you can place the cookies in a zip-top bag and crush them with a rolling pin. The goal is to achieve a texture similar to that of sand.
3. Mix with Butter: In a medium mixing bowl, combine the crushed Oreos with the melted butter. Mix well until all the crumbs are evenly coated with butter.
4. Press into the Pan: Line an 8×8-inch baking pan with parchment paper for easy removal later. Pour the Oreo mixture into the pan and use the back of a measuring cup or your fingers to press the crumbs firmly into an even layer across the bottom of the pan. This step is crucial for creating a solid base that can hold the cheesecake filling without crumbling.
Step 3: Making the Cheesecake Filling
1. Beat the Cream Cheese: In a large mixing bowl, add 16 ounces of softened cream cheese. Using an electric mixer, beat the cream cheese on medium speed until it is smooth and free of lumps. This step is vital for achieving that silky texture characteristic of cheesecake.
2. Add Sugar: Gradually add ½ cup of granulated sugar to the cream cheese, continuing to beat until the mixture is light and fluffy. This process should take about 2-3 minutes.
3. Incorporate Sour Cream: Add ½ cup of sour cream to the mixture and beat until well combined. The sour cream will contribute to the creaminess and enhance the flavor profile of your cheesecake.
4. Add Eggs: It’s time to add the eggs. You will need 2 large eggs for this recipe. It’s important to add them one at a time, mixing well after each addition. This technique helps maintain the airiness of the filling, resulting in a lighter texture.
Step 4: Pouring and Baking
1. Combine and Pour: Once all the ingredients for the filling are well incorporated, carefully pour the cheesecake mixture over the prepared crust in the baking pan. Use a spatula to smooth the top, ensuring even distribution.
2. Bake the Bars: Place the pan in the preheated oven and bake for approximately 25-30 minutes. You will know the cheesecake is done when the edges are set, and the center has a slight jiggle. Avoid overbaking, as this can lead to a dry texture.
3. Cool Down: Once baked, remove the pan from the oven and allow it to cool at room temperature for about 30 minutes. Afterward, refrigerate the bars for at least 3-4 hours, or overnight if possible. Chilling allows the flavors to meld and the texture to set properly.
By following these detailed steps, you will be well on your way to creating delicious Oreo Cheesecake Bliss Bars that are sure to delight anyone who tries them. In the next part of this article, we will explore tips for achieving the best results and answer some common questions about this delectable dessert. Stay tuned for more on how to elevate your baking game with these irresistible bars!
{{image_2}}
Baking Tips for Perfect Cheesecake Bars
Baking Oreo Cheesecake Bliss Bars can be a delightful experience, but there are a few common pitfalls that can turn this sweet treat from blissful to disappointing. Understanding these potential issues and how to avoid them will ensure that your cheesecake bars come out perfectly every time.
Common Pitfalls and How to Avoid Them
1. Overmixing the Filling: One of the most critical mistakes in cheesecake making is overmixing the batter. While it’s important to combine the ingredients well, excessive mixing can incorporate too much air into the filling, leading to cracks during baking. To avoid this, mix the cream cheese until smooth before adding the sugar, eggs, and other ingredients. Once all ingredients are combined, mix just until they are incorporated.
2. Incorrect Oven Temperature: Cheesecake requires a gentle bake to achieve that creamy texture. Always preheat your oven and use an oven thermometer to ensure that the temperature is accurate. If your oven runs hot, consider lowering the temperature by 25 degrees Fahrenheit.
3. Not Using a Water Bath: A water bath (or bain-marie) can help regulate the temperature around the cheesecake and prevent it from baking too quickly. For cheesecake bars, you may not need a full water bath, but placing the pan in a larger baking dish filled with water can help create a moist environment that reduces the risk of cracks.
Recognizing When the Cheesecake is Perfectly Baked
Knowing when your Oreo Cheesecake Bliss Bars are done is crucial. The center should be slightly jiggly when you gently shake the pan. It will continue to set as it cools. If the edges are firm but the center is still very wobbly, it needs more time. Remember, cheesecake continues to cook after you take it out of the oven, so err on the side of slightly underbaking.
Cooling and Chilling: Best Practices for Achieving the Right Texture
Cooling your cheesecake bars properly is essential for achieving that velvety texture. Once out of the oven, let the bars cool at room temperature for about an hour. Afterward, place them in the refrigerator for at least 4 hours, or overnight if possible. This chilling period allows the flavors to meld together and the bars to set fully, making them easier to cut and serve.
Serving Suggestions
The presentation of your Oreo Cheesecake Bliss Bars can elevate them from delicious to extraordinary. Here are some creative ways to serve and present your dessert.
Cutting Techniques for Perfect Squares or Rectangles
To achieve clean cuts for your cheesecake bars, allow them to chill completely. Use a sharp knife and dip it in hot water before cutting, wiping it clean after each slice. This technique helps create smooth edges and prevents the bars from sticking to the knife. For a neat finish, consider cutting them into uniform squares or rectangles, which not only looks appealing but also makes them easier to serve.
Creative Garnishing Ideas
Garnishing your Oreo Cheesecake Bliss Bars can add an extra touch of indulgence. Here are a few ideas:
– Whipped Cream: A dollop of freshly whipped cream on top adds a light and airy contrast to the rich cheesecake.
– Mini Oreos: Place mini Oreos on top of each bar for a fun and decorative touch that enhances the Oreo flavor.
– Chocolate Drizzle: A drizzle of melted chocolate over the bars can add visual appeal and an extra layer of flavor.
Pairing Suggestions
To enhance your dessert experience, consider pairing your Oreo Cheesecake Bliss Bars with complementary beverages or other desserts:
– Coffee: A rich espresso or a cup of dark roast coffee can balance the sweetness of the cheesecake.
– Milk: A classic pairing with Oreos, a cold glass of milk can provide a refreshing contrast to the richness of the bars.
– Fruits: Fresh berries, such as strawberries or raspberries, can add a tart note that complements the sweetness of the cheesecake.
Nutritional Information
Understanding the nutritional aspects of your Oreo Cheesecake Bliss Bars can help you enjoy them mindfully. Here’s a breakdown of key nutritional information per serving (1 bar):
– Calories: Approximately 250-300 calories
– Fat: 18g (of which saturated fat is about 10g)
– Carbohydrates: 25g (with around 18g of sugar)
– Protein: 4g
Modifications for Dietary Preferences
If you’re looking to adjust the recipe for dietary preferences, here are some suggestions:
– Gluten-Free Options: Substitute regular Oreos with gluten-free Oreo cookies and ensure that any other ingredients used are certified gluten-free.
– Reduced Sugar: Use a sugar substitute or reduce the amount of sugar in the filling to create a lighter version of the bars without sacrificing flavor.
– Dairy-Free: For a dairy-free option, substitute cream cheese with a dairy-free alternative, such as cashew cream or a store-bought vegan cream cheese.
Conclusion
Making Oreo Cheesecake Bliss Bars is not just about following a recipe—it’s about creating a delightful experience that you can share with friends and family. The joy of baking, the tantalizing aroma wafting through your kitchen, and the satisfaction of slicing into perfectly chilled cheesecake bars all contribute to a memorable occasion.
These bars are more than just a dessert; they are a wonderful treat for gatherings, celebrations, or simply a cozy night in. The combination of creamy cheesecake and crunchy Oreos creates a delectable dessert that appeals to both kids and adults alike. So gather your ingredients, follow the steps, and enjoy the process of baking these blissful bars.
Whether you serve them at a party, as a special treat for loved ones, or simply savor them at home, these Oreo Cheesecake Bliss Bars promise to bring joy and indulgence to any occasion. Happy baking!