Spicy Pepper Perfection: Quick Canned Jalapeño Treats
Jalapeños have carved a niche for themselves as one of the most beloved ingredients in kitchens around the world. Originating from Mexico, these vibrant green peppers are celebrated for their distinctive flavor and versatility. They can add a kick to dishes, whether they’re used fresh in salsas, roasted on the grill, or pickled to enhance the depth of flavors in various cuisines. One of the best ways to enjoy this spicy pepper throughout the year is by canning them. This method not only preserves their vibrant taste but also allows you to explore a myriad of culinary possibilities.
Pickling is an age-old preservation technique that dates back thousands of years. It involves soaking food in a vinegar solution, which helps to inhibit the growth of bacteria, extending the shelf life of perishable items. The beauty of pickling lies in its ability to enhance the natural flavors of food while also introducing new dimensions through the infusion of spices and seasonings. For those who love the fiery taste of jalapeños, quick-pickled jalapeño treats are a delightful and accessible option. They can elevate any dish, from tacos to sandwiches, and can even serve as a zesty garnish on nachos or salads.
In this article, we aim to provide a comprehensive guide for creating your own canned jalapeño treats. You’ll find detailed steps, tips, and insights that will ensure your pickling experience is both enjoyable and successful. Whether you’re an experienced canner or a novice in the kitchen, this recipe promises to be quick, easy, and versatile.
Understanding Jalapeños: A Flavorful Ingredient
The jalapeño pepper, scientifically known as Capsicum annuum, has a rich history and a unique flavor profile that makes it stand out among other peppers. Traditionally cultivated in Mexico, jalapeños are now grown in various regions around the world, including the United States. Their bright green color and crisp texture are complemented by a balanced heat that can range from mild to moderately spicy, typically measuring between 2,500 to 8,000 Scoville Heat Units. This makes them a popular choice for those seeking a bit of spice without overwhelming heat.
Nutritionally, jalapeños are a powerhouse. They are low in calories and rich in vitamins A, C, and K, as well as a variety of minerals, including potassium and magnesium. Additionally, jalapeños contain antioxidants such as capsaicin, which is known for its potential health benefits, including pain relief and metabolism boosting. Adding jalapeños to your diet can enhance not only the flavor of your meals but also their nutritional value.
When selecting jalapeños for pickling, it’s essential to consider their heat level. Fresh jalapeños can vary significantly in spiciness, so it’s advisable to taste a small piece before you commit to a batch. For those who prefer milder flavors, look for more mature peppers, which tend to be slightly less spicy than their younger counterparts. Conversely, if you crave a bolder kick, choose smaller, younger jalapeños.
Pickling jalapeños is a straightforward method that allows you to enjoy their unique flavor long after the growing season has ended. The process of pickling not only preserves the peppers but also mellows their heat, making them more palatable for those who may find fresh jalapeños a bit too intense. This practice of preserving food in vinegar and spices has a rich history, with roots in ancient civilizations that sought ways to extend the shelf life of their harvests.
Ingredients Breakdown for Canned Jalapeños
Before diving into the canning process, it’s crucial to understand the role of each ingredient in the recipe. A basic canned jalapeño recipe typically includes fresh jalapeños, vinegar, water, sugar, and salt. Each component plays a pivotal role in achieving the perfect balance of flavor and preservation.
Vinegar is the cornerstone of the pickling process. The acidity of vinegar not only helps preserve the jalapeños but also infuses them with tangy flavor. While there are several types of vinegar available, distilled white vinegar is often the preferred choice for pickling due to its high acidity and neutral flavor profile. This ensures that the taste of the jalapeños shines through without being overshadowed by the vinegar.
Sugar and salt are equally important in the pickling process. Sugar helps to balance the heat of the jalapeños, providing a slight sweetness that complements their spiciness. Meanwhile, salt is essential for flavor enhancement and acts as a preservative, drawing moisture out of the peppers and creating an environment that is inhospitable for bacteria.
Beyond the basic ingredients, you can customize your canned jalapeños with optional additions. Cumin and oregano are popular choices that can add depth and warmth to the flavor profile. A drizzle of olive oil can also enhance the richness of the peppers, making them a delicious addition to salads or antipasto platters.
For those with dietary restrictions or preferences, there are several substitutions you can make. If you’re looking to reduce sugar intake, consider using natural sweeteners like honey or agave syrup. Alternatively, for a lower-sodium option, you can experiment with reduced-sodium salt or even skip it altogether, though this may impact the overall flavor and preservation.
Step-by-Step Guide to Canning Jalapeños
Before you begin the canning process, it’s essential to prioritize kitchen safety. Wearing gloves is highly recommended when handling jalapeños, as the oils from the peppers can irritate your skin and potentially cause discomfort if you touch your face or eyes. Thoroughly wash your hands and kitchen tools before and after handling the peppers to prevent cross-contamination.
Start by selecting fresh, firm jalapeños that are free from blemishes or soft spots. Rinse them under cold water, then slice them into rings, ensuring that the seeds and membranes are included for added heat. If you prefer milder jalapeños, you can remove the seeds and membranes before slicing.
Next, prepare your pickling solution by combining vinegar, water, sugar, and salt in a saucepan. Bring the mixture to a boil, stirring until the sugar and salt dissolve completely. Once boiling, remove the saucepan from heat and let the solution cool slightly while you pack your jalapeño slices into sterilized canning jars.
Carefully ladle the hot pickling solution over the jalapeños in the jars, ensuring that the peppers are fully submerged. Leave about half an inch of headspace at the top of each jar to allow for expansion during the canning process. Wipe the rims of the jars with a clean cloth to ensure a proper seal, then place the lids on top and screw on the bands until they are fingertip-tight.
At this stage, you can choose to process your jars in a water bath canner to ensure long-term preservation or store them in the refrigerator for quick use. If opting for the water bath method, immerse the jars in boiling water for 10-15 minutes, adjusting for altitude as necessary. Once completed, allow the jars to cool at room temperature before checking their seals.
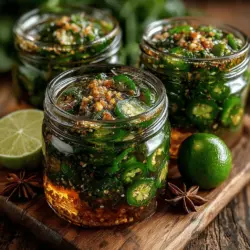
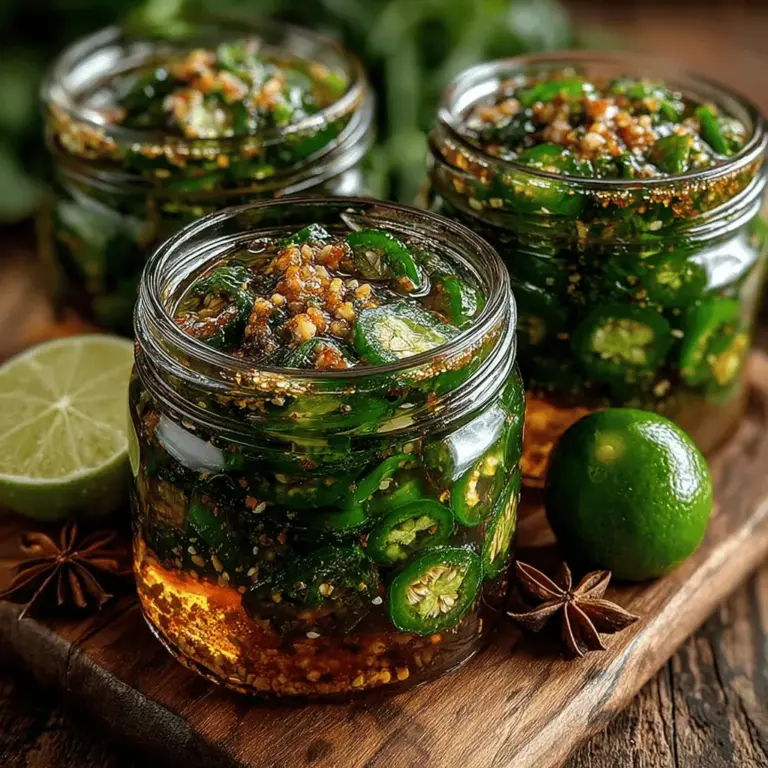
Now, you’re well on your way to creating your own quick canned jalapeño treats. This flavorful addition to your pantry not only offers convenience but also bursts with vibrant taste that can elevate countless dishes. Stay tuned for the next segments of this guide, where we’ll delve deeper into the nuances of flavoring, storage tips, and creative ways to incorporate your spicy pepper perfection into everyday meals.
{{image_2}}
Detailed Instructions for Slicing Jalapeños
Slicing jalapeños is a straightforward process, but it’s essential to handle them correctly to minimize heat transfer to your skin and other ingredients. Here are some techniques to ensure a comfortable experience:
1. Use Gloves: The most effective way to avoid the burn from jalapeño oils is to wear disposable gloves. This protects your skin and prevents accidentally touching your face or eyes after handling the peppers.
2. Cutting Technique: Start by washing the jalapeños under running water. Use a sharp knife to cut off the stem. If you prefer milder jalapeños, slice them in half lengthwise and remove the seeds and white membranes, as this is where much of the heat resides. For a spicier treat, you can leave some seeds intact.
3. Uniform Slices: For even pickling, slice the jalapeños into uniform rounds about 1/4 inch thick. This size ensures that each slice absorbs the brine consistently and maintains a crunchy texture.
4. Disposal: After slicing, dispose of the seeds and any leftover membranes carefully. Avoid touching your face, and wash your hands thoroughly with soap and water.
By following these techniques, you can enjoy the flavor of jalapeños without the unwanted heat lingering on your skin.
Crafting the Perfect Pickling Brine
The pickling brine is the heart of your canned jalapeños, and balancing the flavors is crucial for a delicious result. Here’s how to craft the perfect brine:
1. Basic Ingredients: A standard brine consists of equal parts vinegar (white or apple cider) and water, which helps to balance the sharpness of the vinegar with the mild flavor of water.
2. Flavor Additions: To elevate your brine, consider adding sugar to enhance sweetness, and salt for seasoning. The common ratio is 1 cup of vinegar to 1 cup of water, with 2 tablespoons of salt and 1 tablespoon of sugar. Adjust these amounts to your taste preference.
3. Spices and Herbs: Experiment with spices such as garlic cloves, coriander seeds, mustard seeds, or even bay leaves. These can infuse your jalapeños with additional flavor. Start with a teaspoon of each spice per jar and adjust based on your taste.
4. Consistency: Ensure that the brine is well mixed before pouring it over the jalapeños. Heat the brine until the salt and sugar dissolve completely, then let it cool slightly before using.
A well-crafted brine not only preserves your jalapeños but also enhances their flavor, making them a delightful addition to any dish.
Sterilization Process
Sterilizing your jars and lids is a critical step in the canning process that ensures food safety and longevity. Here’s how to properly sterilize your canning supplies:
1. Cleaning: Wash your jars, lids, and rings in hot, soapy water. Rinse thoroughly to remove any soap residue.
2. Sterilization Methods:
– Boiling Water Method: Place jars in a large pot of boiling water for at least 10 minutes. Ensure the jars are fully submerged.
– Oven Method: Preheat your oven to 200°F (93°C). Place clean jars on a baking sheet and heat for 10-15 minutes. Avoid placing lids in the oven, as this can damage the sealing compound.
3. Drying: Allow the sterilized jars to air dry on a clean towel or cooling rack. Avoid touching the inside of the jars to maintain sterility.
By properly sterilizing your jars, you help to prevent bacterial growth, ensuring your jalapeños remain safe to eat for an extended period.
Packing the Jars
Packing your jalapeños into jars is not just about filling them up; it’s about maximizing flavor and maintaining texture. Here are some tips for effective packing:
1. Layering: Place the sliced jalapeños into the jars in layers, gently pressing down to eliminate air pockets. This helps the brine to penetrate the slices evenly.
2. Add Spices: If you’ve added spices to your brine, consider placing some at the bottom of the jar before adding jalapeños. This distributes the flavors throughout the jar.
3. Leave Headspace: Ensure you leave about 1/2 inch of headspace at the top of the jar. This space allows for the expansion of liquids during the canning process and ensures a proper seal.
4. Avoid Overpacking: While it’s tempting to cram as many jalapeños as possible, overpacking can lead to uneven pickling and compromised texture.
Proper packing ensures that each slice receives the brine’s flavor while maintaining its crispness, creating a satisfying snack or ingredient for your dishes.
Pouring the Brine
Pouring the brine over the jalapeños is a crucial step that determines the pickling process. Here’s how to do it effectively:
1. Hot Brine: Pour the brine into the jars while it is still hot. This helps to create a vacuum seal and enhances the pickling process.
2. Submersion: Make sure the jalapeños are completely submerged in the brine. This is key to achieving even pickling. If necessary, use a clean utensil to push down the jalapeños gently.
3. Bubble Removal: After pouring the brine, run a clean knife or a bubble remover tool around the inside of the jar to release any trapped air bubbles. This step is essential for ensuring a tight seal.
4. Fill to Headspace: Check that the brine level is appropriate, with about 1/2 inch of headspace remaining. If necessary, add more brine to maintain proper levels.
By ensuring complete submersion, you facilitate even pickling and enhance flavor absorption, making your canned jalapeños irresistibly tasty.
Sealing the Jars
Sealing your jars correctly is vital for preserving your jalapeños. Here are the best practices for sealing:
1. Lid Placement: Place the sterilized lids on top of the jars, ensuring that the sealing compound is positioned directly against the jar rim.
2. Applying Rings: Screw on the jar rings until they are fingertip-tight. Avoid over-tightening, as this can prevent air from escaping during the canning process.
3. Processing: If using a water bath canner, process the jars for 10-15 minutes for pickled jalapeños. Refer to your specific canning recipe for exact processing times based on your altitude.
4. Cooling: After processing, remove the jars from the canner and allow them to cool on a clean towel or cooling rack. As they cool, you should hear the satisfying pop of the jar lids sealing.
Proper sealing is crucial for preventing spoilage and ensuring that your jalapeños remain safe and delicious for months.
Cooling and Storage
Cooling and storing your canned jalapeños correctly is essential for their longevity. Here’s how to do it right:
1. Cooling: Allow the jars to cool undisturbed for 12-24 hours. This cooling period is crucial for the formation of a vacuum seal. If any lids do not seal properly (the lid pops back when pressed), refrigerate those jars and consume them within a few weeks.
2. Storage Conditions: Store sealed jars in a cool, dark place, such as a pantry or cupboard. Ideal storage temperatures are between 50°F and 70°F (10°C to 21°C).
3. Labeling: Label each jar with the date it was canned. This helps you keep track of freshness and ensures that you use older jars first.
4. Shelf Life: Canned jalapeños can last for up to a year when stored properly. Always check for signs of spoilage, such as bulging lids or off-smells, before consuming.
Understanding the importance of cooling and storage conditions will help you enjoy your homemade jalapeños for months to come.
Serving Suggestions for Your Canned Jalapeños
Canned jalapeños are incredibly versatile and can elevate a variety of dishes. Here are some creative ways to incorporate them into your meals:
1. Tacos and Burritos: Add slices of canned jalapeños to your tacos, burritos, or quesadillas for a spicy kick. They pair beautifully with meats, beans, and cheese.
2. Charcuterie Boards: Incorporate your canned jalapeños into charcuterie boards. They add color and a zesty flavor that complements cheeses, meats, and crackers.
3. Sandwiches and Burgers: Use jalapeños as a topping for sandwiches and burgers. They add crunch and a burst of flavor, making even the simplest meals more exciting.
4. Salads and Salsas: Toss jalapeños into salads for added heat or use them in salsas for a vibrant, spicy condiment.
5. Presentation Tips: When serving at gatherings, consider using decorative jars or bowls to showcase your canned jalapeños. This not only highlights their color but also invites guests to try them.
The versatility of canned jalapeños allows you to explore a range of cuisines and dishes, making them a staple in your kitchen.
The Joy of Homemade Canning
Homemade canning is more than just a preservation method; it’s about creating something special. Here are some benefits of embracing the art of canning:
1. Cost-Effectiveness: Canning allows you to save money by preserving seasonal produce at its peak. You can enjoy the taste of fresh jalapeños year-round without the high price tag.
2. Flavor Control: By making your own canned goods, you have control over the ingredients and flavors. Customize your brine and spice levels to suit your preferences.
3. Satisfaction: There’s immense satisfaction in creating something from scratch. The process of canning can be therapeutic and rewarding, especially when you see the end result lined up in your pantry.
4. Experimentation: Don’t hesitate to experiment with different spices, herbs, or even other vegetables. Try pickling carrots, cucumbers, or onions alongside your jalapeños for a delightful mix.
5. Other Pickling Recipes: For those interested in expanding their canning skills, consider exploring recipes for pickled red onions, spiced carrot sticks, or dill pickles. Each offers a unique taste and texture.
Homemade canning opens up a world of culinary creativity, allowing you to preserve flavors and explore new recipes.
Conclusion
Making your own canned jalapeños is a rewarding endeavor that brings both flavor and satisfaction to your kitchen. From the straightforward slicing techniques to the intricate process of crafting the perfect brine, each step enhances your culinary skills and ensures delicious results.
By embracing the art of canning, you not only create a delightful condiment but also enrich your meals and inspire creativity in the kitchen. Canned jalapeños can elevate everyday dishes, provide a burst of flavor, and offer a sense of accomplishment that store-bought alternatives simply cannot match.
So gather your ingredients, follow the steps, and relish in the joy of homemade canned jalapeños. Your culinary journey awaits, and the possibilities are endless with your newfound canning skills. Embrace the flavors of home-preserved ingredients, and let your creativity shine in every bite.