Nutty Bliss Frozen Yogurt Wedges: A Delicious and Healthy Treat
Frozen yogurt has emerged as a favorite dessert option for many, celebrated for its creamy texture and refreshing taste. This delightful treat not only satisfies sweet cravings but also offers a healthier alternative to traditional ice cream. With the rise of DIY frozen desserts, home cooks can easily create treats that align with their dietary preferences, making it possible to enjoy indulgent flavors without the guilt. Among these delectable creations is the Nutty Bliss Frozen Yogurt Wedges, a simple yet indulgent recipe that combines the richness of Greek yogurt with a variety of crunchy textures and delightful flavors. This recipe is not only easy to prepare but also incredibly versatile, allowing for endless customization with different nuts, fruits, and sweeteners.
Understanding the Appeal of Frozen Yogurt
One of the main attractions of frozen yogurt lies in its health benefits, particularly when made with Greek yogurt. Greek yogurt is known for its high protein content, which can help keep you feeling full and satisfied. Additionally, it is rich in probiotics, which are beneficial for digestive health. Unlike its creamier counterpart, traditional ice cream, frozen yogurt is often lower in fat and calories, making it a guilt-free dessert choice that doesn’t compromise on flavor.
The customization potential of frozen yogurt is another reason for its growing popularity. Home cooks can easily adapt their frozen yogurt recipes to cater to various dietary needs, whether gluten-free, vegetarian, or even vegan. This flexibility allows everyone to enjoy a delicious frozen treat without worrying about allergens or dietary restrictions.
Ingredients Breakdown
To create Nutty Bliss Frozen Yogurt Wedges, you’ll need a handful of key ingredients that come together harmoniously to create a satisfying snack or dessert. Let’s delve deeper into these components:
Greek Yogurt
The star of this recipe is Greek yogurt, which forms the creamy base of the wedges. You can choose between plain or vanilla-flavored Greek yogurt, depending on your taste preferences. Plain Greek yogurt offers a tangy flavor that pairs well with sweet toppings, while vanilla adds a hint of sweetness right from the start. Nutritionally, Greek yogurt is a powerhouse, providing substantial protein, calcium, and probiotics that support gut health.
Sweeteners
To sweeten the frozen yogurt, you can opt for natural sweeteners like honey or maple syrup. Honey imparts a floral sweetness and has antibacterial properties, while maple syrup provides a distinctive flavor profile with its caramel-like notes. Both options are healthier than refined sugars, making them excellent choices for this recipe. Choosing the right sweetener allows you to control the flavor and health aspects of your Nutty Bliss Frozen Yogurt Wedges.
Granola and Nuts
The addition of granola and nuts brings a satisfying crunch to the creamy yogurt, creating a delightful contrast in texture. Nuts, such as almonds, walnuts, or pecans, not only add crunch but also provide healthy fats and protein. They are known to be heart-healthy and can contribute to improved satiety. Granola, on the other hand, offers a chewy texture and can be customized with various ingredients like oats, seeds, or dried fruits. It serves as an excellent base layer for the frozen yogurt, enhancing both flavor and texture.
Shredded Coconut and Dark Chocolate Chips
For those looking to elevate the flavor profile, consider adding optional ingredients like shredded coconut and dark chocolate chips. Shredded coconut adds a tropical twist and a chewy texture, while dark chocolate chips introduce a rich, indulgent element that complements the sweetness of the yogurt. Both of these ingredients can enhance the visual appeal of the wedges, making them even more tempting.
Fresh Fruit
Fresh fruit is another fantastic addition that can elevate your Nutty Bliss Frozen Yogurt Wedges. Depending on your preference, you can choose fruits like berries, bananas, or peaches, each bringing its unique flavor and nutritional benefits. Berries are packed with antioxidants, while bananas add creaminess and natural sweetness. The inclusion of fresh fruit not only boosts the flavor but also increases the overall nutritional value of the dessert.
Step-by-Step Instructions
Now that we’ve covered the ingredients, here’s a detailed guide on how to prepare Nutty Bliss Frozen Yogurt Wedges:
1. Prepare the Base: Start by selecting your Greek yogurt. In a large mixing bowl, combine 2 cups of Greek yogurt with your chosen sweetener (about 2-4 tablespoons of honey or maple syrup, depending on your desired sweetness). Mix well until the sweetener is fully incorporated.
2. Add Texture: Next, fold in 1 cup of your favorite granola and 1/2 cup of chopped nuts. Feel free to get creative here; you might opt for a mix of almonds and walnuts for a rich flavor or use pistachios for a pop of color. Ensure the granola and nuts are evenly distributed throughout the yogurt mixture.
3. Incorporate Additional Ingredients: If you’re using shredded coconut or dark chocolate chips, add them at this stage. About 1/4 cup of each should suffice, but you can adjust according to your taste preference. Gently fold these ingredients into the yogurt mixture to maintain the chunky textures.
4. Line the Pan: Prepare a baking dish or a silicone mold by lining it with parchment paper. This will help you easily remove the frozen yogurt wedges later.
5. Fill the Mold: Pour the yogurt mixture into the prepared pan, spreading it evenly with a spatula. Aim for a thickness of about 1 inch to ensure the wedges freeze evenly.
6. Add Fresh Fruit: If you’d like to incorporate fresh fruit, scatter slices or pieces of your chosen fruit on top of the yogurt mixture. Press them down gently to ensure they adhere to the yogurt.
7. Freeze: Place the dish in the freezer and allow it to freeze for at least 4-6 hours, or until the yogurt is solid.
8. Slice and Serve: Once frozen, remove the dish from the freezer. Lift the parchment paper to release the frozen yogurt slab, and use a sharp knife to cut it into wedges or bars. Enjoy your homemade Nutty Bliss Frozen Yogurt Wedges right away, or store them in an airtight container in the freezer for later.
By following these steps, you’ll have a delicious batch of Nutty Bliss Frozen Yogurt Wedges ready to indulge in. This recipe not only satisfies your sweet tooth but also provides a nutritious option that can be enjoyed any time of the day. Stay tuned for the next part of the article, where we’ll explore more tips and variations to elevate your frozen yogurt experience!
{{image_2}}
Preparing the Yogurt Mixture
To create the perfect Nutty Bliss Frozen Yogurt Wedges, starting with a well-blended yogurt mixture is crucial. The blend of Greek yogurt, honey, and vanilla extract should be mixed until smooth to ensure a creamy texture that will freeze beautifully. Use a high-speed blender or a food processor to incorporate air into the yogurt mixture, making it fluffy and light. Blending thoroughly not only helps break down any lumps but also enhances the flavor profile by allowing the honey and vanilla to infuse evenly throughout the yogurt. Aim for a consistency that is thick yet pourable, as this will help in achieving a uniform texture when frozen.
Folding in Granola and Nuts
Once your yogurt mixture is smooth, it’s time to fold in the granola and nuts. This step is essential for maintaining the delightful crunch that adds character to your frozen yogurt wedges. Use a spatula to gently fold these ingredients into the yogurt rather than stirring vigorously, which can break apart the granola and nuts. This method preserves the integrity of the texture, ensuring that each bite has a satisfying crunch. Choose a granola that complements your flavors—consider options with honey, cinnamon, or even chocolate for added richness. As for nuts, a mix of almonds, walnuts, or pecans can enhance both flavor and nutrition.
Lining the Pan
Preparing your baking pan is a simple yet crucial step in the process. Lining the pan with parchment paper not only prevents the yogurt mixture from sticking but also allows for easy removal once frozen. This step ensures that your frozen yogurt wedges maintain their shape and presentation. Cut the parchment paper to fit the bottom of the pan and extend it over the sides, creating handles that make lifting the wedges out effortless. This technique also helps keep the edges of the yogurt clean and sharp, making for a visually appealing dessert.
Freezing Process
After pouring your yogurt mixture into the prepared pan, it’s time to freeze. Place the pan in the freezer and allow it to set for at least 4-6 hours, or until completely firm. To ensure even freezing, avoid opening the freezer door too frequently, as this can create temperature fluctuations that affect the texture of the yogurt. If you’re short on time, you can freeze it for about 2 hours until it begins to solidify, then cut into wedges and return them to the freezer for another hour to firm up completely.
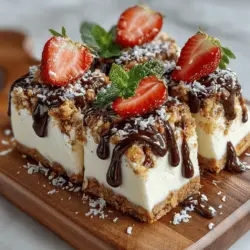
Cutting and Drizzling
Once your frozen yogurt is fully set, it’s time to cut it into wedges. To achieve clean cuts, run a knife under warm water, wipe it dry, and then slice through the frozen yogurt. This method prevents the yogurt from sticking to the knife, creating smooth edges and nicely shaped pieces. For an extra touch of indulgence, consider melting chocolate for drizzling. Use a microwave or a double boiler to melt your chocolate of choice—dark, milk, or white chocolate all work beautifully. Drizzle the melted chocolate over each wedge using a spoon or a piping bag for a more controlled application. This not only enhances the visual appeal but also adds a rich flavor contrast to the tangy yogurt.
Serving Suggestions
Plating Ideas
Presentation is key when serving Nutty Bliss Frozen Yogurt Wedges. Arrange the wedges on a colorful plate to make the dish visually striking. You can garnish each wedge with a sprinkle of chopped nuts, shredded coconut, or fresh mint leaves for a pop of color and additional flavor. For a more elaborate presentation, consider creating a layered dessert by stacking wedges with layers of fresh fruit, such as sliced strawberries or bananas, to add to the fresh and fruity vibe.
Pairing Options
To enhance your frozen yogurt experience, consider pairing your wedges with refreshing beverages. A glass of iced herbal tea or lemonade complements the sweetness of the yogurt perfectly. For a richer experience, serve with a dollop of nut butter on the side or a small bowl of chocolate sauce for dipping. These pairings not only elevate the dish but also add variety to your dessert table.
Storage and Shelf Life
Proper storage of your Nutty Bliss Frozen Yogurt Wedges is essential for maintaining their freshness and texture. Store leftover wedges in an airtight container in the freezer to prevent freezer burn and preserve their creamy consistency. When properly stored, these frozen treats can last up to one week, allowing you to enjoy them throughout the week. If you know you won’t eat them within this time frame, consider wrapping individual wedges in plastic wrap for a convenient grab-and-go snack.
Nutritional Information
Each serving of Nutty Bliss Frozen Yogurt Wedges is not only a delightful treat but also packed with nutritional benefits. The base of Greek yogurt provides a substantial amount of protein, aiding in muscle repair and keeping you feeling full longer. The inclusion of nuts offers healthy fats that are essential for heart health, while the granola adds fiber, promoting digestive health. This dessert is a guilt-free indulgence, allowing you to satisfy your sweet cravings without compromising your health goals.
Conclusion
Making Nutty Bliss Frozen Yogurt Wedges is a rewarding experience that allows you to indulge in a sweet treat while nourishing your body. The combination of creamy yogurt, crunchy granola, and delightful nuts creates a satisfying dessert that can be easily customized to suit your taste preferences. Whether you serve them as a refreshing snack on a hot day or as an elegant dessert for guests, these wedges are sure to impress. Embrace the joy of creating this delicious recipe and feel free to experiment with different flavors and toppings. This dessert not only satisfies sweet cravings but also aligns with a balanced lifestyle, making it a go-to option for anyone looking for a healthy yet indulgent treat. So, gather your ingredients and start blending—your Nutty Bliss Frozen Yogurt Wedges are just a few steps away!