Introduction to Delightful Mini Chocolate Cream Pies
Welcome to the world of indulgent desserts! If you have a sweet tooth and a penchant for chocolate, you’re in for a treat. Today, we’re diving into the delightful mini chocolate cream pies, a perfect combination of rich chocolate filling and a crunchy chocolate wafer crust. These bite-sized desserts are not only visually appealing but also incredibly delicious, making them an ideal choice for any occasion—from family gatherings to elegant parties.
What makes these mini pies truly special is their versatility. They can be enjoyed at a summer picnic, served as a sophisticated dessert at a dinner party, or even enjoyed as a sweet snack at home. This recipe is designed to be approachable for everyone, whether you are an experienced baker or a novice in the kitchen. With clear, detailed instructions, you’ll find yourself empowered to create these delectable treats that are sure to impress family and friends alike.
In this article, we’ll take you through each step necessary to create these mini chocolate cream pies from scratch. You’ll learn about the essential ingredients that contribute to their delicious flavor, the techniques for crafting the perfect crust, and the secrets behind a luxurious chocolate filling. So, put on your apron, preheat that oven, and let’s get started on this chocolatey journey!
Understanding the Components of Mini Chocolate Cream Pies
To create delightful mini chocolate cream pies, it’s essential to understand the components that make up this delicious dessert. Every element plays a critical role in achieving the perfect balance of textures and flavors. Let’s break down the essential ingredients, the crust-making process, and the crafting of the chocolate cream filling.
The Essential Ingredients for Success
When it comes to baking, the quality of your ingredients can make a significant difference in the final product. For our mini chocolate cream pies, we’ll be using a handful of key ingredients that work together harmoniously to create a rich and satisfying dessert.
1. Chocolate Wafer Cookies: The foundation of our mini pies is the crust, made from chocolate wafer cookies. These cookies offer a rich chocolate flavor and a satisfying crunch that pairs perfectly with the creamy filling.
2. Butter: Adding melted butter to the crust mixture provides moisture and binds the cookie crumbs together, ensuring a sturdy yet tender base for our pies.
3. Granulated Sugar: A touch of sugar sweetens the crust, balancing the deep chocolate flavor while also contributing to the overall texture.
4. Whole Milk and Heavy Cream: These two ingredients are crucial for our chocolate filling. Whole milk provides a creamy base, while heavy cream adds richness and a luxurious mouthfeel.
5. Cornstarch: This ingredient acts as a thickening agent, helping to achieve the desired consistency of the chocolate filling.
6. Egg Yolks: They add richness and help stabilize the filling, ensuring a smooth texture.
7. Cocoa Powder: Unsweetened cocoa powder intensifies the chocolate flavor, bringing depth and richness to the cream filling.
Understanding each ingredient’s role is essential. Using high-quality chocolate, fresh dairy products, and pure cocoa powder will elevate the flavors and textures, creating a dessert that stands out.
Creating the Perfect Crust for Mini Pies
The crust is the unsung hero of our mini chocolate cream pies. A well-made crust sets the stage for the filling and can make all the difference in your dessert’s overall success. Let’s delve into the techniques for crafting the perfect chocolate wafer crust.
Analyzing the Choice of Chocolate Wafer Cookies
The first step to a great crust is selecting the right chocolate wafer cookies. These cookies should be sturdy enough to hold the filling without becoming soggy. Look for high-quality brands that offer rich flavor and a crisp texture. If you prefer, you can even make your own chocolate wafers from scratch, but store-bought options are often more convenient.
The Balance of Butter and Sugar for Texture and Flavor
Once you have your cookies, the next step is to crush them into fine crumbs. This can be done using a food processor or by placing the cookies in a zip-lock bag and crushing them with a rolling pin. Combine the cookie crumbs with melted butter and granulated sugar in a mixing bowl. The butter not only adds flavor but also binds the crumbs together, while the sugar enhances the sweetness.
The right ratio is crucial; too much butter can make the crust greasy, while too little will result in a crumbly texture. Aim for a mixture that holds together when pressed but is not overly wet.
Techniques for Pressing and Shaping the Crust in Mini Tart Pans or Muffin Tins
To shape the crust, you can use mini tart pans or muffin tins—both work well for this recipe. Begin by dividing the crumb mixture evenly among the pans. Using your fingers or the bottom of a measuring cup, press the mixture firmly to form a solid crust. Make sure to press it evenly across the bottom and up the sides, creating a slight lip to hold the filling.
Once shaped, the crusts should be baked briefly to set, which helps prevent them from becoming soggy once the filling is added. Bake them at a moderate temperature until firm, and allow them to cool completely before filling.
Crafting the Luxurious Chocolate Cream Filling
Now that your crusts are ready, it’s time to prepare the rich chocolate filling that will make these pies unforgettable. The filling is where the magic happens, and understanding the ingredients and techniques involved is key to achieving that luxurious texture.
Discussing the Significance of Whole Milk and Heavy Cream in Achieving Creaminess
The combination of whole milk and heavy cream is essential for creating a smooth and creamy filling. Whole milk adds a lightness while heavy cream contributes richness. Together, they create a luscious consistency that makes each bite melt in your mouth.
For the best results, use fresh, high-quality dairy products. The creaminess of the filling is what elevates these mini pies from ordinary to extraordinary.
Exploring the Science Behind Cornstarch as a Thickening Agent
Cornstarch plays a vital role in thickening the filling. When heated, cornstarch granules absorb moisture and swell, creating a gel-like texture. This helps to stabilize the filling, ensuring it holds its shape once cooled.
For this recipe, mix the cornstarch with some sugar and a bit of milk before adding it to the pot. This step, known as a slurry, prevents clumping and allows for a smooth integration into the filling.
The Importance of Tempering Egg Yolks for a Smooth Filling
Egg yolks add richness and help emulsify the filling, but they must be tempered to avoid scrambling. To temper, gradually whisk in a small amount of the hot milk mixture into the beaten yolks. This raises the temperature of the yolks without cooking them. Once combined, you can then add the yolk mixture back into the pot, allowing it to thicken beautifully.
Highlighting the Role of Cocoa Powder in Flavor Depth
Cocoa powder is the star ingredient in our filling, providing that deep chocolate flavor we all crave. Choose a high-quality unsweetened cocoa powder for the best results, as it will bring out the chocolate’s natural richness. Sift the cocoa powder into the mixture to avoid any lumps, and whisk it in until fully incorporated.
The Assembly Process: Bringing It All Together
With your crusts baked and cooled, and your chocolate filling ready, it’s time for the final assembly. This is where your mini chocolate cream pies truly come to life.
Step-by-Step Guidance on Filling the Mini Crusts
Start by spooning the chocolate cream filling into each cooled mini crust. Use a spatula to spread the filling evenly, ensuring each pie is generously filled. Once filled, smooth the tops and create a slight dome, as the filling will settle slightly as it cools.
After filling all the crusts, refrigerate the mini pies for at least 2-3 hours to allow the filling to set properly. This chilling time is crucial, as it ensures that the cream filling reaches the right consistency, allowing for easy slicing and serving.
—
In the following sections, we will explore additional tips for achieving the best results with your mini chocolate cream pies, address some common questions, and provide serving suggestions that will elevate your dessert game. Stay tuned for the next part of this delightful chocolate journey!
{{image_2}}
Tips for Preventing a Film from Forming on the Chocolate Filling
One common issue when making chocolate cream pies is the formation of a film on the surface of the chocolate filling as it cools. This unsightly layer can detract from the creamy texture we strive for in our pies. Here are a few tips to prevent this from happening:
1. Cover While Cooling: Once you’ve poured the chocolate filling into the pie crusts, place a piece of plastic wrap directly on the surface of the filling. This will create a barrier that prevents air from coming into contact with the chocolate, thus reducing the likelihood of a film forming.
2. Stir Occasionally: If you allow the filling to cool uncovered, stir it gently every few minutes while it cools. This will help keep the surface smooth and prevent it from developing a skin.
3. Use High-Quality Chocolate: The quality of chocolate you use can influence the texture of your filling. High-quality chocolate typically melts better and incorporates more smoothly, which may help in preventing a film from forming. Look for chocolate with a high cocoa content for the best results.
The Importance of Chilling the Pies for Optimal Texture
Chilling is an essential step in achieving the perfect mini chocolate cream pie. After filling your pie crusts, they should be refrigerated for a minimum of four hours, or preferably overnight. This chilling time allows the filling to set properly, resulting in a rich and creamy texture that holds its shape when sliced.
– Why Chilling Matters: The cooling process allows the chocolate filling to fully thicken, making it easier to slice and serve. Additionally, chilling enhances the flavors, giving the chocolate time to meld with the cream and other ingredients.
– Check for Doneness: Before serving, gently shake the pie. If the filling jiggles slightly but doesn’t slosh around, you know it’s ready. This technique is especially helpful for mini pies, as it lets you see how well the filling has set.
Decorating and Presenting Your Mini Chocolate Cream Pies
Presentation is key when it comes to desserts, and mini chocolate cream pies offer plenty of opportunities for creative decoration. Here are some ways to elevate the appearance of your pies:
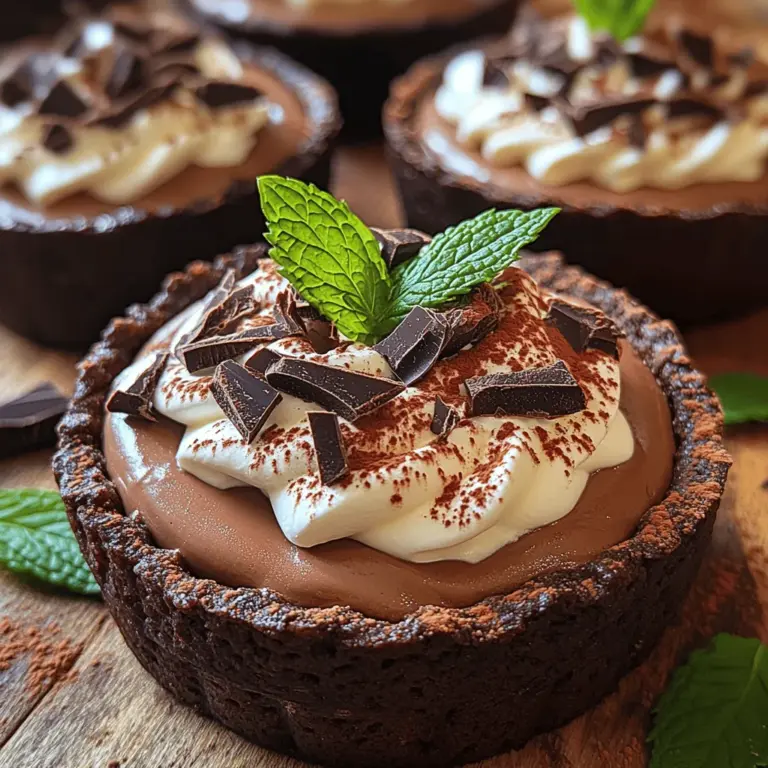
Topping Techniques for Visual Appeal
1. Options for Whipped Cream: Store-Bought vs. Homemade
– Store-Bought Whipped Cream: Convenient and time-saving, store-bought whipped cream can be a quick solution. Look for brands that use natural ingredients for a fresher taste.
– Homemade Whipped Cream: For an indulgent touch, consider making your own whipped cream. Simply whip heavy cream with a dash of vanilla extract and sugar until soft peaks form. This not only tastes better but also allows you to control the sweetness.
2. Creative Garnish Ideas:
– Chocolate Shavings: Use a vegetable peeler to create delicate chocolate shavings from a chocolate bar. Sprinkle these on top of your whipped cream for a sophisticated look.
– Cocoa Powder: Dusting a light layer of cocoa powder on top adds depth and enhances the chocolate flavor.
– Fresh Mint Leaves: A sprig of fresh mint adds a pop of color and a hint of freshness that contrasts beautifully with the rich chocolate.
3. Importance of Presentation in Enhancing the Dessert Experience:
– A well-decorated dessert not only looks appealing but also enhances the overall dining experience. The visual appeal of your mini pies can entice guests and elevate the occasion, making them feel special.
Serving Suggestions and Pairings
These delightful mini chocolate cream pies are versatile and can be served on various occasions. Here are some ideas to consider:
1. Best Occasions to Serve Mini Chocolate Cream Pies:
– Celebrations: Perfect for birthdays, anniversaries, or holiday gatherings. Their bite-sized nature makes them easy for guests to enjoy without feeling overwhelmed by a large dessert.
– Casual Get-Togethers: Serve these pies during casual gatherings with friends or family. They are easy to transport and can be made ahead of time, allowing you to enjoy the company without being stuck in the kitchen.
2. Beverage Pairings That Complement the Richness of the Pies:
– Coffee: A rich cup of coffee pairs beautifully with chocolate desserts, enhancing the flavors.
– Red Wine: Consider a light red wine, such as a Pinot Noir, which can complement the chocolate without overpowering it.
– Milk or Chocolate Milk: For a nostalgic touch, serve your mini pies with a cold glass of milk or chocolate milk, appealing to both children and adults alike.
3. Ideas for Serving This Dessert Alongside Other Treats:
– Dessert Platters: Create a dessert platter featuring various mini desserts. Pair your chocolate pies with mini cheesecakes, fruit tarts, or cookies for a delightful assortment.
– Ice Cream: Serve with a scoop of vanilla or salted caramel ice cream for an extra creamy contrast.
Nutritional Insight into Mini Chocolate Cream Pies
Understanding the nutritional value of your mini chocolate cream pies can help you enjoy these treats more mindfully.
Understanding the Ingredients’ Nutritional Value
– Chocolate: Rich in antioxidants, dark chocolate can provide health benefits when consumed in moderation. It contains flavonoids that may improve heart health and reduce inflammation.
– Cream: While heavy cream adds richness, it is also high in calories and fat. Consider using lighter versions or alternatives if you are looking for healthier options.
– Sugar: The sugar content in desserts can be significant. If you prefer a less sweet option, you can reduce the amount of sugar in the filling or use natural sweeteners like honey or maple syrup.
Discussion on Portion Control with Mini Desserts
Mini desserts like these chocolate cream pies allow for better portion control. You can indulge in a rich chocolate treat without overindulging. These small servings make it easier to satisfy cravings while keeping overall sugar and calorie intake in check.
Tips for Making Healthier Substitutions, If Desired
– Use Greek Yogurt: For a healthier filling option, try mixing Greek yogurt with melted chocolate. This will give you a creamy texture while reducing the fat content.
– Opt for Nut-Based Crusts: Instead of traditional pie crusts, consider using almond or walnut-based crusts for a gluten-free and lower-carb alternative.
Conclusion: The Joy of Baking Mini Chocolate Cream Pies
Making delightful mini chocolate cream pies is not just about satisfying your sweet tooth; it’s about the joy of baking and sharing delicious creations with loved ones. With this comprehensive guide, you now have the knowledge and confidence to whip up these indulgent treats. Whether for a festive gathering or a cozy night in, these mini pies are sure to bring smiles and satisfaction. Enjoy the rich flavors and delightful textures, and relish the art of creating something special in your kitchen.
In conclusion, these mini chocolate cream pies are a testament to the beauty of baking—simple yet elegant, indulgent yet approachable. With careful attention to detail in preparation and presentation, you can create a dessert that not only tastes fantastic but also looks stunning. So roll up your sleeves, gather your ingredients, and get ready to impress your friends and family with these delightful mini pies!
