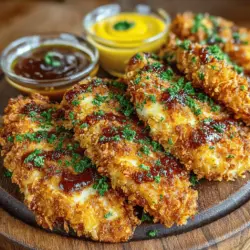
Crispy Golden Chicken Tenders with Sweet Honey Mustard Dip
When it comes to comfort food, few dishes can rival the allure of crispy golden chicken tenders. Perfectly seasoned, tender on the inside, and enveloped in a crunchy coating, chicken tenders are a perennial favorite among both children and adults alike. Whether enjoyed as a simple weeknight dinner, a party snack, or a game-day treat, these delightful morsels never fail to satisfy. Paired with a sweet honey mustard dip that balances tanginess and richness, it’s no wonder that this dish has earned its place as a beloved staple in households around the world.
Homemade chicken tenders offer a level of freshness and flavor that store-bought alternatives simply can’t match. With the ability to customize the seasoning and adjust the crunch factor to your preference, making chicken tenders from scratch is not only rewarding but also allows you to cater to your family’s tastes. The accompanying sweet honey mustard dip enhances the experience, adding a delightful contrast that elevates each bite.
Understanding Chicken Tenders
Chicken tenders, also known as chicken fingers or chicken strips, are cut from the tenderloin of the chicken breast. This particular cut is prized for its tenderness, which makes it ideal for frying or baking. Historically, chicken tenders have roots in various cultures, evolving into the popular dish we know today. Their widespread appeal can be attributed to their simple preparation and versatility; they can be served with a variety of sauces, sides, and garnishes.
In the United States, chicken tenders gained popularity in the 1980s and have since become a staple in fast-food restaurants and casual dining establishments. They are often associated with nostalgia, reminding many of childhood meals and family gatherings. Their crispy exterior and juicy interior make them a comforting choice for any occasion, whether it’s a holiday party or a cozy dinner at home.
Ingredients Breakdown
Creating the perfect crispy chicken tenders starts with high-quality ingredients. The main components of the dish include:
– Chicken Breast: Quality matters when it comes to chicken. Opt for fresh, organic chicken breasts for the best flavor and texture. The tenderness of the chicken is crucial for achieving that melt-in-your-mouth experience.
– Buttermilk: This ingredient plays a significant role in the recipe. Soaking the chicken in buttermilk not only tenderizes the meat but also infuses it with flavor. The acidity in buttermilk helps break down the proteins in the chicken, making it juicy and succulent.
– Seasonings: A blend of garlic powder, onion powder, paprika, salt, and pepper creates a flavor-packed crust. Each seasoning contributes to the overall taste profile, enhancing the natural flavor of the chicken while adding depth and warmth.
– Panko Breadcrumbs: For that signature crunch, panko breadcrumbs are the ideal choice. These Japanese-style breadcrumbs are coarser than traditional breadcrumbs, resulting in a lighter, crispier texture when fried or baked. They hold up well during cooking and create a golden brown exterior that is irresistibly crispy.
The sweet honey mustard dip is equally important in this recipe and consists of a few key ingredients:
– Mayonnaise: This creamy base adds richness to the dip, creating a smooth texture that clings beautifully to the chicken.
– Honey: A natural sweetener, honey brings sweetness to the dip, balancing out the tanginess of the mustard and the acidity of the vinegar.
– Dijon Mustard: This mustard variety provides a sharp, tangy flavor that cuts through the richness of the mayonnaise and complements the sweetness of the honey.
– Apple Cider Vinegar: A splash of apple cider vinegar adds brightness and enhances the overall flavor profile of the dip, making it a refreshing accompaniment to the chicken tenders.
The importance of using fresh ingredients cannot be overstated. Fresh herbs, spices, and produce contribute significantly to the flavor and quality of the dish. It’s worth taking the time to select the best ingredients available, as they will elevate your chicken tenders and dip from ordinary to extraordinary.
Step-by-Step Instructions
Now that we’ve covered the essential ingredients and their roles, let’s dive into the step-by-step instructions for making these crispy golden chicken tenders with sweet honey mustard dip.
1. Marinate the Chicken: Begin by cutting the chicken breasts into strips of your desired size. Place the chicken pieces in a bowl and cover them with buttermilk. Let them marinate in the refrigerator for at least 1 hour, or preferably overnight. This step is crucial for achieving tender, flavorful chicken.
2. Prepare the Coating: In a separate shallow dish, combine the panko breadcrumbs with the garlic powder, onion powder, paprika, salt, and pepper. Mix well to ensure that the seasonings are evenly distributed throughout the breadcrumbs.
3. Preheat the Oven or Oil: If you prefer baking your chicken tenders, preheat your oven to 425°F (220°C) and line a baking sheet with parchment paper. If frying, heat oil in a deep skillet or fryer to 350°F (175°C). The method you choose will impact the texture of the chicken, so select what works best for your cooking style.
4. Coat the Chicken: Remove the marinated chicken strips from the buttermilk, allowing any excess liquid to drip off. Dredge each piece in the seasoned panko mixture, pressing down gently to ensure an even coating. This step is essential for achieving that irresistible crunch.
5. Cook the Chicken: For baking, place the coated chicken tenders on the prepared baking sheet and lightly spray or drizzle them with oil. Bake in the preheated oven for 12-15 minutes, or until golden brown and cooked through. For frying, carefully place the tenders in the hot oil and fry in batches for about 4-5 minutes, or until they are golden and cooked through.
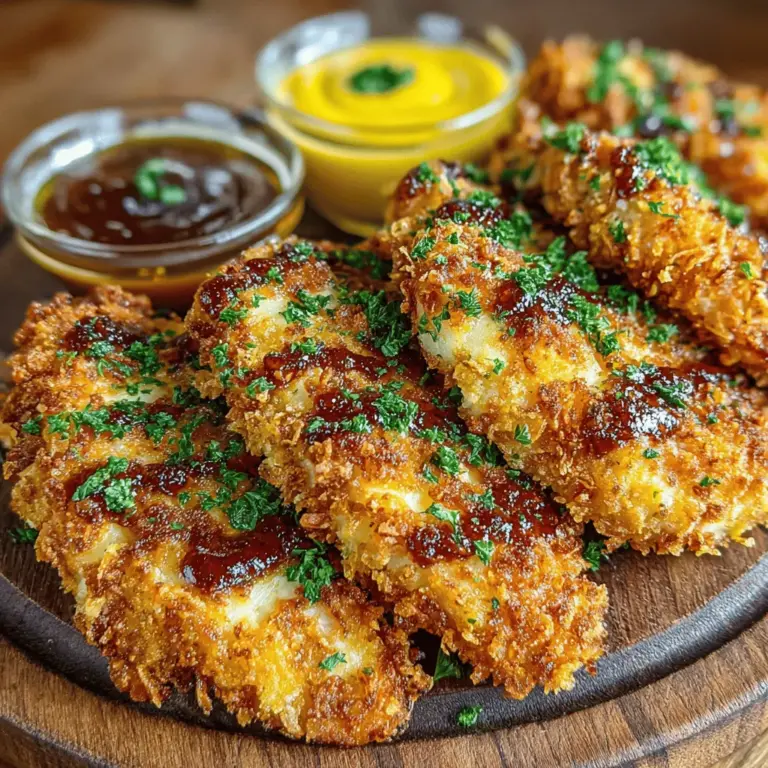
As you progress through these initial steps, the enticing aroma of the chicken tenders will fill your kitchen, setting the stage for a delicious meal. Stay tuned as we detail the preparation of the sweet honey mustard dip and provide additional tips for serving and enjoying these crispy delights.
{{image_2}}
Marinating the Chicken
Marinating the chicken is an essential step that enhances both flavor and tenderness. By allowing the chicken tenders to soak in a marinade, you’re infusing them with moisture and seasoning, which translates to a juicier and more flavorful final product. For this recipe, a simple marinade of buttermilk, garlic powder, onion powder, salt, and pepper works wonders. The acidity in the buttermilk tenderizes the meat while adding a rich flavor profile.
Benefits of Marinating
1. Flavor Enhancement: The longer you marinate, the more intense the flavors will be. Aim for at least 30 minutes, but if time allows, marinating overnight in the refrigerator will yield even more flavorful chicken.
2. Tenderizing: The enzymes in the buttermilk break down protein fibers, resulting in tender chicken tenders that are easy to chew.
3. Juiciness: Marinating helps the chicken retain moisture during cooking, preventing it from drying out, especially when frying.
To marinate, simply combine your chosen ingredients in a bowl or a resealable plastic bag, add the chicken tenders, and ensure they are well-coated. Refrigerate for the recommended time, then remove and let them come to room temperature before breading.
Preparing the Breading Stations
Setting up your breading stations is crucial for an efficient and mess-free cooking experience. A well-organized kitchen can save you time and help you achieve the perfect coating on your chicken tenders.
Importance of Organization
1. Speed: With everything in its place, you can quickly bread the chicken without interruptions, leading to a more enjoyable cooking process.
2. Consistency: A systematic approach ensures each piece of chicken is evenly coated, which contributes to a uniform appearance and texture once cooked.
3. Reduced Mess: Designating specific areas for each step minimizes the spread of flour and breadcrumbs, making for easier cleanup.
Setting Up Your Stations
1. First Station: Place a shallow bowl of the seasoned flour mixture. This will be your first step where the chicken is coated in flour before it gets wet.
2. Second Station: Create a bowl with the beaten eggs. This acts as the binding agent that helps the breadcrumbs stick to the chicken.
3. Third Station: Fill a shallow dish with seasoned breadcrumbs. You can use plain or panko breadcrumbs for extra crunch.
Coating the Chicken
Coating the chicken properly is key to achieving that crispy exterior we all love. Follow these detailed steps for the perfect breading process.
1. Dredging in Flour: Take a marinated chicken tender and shake off any excess marinade. Dip it into the seasoned flour, ensuring it’s fully coated. This step is crucial as the flour helps absorb moisture and provides a base for the egg.
2. Egg Wash: Next, dip the flour-coated chicken into the beaten egg, allowing any excess to drip off. This step helps the breadcrumbs adhere better.
3. Breadcrumb Coating: Finally, roll the chicken in the seasoned breadcrumbs, pressing lightly to ensure an even coat. For an extra crispy texture, you can double-dip by repeating the egg wash and breadcrumb coating.
Tips for Achieving an Even Coat
– Use One Hand for Wet Ingredients: This helps prevent your fingers from getting clumpy with flour and breadcrumbs. Use one hand for the flour and egg, and the other for the breadcrumbs.
– Don’t Rush: Take your time to make sure each piece is well-coated. A thorough coating means a better crunch when frying.
Frying the Chicken
Frying is where the magic happens, transforming your breaded chicken tenders into crispy, golden delights. Here are the best practices to ensure perfect frying results.
Oil Temperature
Using the right oil temperature is crucial. Preheat your frying oil to 350°F (175°C). A thermometer can be extremely helpful here. If the oil is too hot, the outside will brown quickly while the inside remains undercooked. If it’s too cool, the chicken will absorb more oil, resulting in greasy tenders.
Avoiding Overcrowding
Fry your chicken tenders in batches to avoid overcrowding the pan. Placing too many pieces at once can lower the oil temperature, leading to uneven cooking and sogginess. Leave enough space between each tender to allow hot oil to circulate.
Safety Tips for Frying at Home
– Use a Deep Fryer or Heavy Pot: A deep fryer is preferred for consistent temperature control, but if using a pot, ensure it has high sides to prevent splattering.
– Keep a Lid Nearby: In case of oil splatter, having a lid nearby can help you quickly cover the pan, dousing any flames if they arise.
– Monitor Cooking Time: Chicken tenders typically take about 4-5 minutes to cook, depending on thickness. Remove them when they reach an internal temperature of 165°F (75°C).
Making the Honey Mustard Dip
The sweet honey mustard dip is the perfect complement to your crispy chicken tenders. Here’s how to prepare this easy yet delicious sauce.
Step-by-Step Guide
1. Ingredients: Gather 1/2 cup of mayonnaise, 1/4 cup of honey, and 1/4 cup of Dijon mustard. Optionally, add a dash of lemon juice for a touch of acidity.
2. Mixing: In a bowl, combine the mayonnaise, honey, and Dijon mustard. Use a whisk to blend until smooth.
3. Taste and Adjust: Taste the dip and adjust the sweetness or tanginess to your liking. For a spicier kick, consider adding a pinch of cayenne pepper or hot sauce.
4. Chill: Let the dip sit in the refrigerator for at least 30 minutes before serving. This allows the flavors to meld beautifully.
Variations for Personal Taste
– Greek Yogurt Substitute: For a lighter version, substitute mayonnaise with Greek yogurt. This will add creaminess with fewer calories.
– Herb Infusion: Add fresh herbs like dill or parsley for an extra layer of flavor.
Presentation and Serving Suggestions
Presentation can elevate your dish from simple to stunning. Here are some tips for plating your chicken tenders and serving them beautifully.
Tips for Plating
– Use a Large Plate: Arrange the chicken tenders in a circular pattern or stack them slightly for visual interest.
– Add Color: A sprinkle of fresh parsley or paprika can add a pop of color to your dish.
Pairing Side Dishes
Chicken tenders pair wonderfully with various side dishes. Consider serving with:
– Coleslaw: A refreshing side that complements the crunch of the tenders.
– Fries: Classic French fries or sweet potato fries make for a delightful combination.
– Vegetable Sticks: Carrot and celery sticks with ranch dressing can add a healthy crunch.
Serving Suggestions for Different Occasions
– Family Dinners: Serve with a side salad and some homemade biscuits for a comforting meal.
– Parties: Set up a platter with chicken tenders and an array of dips for guests to enjoy.
– Game Day: Offer a basket of chicken tenders with fries and your favorite beverages for a fun, casual atmosphere.
Nutritional Information
Understanding the nutritional values of your dish helps make informed choices. Here’s a quick overview of the chicken tenders and the honey mustard dip:
– Chicken Tenders: A serving of three chicken tenders contains approximately 300 calories, 15g of protein, and 20g of fat, depending on the frying method and breading used.
– Honey Mustard Dip: A tablespoon of the dip adds roughly 50 calories, primarily from fats and sugars.
Healthier Alternatives
For those looking for healthier options, consider these substitutions:
– Baking vs. Frying: Baking your chicken tenders at 400°F (200°C) for about 20 minutes will significantly reduce oil use while still achieving a crispy texture.
– Low-Fat Ingredients: Use low-fat mayonnaise or Greek yogurt in the honey mustard dip to lower fat content without sacrificing flavor.
Conclusion
Making homemade crispy chicken tenders with a sweet honey mustard dip is not only a rewarding culinary experience but also a delightful dish that brings comfort and joy to any table. With the satisfaction of cooking from scratch, you can enjoy a classic meal that can be tailored to suit any palate.
Whether you choose to fry or bake, to serve at family gatherings or casual parties, this recipe is sure to impress. So, roll up your sleeves, gather your ingredients, and try this recipe today. Don’t forget to personalize it to your taste, making it a signature dish that you and your loved ones will return to time and time again!