Crispy Golden Brown Onion Rings Recipe
Introduction
Onion rings have long captured the hearts and taste buds of food lovers around the world. Whether enjoyed as a crunchy snack or served alongside a hearty burger, these golden-fried treats offer a delightful contrast between the sweet, tender onion and the crisp, savory batter. While you can find onion rings at most restaurants and fast-food joints, there’s something undeniably special about homemade versions. The ease of preparation, combined with the ability to customize flavors, makes whipping up a batch of crispy golden brown onion rings an enticing option for any home chef.
This recipe for crispy onion rings stands out due to its simplicity and the satisfying crunch you can achieve in your own kitchen. With just a handful of ingredients and a few straightforward steps, you can create a batch of onion rings that rival those from your favorite diner. Let’s dive into the history of this beloved dish and explore how to make your own delicious onion rings at home.
Understanding Onion Rings
The history of onion rings can be traced back to the early 20th century in the United States. Although fried onions had been enjoyed in various forms prior, it was the onion ring that emerged as a distinct snack food. While exact origins are debated, some credit the invention to a recipe published in 1933 by a New York City restaurant called “The Onion Ring.” This dish quickly gained popularity, leading to the widespread appeal we see today.
Globally, onion rings have inspired numerous variations, each bringing its own unique twist to this classic dish. In the United Kingdom, you might find battered and deep-fried onion rings served alongside fish and chips, while in other cultures, onion fritters may take precedence. Despite these variations, the fundamental appeal of crispy, fried onions remains universal.
Beyond their delightful taste and texture, onion rings also offer nutritional benefits. Onions are low in calories and rich in vitamins C and B6, along with minerals such as potassium and manganese. When prepared thoughtfully, fried snacks like onion rings can be enjoyed as part of a balanced diet. The versatility of onion rings also means they can be paired with various dips and sauces, making them a favorite for gatherings and events.
Essential Ingredients for Perfect Onion Rings
Creating the perfect onion rings hinges on selecting high-quality ingredients. Here’s a closer look at the primary components that contribute to their flavor and texture:
– Yellow Onions: While various types of onions can be used, yellow onions are often the preferred choice for onion rings. Their natural sweetness, combined with a slightly pungent flavor, creates a balanced taste that pairs perfectly with the crispy batter. When cooked, yellow onions caramelize beautifully, enhancing the overall flavor profile of the dish.
– All-Purpose Flour: This versatile ingredient serves as the foundation for the batter. It helps create a light and crispy coating when fried. The flour’s protein content plays a crucial role in achieving that desirable crunch, making it an essential element of the recipe.
– Buttermilk: Incorporating buttermilk into the batter not only adds a rich flavor but also contributes to the overall texture. The acidity in buttermilk helps to tenderize the onions, ensuring that when you bite into a ring, the onion is perfectly cooked and flavorful.
– Breadcrumbs: Using breadcrumbs, especially panko, can elevate the crispiness of your onion rings. Panko breadcrumbs are lighter and flakier than traditional breadcrumbs, offering an extra crunch and a superior texture that enhances the overall eating experience.
In addition to these core ingredients, there are opportunities to customize your onion rings with optional spices and flavorings. Consider adding garlic powder, paprika, or cayenne pepper to the batter for an extra kick. Furthermore, experimenting with various dipping sauces, such as ranch dressing, spicy ketchup, or a tangy aioli, can create a mouthwatering pairing that complements the rings perfectly.
Step-by-Step Guide to Making Crispy Onion Rings
Now that you have a solid understanding of the ingredients, it’s time to roll up your sleeves and get to work. Here’s how to prepare your onion rings, starting with the vital task of preparing the onions:
Preparing the Onions: The first step in making crispy onion rings is selecting and slicing your onions. Choose firm, fresh yellow onions for the best flavor. Begin by peeling the onions and cutting off the ends. Then, slice them into even rings about 1/4 to 1/2 inch thick. It’s important to keep the thickness consistent to ensure even cooking. Once sliced, gently separate the rings, being careful not to break them. You can soak the rings in cold water for about 30 minutes to help reduce any bitterness and enhance their sweetness. After soaking, pat them dry with paper towels to remove excess moisture, which is crucial for achieving that perfect crunch.
Crafting the Batter: With your onions prepared, it’s time to create the batter that will coat your rings. In a mixing bowl, combine all-purpose flour, a pinch of salt, and any additional seasonings you desire. This mixture will provide the base for your batter. In a separate bowl, whisk together the buttermilk and any wet ingredients you wish to incorporate. The consistency of your batter is essential; it should be thick enough to adhere to the onion rings without being overly heavy. Dip each onion ring into the dry mixture, followed by the buttermilk, and then back into the dry mixture to create a double-coat effect. This method helps to build a thicker, crunchier exterior once fried.
As you prepare each onion ring, lay them out on a baking sheet lined with parchment paper. This step not only prevents sticking but also allows for easy transport to the frying station.
The following sections will delve deeper into frying techniques and tips for achieving that golden brown perfection, ensuring your onion rings are the star of any meal or gathering. Stay tuned as we explore the final steps to make your homemade onion rings irresistible.
{{image_2}}
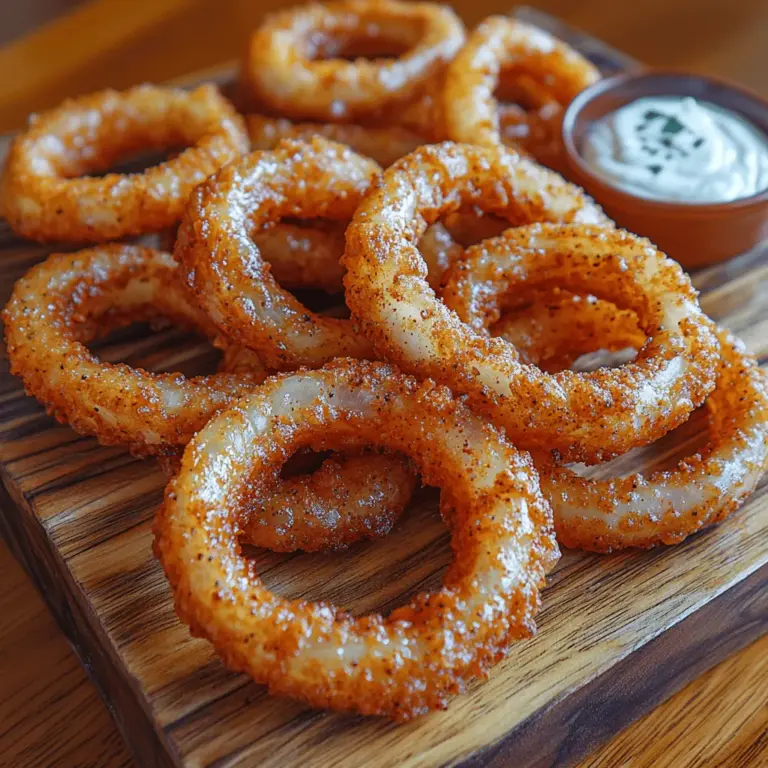
Onion rings are a beloved snack and side dish that perfectly complement a variety of meals. They offer a satisfying crunch and a delightful flavor that can elevate any dining experience. In this section, we will delve into the essential steps for preparing crispy golden brown onion rings, including the important role of eggs, detailed breading processes, frying techniques, serving suggestions, and common mistakes to avoid.
The Role of the Egg in Binding and Providing a Rich Texture
Eggs play a crucial role in the preparation of onion rings. They serve as a binding agent that helps the breading adhere to the onion slices, ensuring that each ring is coated evenly. The proteins in eggs coagulate when cooked, creating a firm, rich texture that enhances the overall mouthfeel of the onion rings. This results in a satisfying contrast between the crunchy exterior and the tender onion inside.
Additionally, the egg wash adds moisture to the coating, allowing the breadcrumbs to achieve a golden and crispy finish once fried. For those looking to create a vegan version, alternatives such as aquafaba or a flaxseed mixture can be used, but the texture may differ slightly.
The Breading Process: Detailed Explanation of Each Step
The breading process is fundamental to achieving that signature crunch. Here’s a step-by-step guide to help you master it:
1. Prepare Your Onion: Slice the onions into uniform rings, about 1/4 inch thick. This thickness ensures even cooking and consistent texture.
2. Create Your Dipping Stations: Set up three shallow dishes:
– Flour Mixture: Combine all-purpose flour with seasonings like salt, pepper, garlic powder, and paprika for added flavor.
– Egg Wash: Beat eggs in a bowl. For extra richness, add a splash of milk or buttermilk.
– Breadcrumbs: Use panko breadcrumbs for a light, crispy texture. You can season them with herbs and spices for added flavor.
3. Coating Process:
– Step 1: Dredge an onion ring in the flour mixture, ensuring it’s fully coated. Shake off any excess.
– Step 2: Dip the floured ring into the egg wash, allowing any excess to drip off.
– Step 3: Finally, press the ring into the breadcrumbs, making sure it’s coated evenly. This step is vital for achieving that crispy outer layer.
4. Resting: Place the coated onion rings on a baking sheet lined with parchment paper. Allow them to rest for 15-20 minutes. This helps the coating adhere better during frying.
Tips for Ensuring an Even Coating
– Use Fresh Ingredients: Fresh breadcrumbs or homemade variants tend to stick better than stale ones.
– Pat the Onions Dry: Ensure the onion rings are dry before dredging to avoid a mushy coating.
– Use a Gentle Touch: Be gentle when pressing the breadcrumbs onto the rings; too much force can cause them to break apart.
– Double Dip for Extra Crunch: For an even thicker coating, consider double-dipping the rings in the egg wash and breadcrumbs before frying.
Importance of Pressing Breadcrumbs Onto the Rings for Adherence
Pressing the breadcrumbs onto the onion rings is essential for securing the coating. When you press down, you create a bond between the breadcrumbs and the egg wash, which helps them adhere better during frying. This step is crucial for achieving that satisfying crunch and preventing the coating from falling off. Take your time with this step; a well-pressed breadcrumb coating will yield superior results.
Frying Techniques for the Perfect Onion Rings
Frying is where the magic happens, transforming your coated onion rings into the crispy delights you crave. Here are some key techniques to consider:
Choosing the Right Oil
Not all oils are created equal when it comes to frying. The best options include:
– Vegetable Oil: A versatile choice with a high smoke point, making it great for frying.
– Canola Oil: Similar to vegetable oil, canola has a neutral flavor and a high smoke point, ideal for deep frying.
– Peanut Oil: Known for its flavor and high smoke point, peanut oil is excellent for achieving a crispy texture.
Make sure to avoid oils with low smoke points, such as olive oil, as they can burn and impart an undesirable flavor to your onion rings.
Understanding Frying Temperatures
The temperature of the oil is crucial for perfect frying. Ideally, the oil should be heated to about 350°F to 375°F (175°C to 190°C). If the oil is too cool, the onion rings will absorb excess oil and become greasy. Conversely, if the oil is too hot, the outside will burn before the inside cooks through.
To test the oil temperature, you can drop a small piece of bread into the oil; if it bubbles and turns golden brown in about 60 seconds, the oil is ready.
Batch Frying Tips
Frying in batches is important for maintaining the oil temperature:
– Avoid Overcrowding: Fry only a few rings at a time to prevent the temperature from dropping too drastically. Overcrowding can lead to uneven cooking and soggy rings.
– Monitor the Temperature: Keep an eye on the oil temperature using a thermometer. If it drops too low, allow it to heat back up before adding more onion rings.
– Drain Properly: Once fried, place the onion rings on a wire rack or paper towels to drain excess oil. This step will help maintain their crispiness.
Serving Suggestions and Presentation
Presentation can elevate your onion rings from a simple side dish to a memorable culinary experience. Here are some ideas for serving:
Plating Techniques for an Appealing Presentation
– Stacking: Create a tower of onion rings on a plate for added visual interest.
– Garnishes: Sprinkle fresh herbs, like parsley or chives, around the rings for a pop of color.
– Creative Serveware: Use a rustic wooden board or a slate platter to serve your onion rings, making them the star of the table.
Recommended Dipping Sauces
Dipping sauces can enhance the flavor of your onion rings. Here are some classic and creative options:
– Classic Ketchup: A timeless pairing for onion rings.
– Ranch Dressing: Creamy and herby, this sauce complements the crunch of onion rings beautifully.
– Spicy Mayo: Mix mayonnaise with sriracha for a tangy and spicy kick.
– Honey Mustard: The sweetness of honey balances the savory flavor of the rings.
– Chipotle Aioli: A smoky, spicy dip that adds depth to the experience.
Pairing Onion Rings with Different Meals
Onion rings are incredibly versatile and can be paired with a variety of dishes. Here are some meal ideas:
– Burgers: Serve onion rings alongside your favorite burger for a classic diner-style meal.
– Salads: Add a crunchy element to salads by placing onion rings on top.
– Sandwiches: Enhance sandwiches with a few crispy onion rings for added texture and flavor.
Common Mistakes to Avoid
Even the most experienced cooks can run into pitfalls when making onion rings. Here are some common mistakes and how to avoid them:
Overcrowding the Frying Pan
As mentioned earlier, frying too many onion rings at once can lead to uneven cooking. Always fry in small batches to ensure crispy results.
Not Achieving the Right Oil Temperature
Failing to monitor the oil temperature can result in soggy or burnt onion rings. Invest in a good thermometer to take the guesswork out of frying.
Under-Seasoning the Batter
The batter is where much of the flavor comes from. Don’t skimp on the seasonings in your flour mixture or breadcrumbs; this will enhance the overall taste of your onion rings.
Tips for Troubleshooting Issues During Preparation and Cooking
– If your onion rings are falling apart during frying, ensure they are well-coated and have rested long enough.
– If they are greasy, check your oil temperature and avoid overcrowding.
– To add flavor post-frying, consider sprinkling sea salt or additional seasoning right after they come out of the oil.
Conclusion
Making homemade crispy onion rings is a delightful culinary experience that brings joy to both the cook and those enjoying the final product. With the right techniques, ingredients, and a little creativity, you can create a dish that not only satisfies your cravings but also impresses your family and friends.
Don’t hesitate to experiment with different flavors and presentations to make the dish your own. The joy of sharing food with loved ones is one of the greatest pleasures in life, and these crispy onion rings are sure to be a hit at any gathering. Enjoy the process, savor the results, and make this delightful treat a staple in your cooking repertoire!
