Choco-Toffee Bliss Frozen Yogurt Bars: A Delicious and Healthy Treat
As the temperatures rise and the sun shines brighter, the craving for refreshing and satisfying snacks becomes almost irresistible. Enter Choco-Toffee Bliss Frozen Yogurt Bars—a delightful blend of creamy Greek yogurt, rich chocolate, and crunchy toffee that offers a guilt-free indulgence for warm days. These frozen yogurt bars not only satisfy your sweet tooth, but they also provide a healthier alternative to traditional ice cream, making them perfect for both adults and children alike.
The beauty of this recipe lies in its versatility; it can be easily customized to cater to various dietary preferences, whether you’re vegan, gluten-free, or simply trying to reduce sugar intake. With just a few wholesome ingredients, like Greek yogurt, honey, and a selection of nuts, you can whip up these delicious bars in no time. The preparation is straightforward, making it an accessible project for even novice cooks.
Understanding the Ingredients
To create the perfectly creamy and flavorful Choco-Toffee Bliss Frozen Yogurt Bars, it’s essential to understand the role and benefits of each ingredient in the recipe. This not only enhances the taste but also boosts the nutritional profile of your frozen treat.
Greek Yogurt
At the heart of this recipe is plain Greek yogurt, a key player that brings both creaminess and health benefits to the table. Unlike regular yogurt, Greek yogurt is strained to remove excess whey, resulting in a thicker texture and higher protein content. This protein boost helps keep you full for longer and supports muscle repair and growth, making it an excellent choice for an afternoon snack or post-workout treat.
Furthermore, Greek yogurt is packed with probiotics, which are beneficial for gut health. These live cultures can aid digestion and contribute to overall wellness. Additionally, using plain Greek yogurt means you’re avoiding the added sugars often found in flavored yogurts, allowing you to control the sweetness of your final product.
Natural Sweeteners
Sweetening your Choco-Toffee Bliss Frozen Yogurt Bars can be done healthily with natural sweeteners like honey or maple syrup. Both options provide unique flavors and nutritional benefits. Honey, known for its antibacterial properties, adds a floral sweetness that complements the rich chocolate and toffee flavors. It also has a lower glycemic index compared to refined sugars, making it a better choice for sustained energy without the sugar crash.
On the other hand, maple syrup offers a distinct caramel-like sweetness and is packed with antioxidants, vitamins, and minerals. Its unique flavor profile can add depth to your frozen yogurt bars, making them even more delightful. Choosing between honey and maple syrup allows you to customize the bars to your taste preferences or dietary needs, such as vegan diets where maple syrup would be the preferred option.
Cocoa Powder
No frozen treat would be complete without chocolate, and in this recipe, unsweetened cocoa powder serves as the primary chocolate component. Cocoa powder is not only packed with rich flavor but also boasts impressive health benefits. It is a great source of antioxidants, which help combat oxidative stress in the body. Additionally, cocoa contains flavonoids that can improve heart health and enhance mood.
Using unsweetened cocoa powder allows you to control the sweetness of the bars while still delivering a delicious chocolatey flavor. This makes it an ideal ingredient for those looking to create healthier desserts without sacrificing taste.
Toffee Bits and Chocolate Chips
To elevate the flavor and texture of your frozen yogurt bars, toffee bits and semi-sweet chocolate chips are essential additions. The toffee bits provide a delightful crunch and a buttery sweetness that contrasts beautifully with the creamy yogurt base. If you’re concerned about added sugars or artificial ingredients, look for toffee bits made from natural ingredients, or consider making your own using a simple toffee recipe.
Semi-sweet chocolate chips add richness and depth to the bars. They melt perfectly when mixed with the yogurt base, creating a luscious texture. For those looking for healthier options, you can opt for dark chocolate chips, which contain less sugar and higher levels of antioxidants. Alternatively, dairy-free chocolate chips are available for those following a vegan diet.
Optional Ingredients
For those who enjoy a bit of crunch and extra flavor in their frozen treats, crushed nuts can be an excellent optional addition. Nuts not only add texture but also provide healthy fats, protein, and fiber, making your frozen yogurt bars more filling. Options like almonds, pecans, or walnuts can complement the chocolate and toffee flavors beautifully. If you have nut allergies or are catering to someone with them, you can easily skip this step or substitute with seeds like sunflower or pumpkin seeds for added crunch.
Step-by-Step Recipe Instructions
Now that we’ve explored the ingredients and their benefits, it’s time to dive into the preparation of your Choco-Toffee Bliss Frozen Yogurt Bars. The following step-by-step instructions will ensure that you achieve a smooth and creamy base, leading to a delicious frozen treat.
Preparing the Base
1. Gather Your Ingredients: Start by assembling all your ingredients. You will need plain Greek yogurt, honey or maple syrup, unsweetened cocoa powder, toffee bits, semi-sweet chocolate chips, and any optional nuts you wish to include.
2. Mix the Yogurt Base: In a large mixing bowl, add the Greek yogurt. If you prefer a sweeter yogurt base, drizzle in your choice of honey or maple syrup. Start with a smaller amount and gradually add more to taste.
3. Incorporate Cocoa Powder: Next, sift in the unsweetened cocoa powder to avoid lumps. Using a whisk or electric mixer, combine the ingredients until the mixture is smooth and creamy. It’s crucial to ensure there are no lumps of cocoa powder, as this will affect the texture of your frozen yogurt bars.
4. Add Sweetness and Flavor: Taste your yogurt mixture and adjust the sweetness if necessary. This is the moment to ensure it meets your flavor preferences, whether you desire a richer chocolate taste or a sweeter profile.
5. Fold in Chocolate and Toffee: Once the base is well-mixed, gently fold in the toffee bits and chocolate chips, ensuring they are evenly distributed throughout the yogurt mixture. If you’re adding nuts, now is the time to incorporate them as well.
6. Prepare for Freezing: Line a baking dish or a silicone mold with parchment paper for easy removal later. Pour the yogurt mixture into the prepared dish, spreading it evenly with a spatula.
7. Freeze the Mixture: Place the dish in the freezer and allow the yogurt bars to set for at least 4-6 hours, or until fully frozen. For best results, overnight freezing is recommended.
By following these initial steps, you’re well on your way to creating a batch of Choco-Toffee Bliss Frozen Yogurt Bars that are not only delicious but also packed with nourishing ingredients. The combination of chocolate, toffee, and creamy yogurt will undoubtedly become a favorite treat for both you and your loved ones, offering a sweet escape from the heat while maintaining a focus on health and wellness.
Stay tuned for the next part of the recipe, where we will explore tips for serving, storage, and variations to keep your frozen yogurt bars exciting!
{{image_2}}
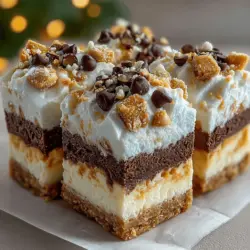
Incorporating Mix-Ins
To achieve the perfect Choco-Toffee Bliss Frozen Yogurt Bars, it’s essential to incorporate your mix-ins effectively. Begin by adding the toffee bits and chocolate chips to your yogurt mixture. Using a spatula, gently fold the mix-ins into the yogurt, ensuring they are evenly distributed throughout without over-mixing. Over-mixing can cause the yogurt to become runny, which will affect the texture of your frozen bars. Aim for a consistent mixture where every bite contains a delightful blend of toffee and chocolate. A gentle hand is key here—take your time and fold until the mix-ins are just visible throughout the yogurt.
Lining the Pan
Lining your baking dish with parchment paper is a crucial step that ensures easy removal of your frozen yogurt bars. Not only does this prevent the mixture from sticking, but it also makes for a cleaner serving experience. Cut a piece of parchment paper large enough to cover the bottom and sides of the dish, allowing for some overhang. This overhang is your best friend, acting as handles when it’s time to lift the frozen yogurt out of the dish. Whether you’re using an 8×8 or a 9×9 square baking dish, this simple step will save you time and frustration when serving.
Spreading the Mixture
Once your mixture is ready and your pan is lined, it’s time to spread the yogurt mixture evenly into the prepared dish. The goal here is to achieve a consistent thickness across the entire surface. Use a spatula to scoop the yogurt into the pan, then gently spread it out. Start from the center and work your way to the edges, ensuring that the mixture reaches all corners. For optimal results, aim for a thickness of about 1 inch. This will provide a satisfying bite while also ensuring that the bars freeze properly.
Topping Options
Let your creativity shine by considering various toppings to elevate your Choco-Toffee Bliss Frozen Yogurt Bars. While the chocolate chips and toffee bits provide a delightful crunch, you can explore other options such as chopped nuts, crushed cookies, or a sprinkle of sea salt for a touch of contrast. Drizzling melted dark chocolate over the top before freezing adds an elegant finish, while fresh fruit, like sliced strawberries or bananas, can introduce a refreshing flavor that complements the richness of the yogurt. Once you’ve chosen your toppings, sprinkle them evenly over the yogurt mixture before placing it in the freezer.
Freezing Process
The freezing process is vital for achieving the perfect texture in your frozen yogurt bars. After spreading the mixture and adding your toppings, cover the dish tightly with plastic wrap or aluminum foil to prevent any ice crystals from forming. This ensures a creamy, smooth texture when you finally dig in. Place the dish in the freezer and allow it to freeze for at least 4-6 hours, or until completely firm. For best results, consider leaving it overnight. This extended freezing time will help the flavors meld together beautifully and create a delightful treat.
Cutting and Serving the Bars
Once your bars are fully frozen, it’s time to cut and serve them! To make cutting easier, let the dish sit at room temperature for about 5-10 minutes before slicing. This will allow the edges to soften slightly, making it easier to cut through the frozen yogurt. Using a sharp knife, cut the frozen yogurt into bars of your desired size. For a clean cut, you can dip the knife in warm water between slices. When serving, you might consider placing the bars on a decorative plate or even wrapping them in wax paper for a homemade touch. These bars are perfect for sharing and make for an impressive presentation at any gathering.
Nutritional Benefits of Choco-Toffee Bliss Frozen Yogurt Bars
One of the best aspects of Choco-Toffee Bliss Frozen Yogurt Bars is their nutritional benefits compared to traditional ice cream bars. Made with yogurt, they are a source of calcium and protein, which can contribute positively to your diet. The toffee bits and chocolate chips, while indulgent, can be used in moderation to keep the overall calorie count reasonable. Additionally, yogurt contains probiotics, which are beneficial for digestive health. By making these bars at home, you have full control over the ingredients, allowing you to satisfy your sweet tooth without compromising your health goals.
Ideal Occasions for Enjoying Frozen Yogurt Bars
Choco-Toffee Bliss Frozen Yogurt Bars are versatile enough to serve at various occasions. They are an ideal treat for family gatherings, providing a refreshing option on warm days. Their delightful taste and presentation make them a hit at summer parties or barbecues, where guests can enjoy a delicious, cool dessert. Additionally, these bars are perfect for a simple afternoon treat, offering a guilt-free way to satisfy cravings without the heaviness of traditional ice cream.
Storing Frozen Yogurt Bars
To ensure your Choco-Toffee Bliss Frozen Yogurt Bars remain fresh and delicious, proper storage is essential. After cutting the bars, place them in an airtight container, separating layers with parchment paper to prevent sticking. This method will keep your bars intact and ready to enjoy whenever the craving strikes. Stored correctly, these frozen treats can last for up to two weeks in the freezer, though they are likely to be devoured much sooner!
Conclusion
Choco-Toffee Bliss Frozen Yogurt Bars present a delightful, healthier alternative to traditional ice cream bars, making them a fantastic addition to your dessert repertoire. Their easy preparation and customizable nature allow you to craft a treat that suits your personal taste preferences while satisfying your sweet cravings. Whether enjoyed at family gatherings, summer parties, or as a simple afternoon snack, these bars are sure to impress. Embrace the joy of creating your frozen yogurt bars, and indulge in this wholesome treat that brings smiles to faces and satisfaction to taste buds. Enjoy crafting your very own frozen yogurt bliss!