Introduction
If you’re searching for the perfect dessert that embodies the essence of summer and brings a pop of flavor to your dinner table, look no further than the Zingy Raspberry Lemon Tart. This delightful tart combines the tangy sweetness of raspberries with the refreshing zest of lemons, creating a treat that is both visually stunning and utterly delicious. As a beloved choice among dessert enthusiasts, this tart stands out not only for its taste but also for its versatility, making it an ideal addition to any gathering or a simple indulgence to enjoy at home.
The allure of a homemade tart lies in its ability to elevate everyday meals into something extraordinary. While store-bought desserts can occasionally satisfy a sweet tooth, nothing compares to the satisfaction of creating a dessert from scratch. The Zingy Raspberry Lemon Tart is a testament to this idea, showcasing how a handful of fresh ingredients can come together to create a masterpiece that impresses both the eyes and the palate.
Understanding the Zingy Raspberry Lemon Tart
History and Origins
The origins of lemon tarts date back to medieval Europe, where lemon flavors were highly prized. Citrus fruits were often used in desserts to balance sweetness and provide a refreshing contrast. The combination of lemons with berries, particularly raspberries, became popular as both fruits flourished in temperate climates and were easily accessible. This tart is a modern interpretation of a classic dessert, bringing together the best of both worlds while emphasizing a balance of flavors.
Key Ingredients that Define a Classic Zingy Raspberry Lemon Tart
To achieve the perfect Zingy Raspberry Lemon Tart, a few essential ingredients are required.
– Fresh Raspberries: The star of the show, raspberries add a burst of tartness that complements the sweet, creamy filling.
– Lemons: Fresh lemon juice and zest are crucial for imparting the signature zing that characterizes this dessert.
– Sugar: Sweetness is necessary to balance the tartness of the raspberries and the acidity of the lemons.
– Butter: Used in the crust, butter adds richness and flavor, creating a flaky base for the tart.
– Eggs: Essential for the filling, eggs help to thicken and provide structure to the tart.
Popular Variations and Regional Adaptations
While the classic Zingy Raspberry Lemon Tart is a delightful treat on its own, there are numerous variations that can cater to different tastes and preferences. Some popular adaptations include:
– Mixed Berry Tart: Incorporating other berries such as blueberries, strawberries, or blackberries can create a colorful and flavorful twist.
– Gluten-Free Crust: For those with dietary restrictions, using almond flour or a gluten-free flour blend can result in a delicious crust that everyone can enjoy.
– Meringue Topping: Adding a light and airy meringue topping can elevate the dessert, providing a sweet contrast to the tartness of the filling.
Ingredients for the Perfect Zingy Raspberry Lemon Tart
To make your own Zingy Raspberry Lemon Tart, gather the following ingredients:
Essential Ingredients for the Crust
– 1 ½ cups all-purpose flour: This forms the base of the crust, providing structure and texture.
– ½ cup unsalted butter, chilled and diced: For a rich and flaky crust, use high-quality butter.
– ¼ cup granulated sugar: To add a touch of sweetness to the crust.
– 1 egg yolk: Helps bind the crust together and adds richness.
– Cold water: Just enough to bring the dough together.
Essential Ingredients for the Filling
– 1 cup fresh raspberries: The key ingredient that gives the tart its zesty flavor.
– 1 cup granulated sugar: To sweeten the tart and balance the tanginess of the fruit.
– 4 large eggs: Essential for the custard-like filling.
– ⅓ cup freshly squeezed lemon juice: Provides the tartness that defines the dessert.
– Zest of 2 lemons: For added flavor and aroma.
Optional Add-ins and Garnishes
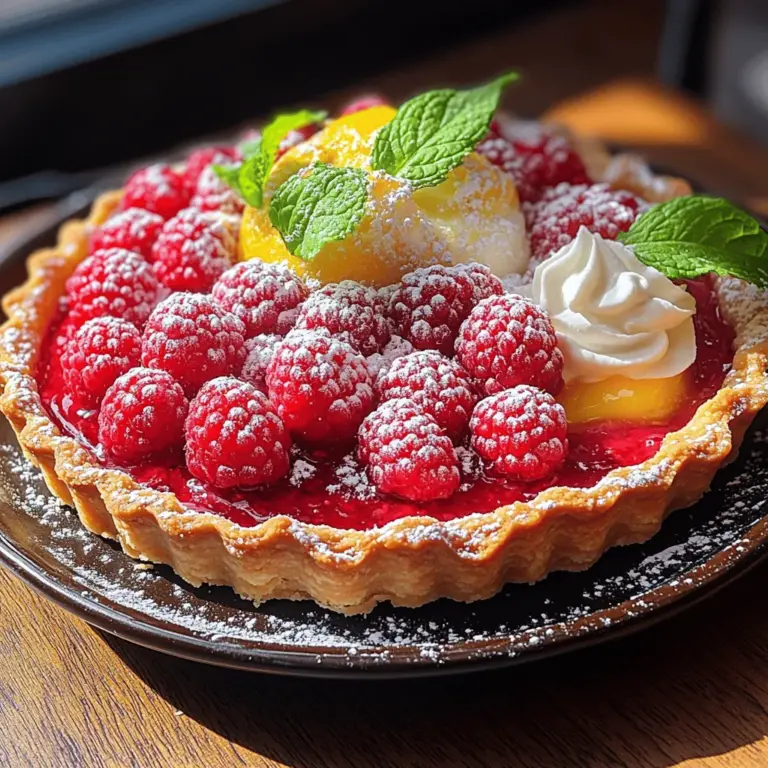
– Powdered sugar: For dusting the top of the tart before serving.
– Fresh mint leaves: A fresh garnish that adds a pop of color and a hint of herbal flavor.
– Whipped cream: A dollop of lightly sweetened whipped cream can enhance the tart’s flavors.
Preparation Steps for Zingy Raspberry Lemon Tart
Now that you have all the ingredients, it’s time to dive into the preparation of your Zingy Raspberry Lemon Tart. Here’s a step-by-step guide to ensure your tart turns out perfectly.
Step 1: Prepare the Tart Crust
1. Mix the dry ingredients: In a large mixing bowl, combine the all-purpose flour and granulated sugar.
2. Cut in the butter: Add the chilled, diced butter to the flour mixture. Using a pastry cutter or your fingertips, work the butter into the flour until the mixture resembles coarse crumbs.
3. Add the egg yolk: Create a well in the center of the mixture and add the egg yolk. Mix until combined.
4. Incorporate cold water: Gradually add cold water, one tablespoon at a time, until the dough comes together. Be careful not to overwork the dough.
5. Chill the dough: Form the dough into a disc, wrap it in plastic wrap, and refrigerate for at least 30 minutes. This helps the gluten relax, resulting in a tender crust.
Step 2: Pre-bake the Tart Shell
1. Preheat the oven: Set your oven to 350°F (175°C).
2. Roll out the dough: On a lightly floured surface, roll out the chilled dough to a thickness of about ¼ inch. Carefully transfer the rolled dough to a 9-inch tart pan, pressing it into the edges and trimming any excess.
3. Blind bake the crust: To prevent the crust from puffing up during baking, place a piece of parchment paper over the dough and fill it with pie weights or dried beans. Bake for 15 minutes, then remove the weights and parchment paper, and bake for an additional 10 minutes, or until lightly golden.
Step 3: Prepare the Filling
1. Blend the raspberries: In a blender or food processor, puree the fresh raspberries until smooth. Strain the puree through a fine-mesh sieve to remove the seeds, collecting only the smooth raspberry sauce.
2. Mix the sugar and eggs: In a mixing bowl, whisk together the granulated sugar and eggs until they are light and fluffy.
3. Incorporate lemon juice and zest: Add the freshly squeezed lemon juice and lemon zest to the egg mixture, stirring until well combined.
4. Combine with raspberry puree: Gently fold the raspberry puree into the lemon mixture, ensuring an even distribution of flavors.
Step 4: Bake the Tart
1. Pour filling into the crust: After the crust has cooled slightly, pour the raspberry lemon filling into the pre-baked tart shell.
2. Bake: Return the tart to the oven and bake for 25-30 minutes, or until the filling is set around the edges but slightly jiggly in the center.
3. Cool: Once baked, remove the tart from the oven and allow it to cool to room temperature before refrigerating for at least 2 hours to set.
With these steps completed, you will have a beautifully crafted Zingy Raspberry Lemon Tart ready to be garnished and served. This dessert not only showcases the vibrant flavors of raspberries and lemons but also represents the joy of baking at home. Stay tuned for the next part of this article, where we will delve into tips for achieving the best results and answer some common questions about this delightful dessert.
{{image_2}}
Importance of Timing for the Perfect Texture
Achieving the perfect texture in your Chicken Alfredo is all about timing. Overcooking the pasta can lead to a mushy mess, while undercooking it may leave you with a chewy bite that doesn’t meld well with the sauce. Follow the package instructions for cooking the pasta, but consider testing it a minute or two before the suggested time to achieve that perfect al dente texture. This will allow the pasta to absorb the creamy sauce effectively once combined, ensuring a delightful mouthfeel.
When it comes to the chicken, timing is just as crucial. Cooking it too long can dry it out, making it tough and unappealing. Aim for a golden-brown crust on the outside while keeping the inside juicy. Use a meat thermometer to check if the internal temperature reaches 165°F (74°C). This way, you ensure safety while preserving the chicken’s tenderness.
Combining Pasta, Chicken, and Sauce
Once your pasta is cooked to perfection and your chicken is browned and juicy, it’s time to bring everything together. Start by reserving a cup of the pasta cooking water before you drain the pasta; this starchy liquid can help adjust the sauce’s consistency later.
In a large skillet over medium heat, combine the cooked pasta and chicken. Pour in the Alfredo sauce and mix gently, allowing the sauce to coat every piece of pasta and chicken. At this stage, if the sauce appears too thick, gradually add some of the reserved pasta water until you reach your desired creaminess. Toss everything together to ensure even distribution of the sauce, and let it simmer for a couple of minutes to allow the flavors to meld beautifully.
Techniques for Ensuring a Creamy Consistency
To achieve that signature creamy consistency of Chicken Alfredo, there are a few techniques that can make a significant difference. Firstly, use high-quality ingredients; fresh cream and real Parmesan cheese will provide the richest flavor and texture. When making your sauce, ensure that your butter is melted but not browned, as this can alter the flavor.
Another tip is to add the cheese gradually while stirring continuously. This helps to prevent clumping and ensures that the cheese melts evenly into the sauce. If you find your sauce is still too thick, adding a splash of milk or more of the reserved pasta water can help loosen it up without compromising the flavor.
Serving Suggestions for Chicken Alfredo
Ideal Side Dishes to Complement Chicken Alfredo
When it comes to serving Chicken Alfredo, the side dishes you choose can elevate the entire meal. Garlic bread is a classic pairing that complements the creamy sauce while allowing diners to savor every last bite. A Caesar salad is another excellent option, providing a crunchy contrast to the smooth pasta and adding a refreshing element to the plate. Alternatively, steamed vegetables such as broccoli or asparagus can add a pop of color and nutritional value to your meal.
Wine Pairings that Enhance the Dining Experience
Pairing the right wine can enhance the flavors of Chicken Alfredo beautifully. For white wine enthusiasts, a Chardonnay is an excellent choice; its buttery notes complement the creaminess of the sauce. A crisp Sauvignon Blanc can also work well, providing a refreshing acidity that cuts through the richness. If you prefer something bubbly, a sparkling wine like Prosecco can add a celebratory touch to your meal.
Presentation Tips for an Appealing Plate
Presentation is key when serving Chicken Alfredo. Start by twirling the pasta onto the plate for a visually appealing mound. Arrange the sliced chicken on top or to the side, and drizzle additional Alfredo sauce over the dish. Fresh herbs like parsley or basil can add a vibrant touch and a burst of flavor. A sprinkle of freshly grated Parmesan cheese can also enhance the visual appeal and taste.
Nutritional Information and Variations
Overview of Nutritional Value in a Typical Serving
A typical serving of Chicken Alfredo contains approximately 600-800 calories, depending on portion size and specific ingredients used. It is a good source of protein from the chicken, and the cream contributes to its richness, but it is also high in fats and carbohydrates.
Healthier Alternatives and Substitutions
For those looking to lighten the dish, there are several alternatives you can consider. Using low-fat cream can reduce the overall calorie count while maintaining some of the creamy texture. Dairy-free options like cashew or almond cream can also be used for a lighter version that caters to lactose intolerant individuals.
Vegetable-Based Pasta Alternatives
If you’re seeking to make the dish more nutritious, consider using vegetable-based pasta alternatives made from zucchini, spinach, or chickpeas. These options can provide additional fiber and lower carbohydrates while still delivering a satisfying meal.
Creative Twists on the Classic Recipe
To keep your Chicken Alfredo exciting, don’t shy away from adding vegetables or proteins. Spinach or mushrooms can introduce new textures and flavors, while shrimp or salmon can elevate the dish to a seafood delight. Experimenting with different herbs and spices, such as thyme or a hint of nutmeg, can also add a unique twist to your classic recipe.
Troubleshooting Common Issues
Issues with Sauce Consistency and How to Fix Them
If you find your Alfredo sauce is too thick, adding a bit of milk or reserved pasta water can help achieve the desired creaminess. Conversely, if the sauce is too thin, simmer it for a few minutes to thicken it up or add more cheese gradually, stirring continuously.
Overcooked Chicken: Avoiding Dry Meat
To prevent your chicken from becoming dry, ensure that you’re not overcooking it. Use a meat thermometer for accuracy, and consider letting the chicken rest after cooking to retain its juices before slicing.
Pasta Sticking Together: Prevention Techniques
To prevent pasta from sticking together, make sure to use enough water when boiling. Stir the pasta occasionally during cooking, and once drained, toss it immediately with a bit of olive oil before mixing it with the sauce.
Storing and Reheating Chicken Alfredo
Best Practices for Storing Leftovers
When storing Chicken Alfredo, it’s best to keep the pasta and sauce separate if possible. This will help maintain the texture of the pasta when reheated. Place the leftovers in airtight containers and store them in the refrigerator for up to three days.
Refrigeration and Freezing Methods
For longer storage, you can freeze Chicken Alfredo. Store it in freezer-safe containers or bags, ensuring that as much air as possible is removed. It can be frozen for up to three months. When ready to eat, thaw it in the refrigerator overnight before reheating.
How to Reheat Chicken Alfredo Without Losing Flavor or Texture
To reheat Chicken Alfredo, place it in a skillet over low heat. Add a splash of milk or cream to help restore its creamy consistency, stirring gently until warmed through. Avoid microwaving for long periods, as it can lead to an uneven temperature and a rubbery texture.
Conclusion
Making Chicken Alfredo at home is not just about following a recipe; it’s about creating a comforting and versatile dish that can be enjoyed on various occasions, from family dinners to special celebrations. With its creamy sauce and tender chicken, this classic dish is sure to impress your guests and satisfy your cravings.
Remember, the beauty of Chicken Alfredo lies in its adaptability. Feel free to experiment with different ingredients and flavors, making it your own. Whether you stick to the traditional recipe or incorporate your own creative twists, the joy of cooking and sharing food with loved ones is what truly makes this dish special. So gather your ingredients, embrace the process, and savor every delicious bite of your homemade Chicken Alfredo.