Introduction to Heavenly Strawberry Bliss Danish
If you have a sweet tooth and a love for pastries, the Heavenly Strawberry Bliss Danish is a recipe that will elevate your baking game and tantalize your taste buds. This delightful pastry combines the freshness of strawberries with a flaky, buttery dough, resulting in a dessert that is as pleasing to the eye as it is to the palate. Whether you’re preparing for a special occasion or simply indulging in a weekend treat, this Danish pastry is sure to impress.
Strawberries hold a special place in the world of baking, not only for their vibrant color and delicious flavor but also for their versatility. These berries are the star of summer desserts, bringing a sweet-tart balance that complements various baked goods. Their natural juiciness makes them an excellent filling for pastries, where they can shine alongside other ingredients, creating a harmonious blend of flavors.
The appeal of Danish pastries goes far beyond their delicious taste. Originating from Denmark, these pastries have a rich history that dates back to the 19th century. The unique method of preparing Danish dough—layering butter with dough to create flaky layers—has captured the hearts of bakers and dessert lovers worldwide. As you delve into creating the Heavenly Strawberry Bliss Danish, you’ll experience the magic of this classic pastry while putting your own spin on a timeless recipe.
Understanding Danish Pastry
To truly appreciate the Heavenly Strawberry Bliss Danish, it’s essential to understand what constitutes Danish pastry. Defined as a sweet, laminated dough that is commonly filled with a variety of ingredients, Danish pastries are characterized by their flaky texture and buttery flavor. The process of making Danish pastry involves layering butter between sheets of dough, which creates the signature light and flaky layers that melt in your mouth.
Danish pastries come in many different variations and flavors, ranging from fruit-filled options like apple and raspberry to custard-based ones like cream cheese and almond. Each variant showcases the versatility of the pastry, allowing bakers to experiment with different fillings and toppings. The possibilities are endless, making Danish pastries a beloved choice for breakfast, brunch, or dessert.
At the heart of what makes Danish pastry so irresistible is the role of butter. The use of high-quality butter is crucial in creating those beautifully flaky layers that define this pastry. When incorporated correctly, butter creates steam during the baking process, which causes the layers to separate and puff up, resulting in a light and airy texture. The rich flavor of butter also adds depth to the overall taste of the pastry, making it even more delightful.
Ingredients Breakdown for Heavenly Strawberry Bliss Danish
Creating the Heavenly Strawberry Bliss Danish requires a thoughtfully selected array of ingredients, each contributing to the final product’s taste and texture. Let’s break them down.
Analyzing the Pastry Ingredients
1. All-Purpose Flour: The foundation of any good pastry, all-purpose flour provides the necessary structure and stability. It contains a moderate amount of protein, which helps form gluten when mixed with water, giving the pastry its characteristic texture.
2. Butter: The star ingredient of any Danish pastry, butter is essential for achieving the desired flakiness. It not only contributes to the pastry’s rich flavor but also plays a crucial role in the lamination process, where layers of butter are folded into the dough.
3. Sugar: While the primary role of sugar is to sweeten the dough, it also aids in browning the pastry during baking, giving it an appealing golden color and enhancing the overall flavor.
4. Salt: Often overlooked, salt is vital for balancing sweetness and enhancing the flavors in the pastry. A small amount of salt can elevate the taste of the dough and complement the sweetness of the filling.
5. Ice-Cold Water: The temperature of the water used in the pastry is crucial. Ice-cold water helps keep the butter firm during the mixing process, preventing it from melting and ensuring that the layers remain distinct.
Exploring the Filling Components
The filling of the Heavenly Strawberry Bliss Danish is where the magic truly happens. It includes:
1. Fresh Strawberries: The highlight of this recipe, fresh strawberries not only provide a burst of flavor but also deliver nutritional benefits, such as vitamin C and antioxidants. Their natural sweetness and acidity create a delightful contrast in the pastry.
2. Granulated Sugar: To enhance the sweetness of the strawberries, granulated sugar is added. This step is essential for creating a well-balanced filling that is neither too tart nor overly sweet.
3. Cornstarch: Acting as a thickening agent, cornstarch helps to create a cohesive filling that holds its shape when baked. It absorbs excess moisture from the strawberries, preventing the pastry from becoming soggy.
4. Lemon Juice: A splash of lemon juice brightens the flavor of the filling, adding a refreshing acidity that complements the sweetness of the strawberries.
Cream Cheese Mixture: A Rich Addition
To elevate the filling further, a cream cheese mixture is incorporated:
1. Cream Cheese: This ingredient adds a creamy texture and a slight tang to the filling, making it richer and more indulgent.
2. Powdered Sugar: Used instead of granulated sugar, powdered sugar dissolves easily into the cream cheese, ensuring a smooth filling without any graininess.
3. Vanilla Extract: A splash of vanilla extract enhances the overall flavor profile of the cream cheese mixture, adding aromatic depth and a hint of warmth.
Glaze Ingredients and Their Purpose
To finish off the Heavenly Strawberry Bliss Danish, a simple glaze is drizzled on top:
1. Powdered Sugar: The primary ingredient for the glaze, powdered sugar adds sweetness and a smooth finish to the pastry.
2. Milk or Heavy Cream: Used to achieve the right consistency for the glaze, milk or heavy cream helps create a pourable mixture that can be easily drizzled over the pastries.
3. Lemon Zest: While optional, adding lemon zest to the glaze can provide an extra layer of flavor, tying in with the lemon juice used in the filling.
Step-by-Step Instructions for Preparing Heavenly Strawberry Bliss Danish
Now that we’ve covered the ingredients that make the Heavenly Strawberry Bliss Danish so special, it’s time to dive into the preparation. Here’s how to create this delectable pastry from scratch:
Preparing the Pastry
1. Mixing Ingredients for Optimal Texture: Start by whisking together the all-purpose flour, sugar, and salt in a large mixing bowl. This ensures that the dry ingredients are well combined before adding the butter. Next, cut the cold butter into small cubes and add it to the flour mixture. Using a pastry cutter or your fingers, work the butter into the flour until the mixture resembles coarse crumbs. This step is critical for achieving the flaky texture that Danish pastries are known for.
2. Incorporating the Ice-Cold Water: Once the butter is incorporated, gradually add the ice-cold water, mixing gently until the dough comes together. Be careful not to overmix; you want to maintain those small pieces of butter that will create the flakiness in the final pastry.
3. Chilling the Dough: Form the dough into a flat rectangle and wrap it in plastic wrap. Refrigerate for at least 30 minutes to allow the gluten to relax and the butter to firm up. This chilling step is crucial for a successful lamination process.
4. Laminating the Dough: After chilling, roll the dough out on a lightly floured surface into a long rectangle. Fold it into thirds, like a letter, and roll it out again. Repeat this process two more times, ensuring that the butter remains cold throughout. This creates the signature layers that are characteristic of Danish pastry.
Assembling the Filling
While the pastry dough is chilling, prepare the filling:
1. Strawberry Preparation: Wash and hull the fresh strawberries, then chop them into small pieces. In a bowl, combine the chopped strawberries with granulated sugar, cornstarch, and lemon juice. Toss gently to coat the strawberries evenly and let the mixture sit to allow the flavors to meld.
2. Cream Cheese Mixture: In another bowl, beat the cream cheese, powdered sugar, and vanilla extract together until smooth and creamy. This rich mixture will add a decadent layer to the filling.
With the pastry dough prepared and the filling components ready, you’re well on your way to creating a spectacular Heavenly Strawberry Bliss Danish. In the next section of this article, we will guide you through the final steps of assembly and baking, ensuring that your pastry turns out perfectly every time. Stay tuned for more delicious insights!
{{image_2}}
Importance of Chilling the Dough
Chilling the dough is a crucial step in making the Heavenly Strawberry Bliss Danish. It allows the butter to firm up, which is essential for achieving that flaky, layered texture characteristic of Danish pastries. When you roll out the dough, the cold butter creates steam during baking, leading to a puffy, airy structure. If you skip this step, the butter may melt too quickly, resulting in a dense pastry rather than the light, flaky layers we aspire to create.
Visual Cues for Dough Readiness
As you prepare the dough, there are several visual cues to look for to ensure it’s ready for rolling. The dough should be smooth and slightly tacky, not sticky. When you press it lightly with your finger, it should bounce back but not stick to your hand. A well-chilled dough will also be firm yet pliable, allowing you to roll it out without tearing.
Making the Filling
Cooking Strawberries: Techniques for Preserving Flavor
To create the filling for your Heavenly Strawberry Bliss Danish, begin with fresh strawberries. Rinse them thoroughly and hull them, removing the green tops. Slice the strawberries into small pieces, making them easier to incorporate into the filling.
In a saucepan over medium heat, combine the sliced strawberries with a splash of lemon juice and a bit of sugar. The lemon juice enhances the strawberries’ natural sweetness while adding a hint of acidity that brightens the flavors. Cook the strawberries gently, allowing them to soften and release their juices without turning into mush. This technique preserves the flavor and texture of the strawberries, resulting in a luscious filling.
Understanding the Thickening Process with Cornstarch
Once the strawberries have cooked down and released their juices, it’s time to thicken the mixture using cornstarch. To do this, whisk together cornstarch and a small amount of water to create a slurry. Gradually stir this mixture into the cooked strawberries while continuously stirring. The heat from the strawberries will activate the cornstarch, thickening the filling as it simmers. This step is essential because it prevents the filling from becoming too runny when you assemble the Danish.
Cooling the Filling: Why It’s Essential Before Assembly
After thickening, remove the filling from the heat and allow it to cool completely. This step is vital because adding hot filling to the dough can lead to premature melting of the butter, compromising the flaky texture of your Danish. Cooling the filling also allows the flavors to meld together beautifully, enhancing the overall taste of your pastry.
Preparing the Cream Cheese Mixture
Achieving a Smooth Texture: Tips for Beating Cream Cheese
While the strawberry filling cools, prepare the cream cheese mixture. Start with softened cream cheese; this is crucial for achieving a smooth texture. If your cream cheese is too cold, it will be lumpy and difficult to incorporate completely. Use a hand mixer or a stand mixer to beat the cream cheese until it’s creamy and smooth.
Balancing Flavors in the Mixture
To the beaten cream cheese, add a touch of powdered sugar and a splash of vanilla extract. The powdered sugar not only sweetens the mixture but also helps to stabilize it, preventing it from becoming too runny when baked. The vanilla adds a warm, aromatic flavor that complements the strawberries beautifully. Mix until well combined and set aside.
Assembling the Danish
Techniques for Rolling and Cutting Pastry
Once your dough is chilled and your fillings are ready, it’s time to assemble the Heavenly Strawberry Bliss Danish. Roll out your dough on a lightly floured surface into a rectangle about 1/4 inch thick. Use a sharp knife or a pizza cutter to cut the dough into squares or rectangles—about 4 to 6 inches in size.
Scoring the Dough: Purpose and Technique
To create the signature Danish shape, you’ll need to score the edges of each square. Use a sharp knife to make a shallow cut about 1 inch from the edge of each square, creating a border. Be careful not to cut all the way through; this border will rise beautifully during baking, forming the outer edge of your Danish.
Layering Fillings for a Perfect Balance
In the center of each square, spread a generous tablespoon of the cream cheese mixture followed by a tablespoon of the strawberry filling. Be careful not to overfill; you want to maintain a balance that will allow the dough to fold over without spilling out the fillings during baking.
Baking the Danish
Preheating the Oven: Why It Matters
Before placing your assembled Danish in the oven, preheat it to 375°F (190°C). Preheating is crucial for ensuring that your pastries bake evenly. A hot oven will create steam, which is essential for developing that flaky texture.
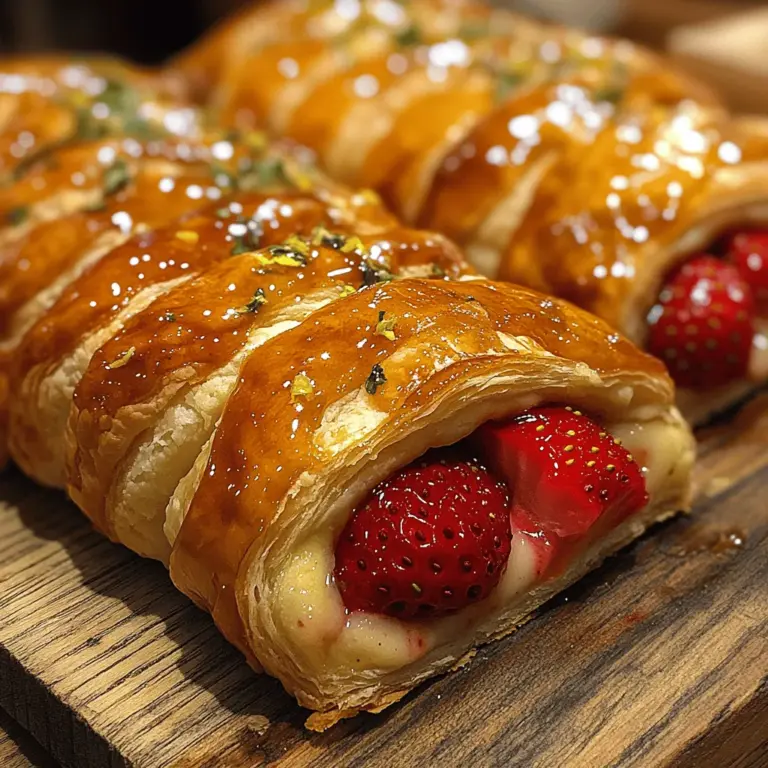
Identifying Doneness: Visual and Aroma Cues for Perfect Baking
Bake the Danish for 20-25 minutes, or until they are golden brown and puffy. Keep an eye on them in the last few minutes of baking; they should have a delightful aroma wafting through your kitchen, indicating that they are close to being done. A perfectly baked Danish will have a beautiful golden color and a crisp exterior.
Preparing the Glaze
Achieving the Right Consistency: Tips for Glazing
While the Danish are cooling, prepare a simple glaze to drizzle over them. In a small bowl, combine powdered sugar with a bit of milk or lemon juice. Whisk until smooth, adjusting the consistency as needed. You want it to be thick enough to hold its shape but still pourable.
Optional Flavor Variations: Exploring Citrus Notes
For a unique twist, consider adding a teaspoon of lemon or orange zest to your glaze. This addition will enhance the overall flavor profile of the Danish, complementing the strawberries with a refreshing citrus note.
Presentation and Serving Suggestions
Creative Ways to Serve Danish Pastries
When it comes to serving your Heavenly Strawberry Bliss Danish, presentation is key. Arrange the pastries on a decorative platter, allowing space between each one to showcase their beautiful golden crusts. Drizzle the glaze over the top just before serving for an appealing finish.
Garnishing Ideas with Fresh Fruits
To elevate your presentation, garnish the plate with fresh strawberries or edible flowers. Not only do they add color, but they also enhance the fresh, fruity theme of the pastry.
Pairing Suggestions: Beverages that Complement the Danish
For a delightful experience, pair your Danish with a cup of freshly brewed coffee or a pot of herbal tea. The warm flavors of the coffee will complement the sweetness of the strawberry filling, while tea can offer a refreshing contrast.
Nutritional Insights of Heavenly Strawberry Bliss Danish
Caloric Breakdown per Serving
Each Heavenly Strawberry Bliss Danish contains approximately 250-300 calories, depending on the specific ingredients and portion sizes used. This makes it a delicious treat for special occasions without being overly indulgent.
Healthier Ingredient Substitutions
For those looking to make healthier choices, consider using whole wheat flour for the dough or swapping out some of the butter for Greek yogurt. You can also reduce the sugar in the filling or use a natural sweetener to lower the calorie count.
Benefits of Strawberries in Your Diet
Strawberries are not just delicious; they are also packed with nutrients. They are an excellent source of vitamins C and K, fiber, and antioxidants, making them a healthy addition to your diet. Including strawberries in your baking not only enhances flavor but also adds nutritional value to your treats.
Conclusion: The Joy of Baking Heavenly Strawberry Bliss Danish
Baking your own Heavenly Strawberry Bliss Danish offers a delightful experience that combines the joy of creating something special with the satisfaction of enjoying a homemade treat. The process of preparing the dough, making the filling, and assembling the pastries allows you to explore your culinary skills and creativity.
The satisfaction of biting into a warm, flaky Danish filled with sweet strawberries and smooth cream cheese is an experience that is hard to replicate with store-bought pastries. We encourage you to explore variations of this recipe, perhaps adding different fruits or experimenting with flavors in the cream cheese mixture.
As you embark on this baking journey, remember that each Danish you create is a reflection of your personal touch. Enjoy the process, savor the results, and let your creativity shine in the kitchen. Happy baking!
